MP4-PLAY10/SD
MP4-PLAY11/SD
1. Package contents
- MP4 player
- USB cable
- Headphones
- Manual (on CD)
- Software CD-ROM
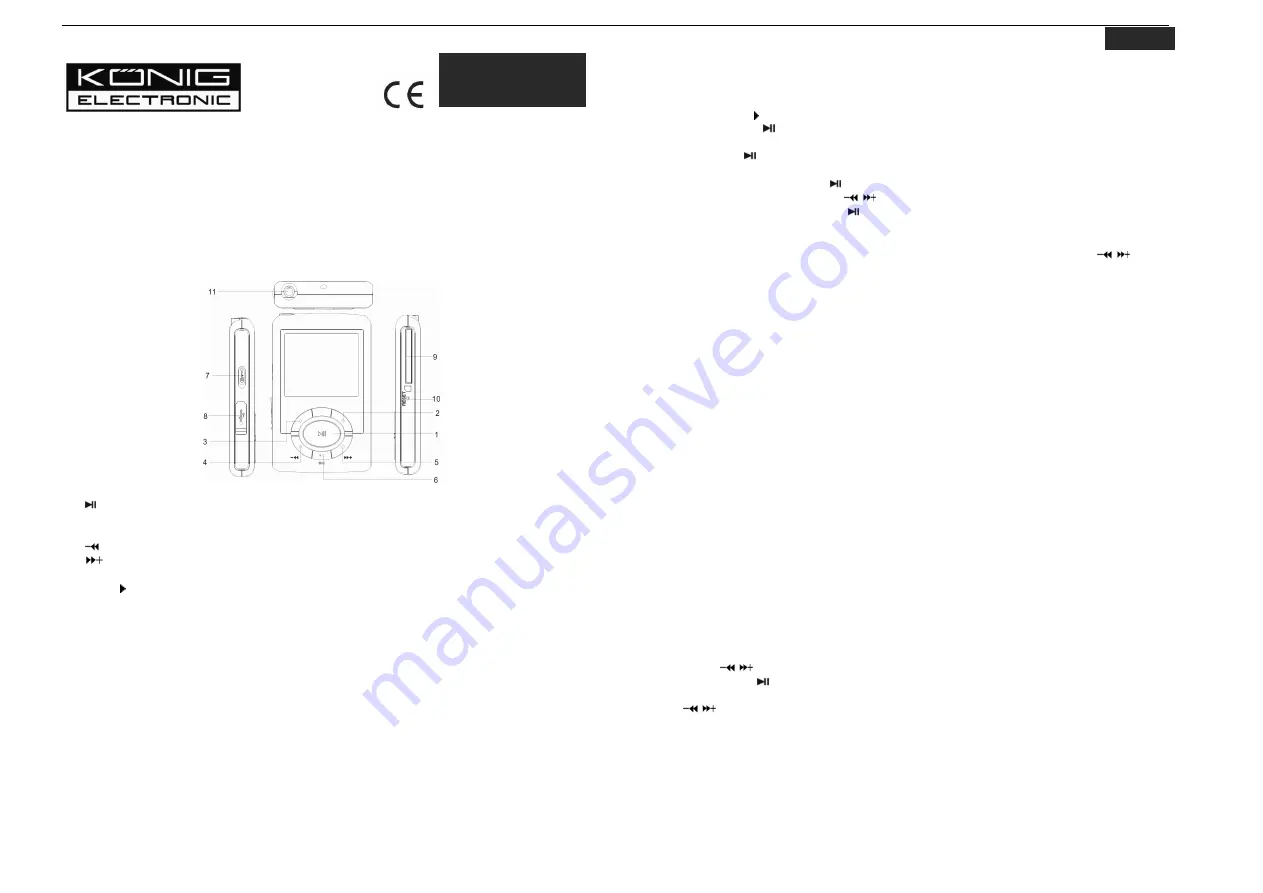
2. Buttons and ports
01. : Play/Pause
02. M : Menu or confirm button
03. R/V : Record/volume button
04.
: Previous track/ Backward
05.
: Next track/Forward
06. MIC : micro earphone
07. HOLD : Lock/Unlock button (write protection) switch
08. USB port
09. SD/MMC card slot
10. RESET button
11. Earphone jack
3. Connection to the PC
1.
Connect the PC USB port and the MP3 USB port with the provided USB cable.
2.
The power icon is blinking when charging. Once fully charged, the power icon will stop
blinking. The charging time is approximately 3.5 hours.
3.
If the unit is being used during charging, it will take longer to charge.
4.
To stop recharging, disconnect the USB cable.
Notes:
Before your first time use, please recharge your MP3 player.
Your computer must be turned on while connected to your MP3 for charging.
-1-
4. Basic operation:
Turn power on and play music
1.
Connect earphones to earphone jack.
2.
Switch HOLD to unlock position.
3.
Press and hold button to turn on and enter “MUSIC” mode (the default mode is “MUSIC”
mode).
4.
Short press button to play music.
5.
To return to the main menu: Long press M button.
To Pause/Play: Short press button.
To change tracks: Short press
/
button.
To turn unit off: Press and hold button.
Volume adjustment:
In music, movie or voice mode, short press R/V button to adjust the volume: press
/
button
to turn down or turn up the volume.
Adding or removing files (Use as USB storage)
1.
Connect the PC USB port and the MP3 USB port with the provided USB cable.
2.
Add MP3 files/folders to the USB storage‘s folder.
Ⅰ
. Open files/folders to transfer from your computer.
Ⅱ
. Open My Computer → Removable Disk from the desktop.
Ⅲ
. Select the files/folders to transfer from your computer and drag and put them to a folder of
your choice in the Removable Disk (you also can transfer files on your PC to the player using
the "Copy" and "Paste" functions).
3.
Delete MP3 files from the removable USB storage: simply click "Delete" to remove files.
Remove the player from the PC
1. Click the left mouse button on the “Safely remove hardware” icon that is in the taskbar at
the bottom right corner of the desktop.
2. Click the "Safely remove USB Mass storage Device – Drive(X:)" column. (X: can be another
letter depending on your computer’s configuration).
3. Disconnect the player from your computer.
CAUTION:
Do not remove the player while files within the USB Mass Storage are being played on
your computer.
Do not disconnect the player from your computer while transferring files, as it may cause
damage to the player or data loss.
5. Menu navigation
M button: Enter main menu, submenu or return.
Skip button (
/
): Shift menus.
Play/Pause button ( ): Play, Pause, or confirm.
Press and hold M button to enter main menu.
Press
/
buttons to select your desired option (e.g. MUSIC, FILE, VOICE, PHOTO, SETUP,
VIDEO, EBOOK, GAME).
-2-
ENGLISH
INSTRUCTIONS
EN


