background image

Installing PPD File From the Command Line 

67

Installing PPD File From the Command Line

"

Before proceeding with the installation, be sure to exit all running 
applications.

"

Root privileges are required in order to install ppd file.

1

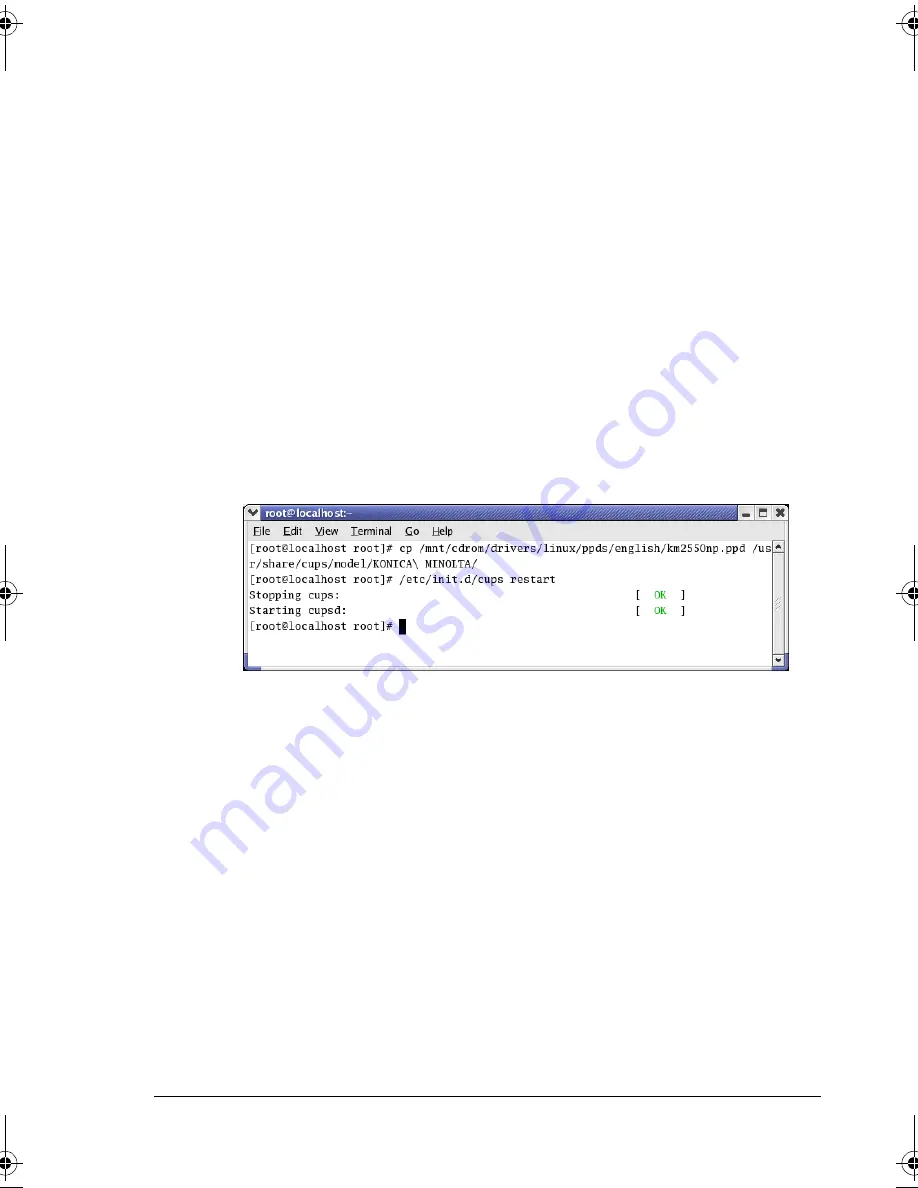
Copy the ppd file from the CD-ROM to the “/usr/share/cups/model/
KONICA_MINOLTA/” on the computer.

"

A ppd file for each language is available in the corresponding “driv-
ers/linux/ppd/<language>” folder on the Software Utilities 
CD-ROM. Use the appropriate ppd file for the language.

"

When printing from OpenOffice, use km2550-open.ppd. Other-
wise, use km2550np.ppd. 
For details on the procedure for printing from OpenOffice, refer to 
“Example Using OpenOffice” on page 76.

2

From the Main Menu, select 

System Tools

, then 

Terminal

.

3

Enter the command “/etc/init.d/cups restart”.

4

Quit Terminal.

mc2550_RG_E.book  Page 67  Wednesday, March 29, 2006  6:29 PM

Summary of Contents for Magicolor 2550

Page 1: ...magicolor 2550 Reference Guide A00V 9571 00A 1800822 001A ...

Page 2: ... run on the Linux is published by ESP Easy Software Products under the GPL All source codes that we write must be available to the general public Trademarks KONICA MINOLTA the KONICA MINOLTA logo and PageScope are trademarks or registered trademarks of KONICA MINOLTA HOLDINGS INC magicolor is a trademark or registered trademark of KONICA MINOLTA PRINTING SOLUTIONS U S A INC Notice KONICA MINOLTA B...

Page 3: ...under this Agreement to an assignee of all of Licensee s right and interest to such Software and Documentation Assignee provided you transfer to Assignee all copies of such Software and Documentation Assignee agrees to be bound by all of the terms and conditions of this Agreement 5 You agree not to modify adapt or translate the Software and Documentation 6 You agree that you will not attempt to al...

Page 4: ... the Software is allowed including without limitation distribution of the Software when incorpo rated into or bundled with any application software All individual profiles must be refer enced by their ICC Profile description string You may not modify the Software Adobe is under no obligation to provide any support under this Agreement including upgrades or future versions of the Software or other ...

Page 5: ...D EXCLUSIONS APPLY TO THE EXTENT PERMITTED BY APPLICABLE LAW IN YOUR JURISDICTION ADOBE S AGGREGATE LIABILITY AND THAT OF ITS SUPPLIERS UNDER OR IN CONNECTION WITH THIS AGREEMENT SHALL BE LIMITED TO THE AMOUNT PAID FOR THE SOFT WARE Nothing contained in this Agreement limits Adobe s liability to you in the event of death or personal injury resulting from Adobe s negligence or for the tort of decei...

Page 6: ...prior agree ment oral or written between Adobe and you with respect to the licensing to you of the Software No variation of the terms of this Agreement will be enforceable against Adobe unless Adobe gives its express consent in writing signed by an authorized signatory of Adobe ICC Profile for TOYO INK Standard Color on Coated paper TOYO Offset Coated 2 0 This ICC Profile TOYO Offset Coated 2 0 ch...

Page 7: ... 4 The names OpenSSL Toolkit and OpenSSL Project must not be used to endorse or pro mote products derived from this software without prior written permission For written per mission please contact openssl core openssl org 5 Products derived from this software may not be called OpenSSL nor may OpenSSL appear in their names without prior written permission of the OpenSSL Project 6 Redistributions of...

Page 8: ... the author of the parts of the library used This can be in the form of a textual message at program startup or in documentation online or textual provided with the package Redistribution and use in source and binary forms with or without modification are permitted provided that the following conditions are met 1 Redistributions of source code must retain the copyright notice this list of conditio...

Page 9: ...ITED TO PROCUREMENT OF SUBSTITUTE GOODS OR SER VICES LOSS OF USE DATA OR PROFITS OR BUSINESS INTERRUPTION HOWEVER CAUSED AND ON ANY THEORY OF LIABILITY WHETHER IN CONTRACT STRICT LIABIL ITY OR TORT INCLUDING NEGLIGENCE OR OTHERWISE ARISING IN ANY WAY OUT OF THE USE OF THIS SOFTWARE EVEN IF ADVISED OF THE POSSIBILITY OF SUCH DAMAGE The licence and distribution terms for any publically available ver...

Page 10: ......

Page 11: ...er Setup Utility Settings 5 When Using a USB Connection 5 When Using a Network Connection 7 AppleTalk Setting 7 IP Printing Setting 9 Selecting Print Options 14 Specifying Page Setup Settings 16 Page Attributes Options 17 Specifying Custom Paper Size 18 Specifying Print Settings 19 Print Dialog Box 19 Common buttons 20 Copies Pages 21 Layout 22 Scheduler 23 Paper Handling 24 ...

Page 12: ...9 Selecting the Printer in the Chooser 40 Specifying Page Setup Settings 42 Page Attributes Options 42 Specifying a Custom Paper Size 43 Specifying Print Settings 45 Print Dialog Box Options 45 Common buttons 46 General 47 Background Printing 48 Color Matching 49 Cover Page 50 Font Settings 51 Job Logging 52 Layout 53 Save as File 54 Watermark 55 Job Retention 56 Quality Adjustment Settings 57 Ima...

Page 13: ... Management Utilities 81 Installing Printer Management Utilities on Windows 82 5 Understanding the Ethernet Configuration Menus 83 Ethernet Menu 84 Location within the Configuration Menu 84 Accessing the Ethernet Menu 86 Using the Ethernet Menu Options 87 TCP IP 87 IPX SPX 89 EtherTalk 89 Ethernet Speed 90 6 Using Crown Print Monitor 91 Adding a Crown Port After Installing Crown Print Monitor 92 F...

Page 14: ... Determining the Printer Name 113 Setting Up Your Browser Software 113 Internet Explorer version 6 0 for Windows 114 Netscape Navigator version 7 1 115 Safari version 1 1 115 Understanding the PageScope Web Connection Window 116 Navigation 116 Current Status 117 User Mode 117 Administrator Mode 117 Configuring the Printer 119 System Page 119 Summary shown above 119 Operator Control 121 Paper Handl...

Page 15: ...apture Print Job 151 Print Page 152 Local Interface 152 Default Setting 153 Download Font Form 159 Network Page 163 Ethernet 163 Request a Certificate 178 Certificate Signing Request Data 180 Install a Certificate 181 Encryption Strength 182 Remove Certificate 183 SSL TLS Mode 184 Accounting Page 185 Printer based Job Accounting shown above 185 Printer based Error Accounting 187 ...

Page 16: ......

Page 17: ...1 Operation on Mac OS X ...

Page 18: ...h the following processor PowerPC G3 or later processor PowerPC G4 or later is recommended Intel Core Duo or later processor Connecting the computer and printer USB connection network connection 10Base T 100Base TX Operating system Mac OS X 10 2 or later We recommend installing the newest patch Mac OS X Server 10 2 or later RAM More than OS recommendation 128 MB or more is recommended Available di...

Page 19: ...depending on the version of the operating system being used Complete the installation according to the instructions in the dialog boxes that appear 1 Insert the magicolor 2550 Software Utilities CD ROM in the CD DVD drive of your Macintosh 2 Double click the CD icon on the desk top then double click the Install icon The installer for the printer driver starts up For the following languages use the...

Page 20: ...Installing the Printer Driver 4 4 Click Install Software The Install 2550 dialog box appears 5 Click Install Installation starts ...

Page 21: ...sing a USB Connection 1 Use a USB cable to connect the printer to your computer 2 Open Printer Setup Utility which can be accessed by clicking Macintosh HD then Applications then Utilities 3 In the Printer List click Add The detected printer appears in the Printer Browser ...

Page 22: ...list If magicolor2550 does not appear check that the printer is turned on and the USB cable is connected and then restart the computer 5 Check that KONICA MINOLTA magicolor 2550 is selected in the Printer Using list 6 Click Add The new printer appears in the Printer List screen ...

Page 23: ... several ways AppleTalk setting IP printing setting IPP LPD or Socket AppleTalk Setting 1 Connect the printer to an Ethernet network 2 Open Printer Setup Utility which can be accessed by clicking Startup Disk then Applications then Utilities 3 In the Printer List click Add The detected printer appears in the Printer Browser ...

Page 24: ...up Utility Settings 8 4 Select magicolor 2550 in the Printer Browser 5 Check that KONICA MINOLTA magicolor 2550 is selected in the Printer Using list 6 Click Add The new printer appears in the Printer List screen ...

Page 25: ...gs 9 IP Printing Setting 1 Connect the printer to an Ethernet network 2 Open Printer Setup Utility which can be accessed by clicking Startup Disk then Applications then Utilities 3 Click Add in the Printer List 4 Click IP Printer ...

Page 26: ...ettings 10 5 Select desired print protocol from the Protocol pop up menu For an IPP setup select Internet Printing Protocol IPP For an LPD setup select Line Printer Daemon LPD For a port 9100 setup select HP Jet Dorect Socket ...

Page 27: ...tility Settings 11 6 Enter the IP address for the printer in the Address text box For an LPD setup lp in the Queue text box For an IPP setup ipp in the Queue text box 7 Select KONICA MINOLTA in the Printer Using list ...

Page 28: ...12 8 Select KONICA MINOLTA magicolor 2550 in the Model list 9 Click Add 10 Select the appropriate settings in Optional Input Bin Optional Hard Disk Optional Duplexer check boxes according to your printer setup and then click Continue ...

Page 29: ...Printer Setup Utility Settings 13 The new printer appears in the Printer List screen ...

Page 30: ...s 1 Open Printer Setup Utility which can be accessed by clicking Macintosh HD then Applications then Utilities 2 Select this printer in the Printer List and then select Show Info from the Printers menu 3 Select Installable Options from the pop up menu ...

Page 31: ...int Options 15 4 Select the appropriate settings in Optional Input Bin Optional Hard Disk Optional Duplexer check box according to your printer setup and then click Appy Changes 5 Close the Printer Info dialog box ...

Page 32: ...lect Page Setup from the File menu The Page Setup dialog box appears 2 Select this printer in the Format for pop up menu You can select the following sections from the Settings pop up menu Section Description Page Attributes This is used to specify the settings for the paper size scaling and print orientation Save As Default This is used to save the new settings as the defaults ...

Page 33: ...n Paper Size Select the desired paper size from the Paper Size pop up menu Orientation Select either a vertical or horizontal page orientation for printouts Scale If you want to enlarge or reduce the size of the printout enter the scale ratio here 1 400 Regardless of which paper size is selected the printer does not print within 0 157 4 mm of the edge of the paper ...

Page 34: ...e a new custom page size Click this button to delete a custom page size Duplicate Click this button to duplicate copy the settings of an existing custom page size and create a new custom page size based on those settings Paper Size Enter the dimensions of the paper height and width for the custom page size Height 8 3 14 0 210 356 mm Width 3 6 8 5 92 216 mm Printer Margins Enter the dimensions for ...

Page 35: ...he number of copies to be printed and the range of pages to print Layout This section contains options for specifying the page layout when printing and the setting for double sided printing Scheduler This section contains options for specifying the print timing and priority of jobs Paper Handling This section contains options for specifying the pages to be printed and their printing order ColorSyn...

Page 36: ...ectly Cancel Click this button to close the Print dialog box without applying any of the settings Print Click this button to print using the selected print options Paper Feed This section contains paper feed options Color Options This section contains options for color print ing Printer Features This section contains options for specifying whether or not paper of the nearest size is automatically ...

Page 37: ...ies the number of copies to be printed If the Collated check box is selected all pages in the documents are printed as sets of print outs For example if 5 is entered for Copies and Collated is selected the doc ument is printed five times from the first page to the last page Pages All Prints all pages in the document From to Specifies the range of pages to be printed ...

Page 38: ...irec tion and order the pages should be arranged on each sheet of paper Border This prints a border around the image for each of the pages printed on one sheet of paper when more than one page is printed on one sheet of paper Two Sided Select the desired setting for double sided printing when the optional duplexing unit is installed Off Double sided printing is not performed Long edged binding Dou...

Page 39: ...ven when the Optional Duplexer is not installed However in this case the print job will be cancelled Scheduler The Scheduler section is used to specify the timing and priority for printing jobs Print Document Now Select this option to begin printing immediately At Specify the time to begin printing On Hold Select this option to hold the print job Priority Select the priority for printing jobs that...

Page 40: ...der in which the pages are printed Reverse page order Select this check box to print in the reverse page order Print All pages Select this option to print all pages Odd numbered pages Select this option to print only the pages with odd page numbers Even numbered pages Select this option to print only the pages with even page numbers ...

Page 41: ...lows you to select host based color matching or printer based color matching Quartz Filter Allows you to select Quartz Filter Cover Page Print Cover Page Allows you to set cover page before or after document Cover Page Type Allows you to select cover page type ...

Page 42: ...you to set billing information printed on cover page Error Handling PostScript Errors Allows you to select whether or not a report is outputted when a Post Script error occurs Tray Switching Allows you to select Tray Switching behavior of the printer ...

Page 43: ...the document is printed on paper from a paper tray differ ent from the tray used to print the rest of the document Remaining from The rest of the document is printed from the specified paper tray when the first page is to be printed on paper from a different tray If an optional tray is installed select Optional Input Bin under Install able Options p 14 If Optional Input Bin is not selected Tray 2 ...

Page 44: ...color preset Resolution Allows you to select the resolution to be used when printing a document Paper Type Allows you to select the type of paper on which the print image will be printed Color Mode Allows you to select the color space Details Click this button to display detailed settings tabs ...

Page 45: ...select RGB color profiles for images Image RGB Intent Allows you to select RGB intent for images Image Halftone Allows you to select halftone for images Hide Details Click this button to hide the Detailed Settings tabs and display the Quality Adjustment Settings pane ...

Page 46: ...gs 30 Graphics Graphics Setting Allows you to select settings same as the text settings or the image set tings Hide Details Click this button to hide the Detailed Settings tabs and display the Quality Adjustment Settings pane ...

Page 47: ...t Text RGB Intent Allows you to select RGB intent for text Text RGB Gray Treatment Allows you to select RGB gray treatment for text Text Halftone Allows you to select halftone for text Hide Details Click this button to hide the Detailed Settings tabs and display the Quality Adjustment Settings pane ...

Page 48: ...Source Profile for simulation Simulation Gray Treatment Allows you to select Simulation gray treatment Simulation Match Paper Color Allows you to set Match Paper Color Hide Details Click this button to hide the Detailed Settings tabs and display the Quality Adjustment Settings pane ...

Page 49: ...Specifying Print Settings 33 Summary The Summary is used to check the currently selected print settings ...

Page 50: ...k the following files and then select Get Info from the File menu For Mac OS X 10 3 and 10 4 Library Printers KONICAMINOLTA PDEs KONICA MINOLTA mc2550 Color plugin For Mac OS X 10 2 Library Printers PPD Plugins KONICA MINOLTA mc2550 Color plugin The dialog box displays incorrectly after you select another manufacture s printer and then select the magicolor 2550 again Close the Print dialog box and...

Page 51: ...nu ously When printing multiple copies of multiple pages on a single sheet of paper Collated cannot be selected While printing from Acrobat Reader the pages are not correctly collated or the print job is cancelled If a printing error occurs with Acrobat Reader print using the Preview application provided by the operating system Symptom Solution ...

Page 52: ...Troubleshooting 36 ...

Page 53: ...2 Operation on Mac OS 9 ...

Page 54: ...requirements Computer Apple Macintosh computer with a Pow erPC G3 or later processor PowerPC G4 or later is recommended Connection between computer and printer USB connection Network connection 10Base T 100Base TX Operating system Mac OS 9 1 or later RAM More than OS recommendation 128 MB or more is recommended Available disk space 256 MB or more is recommended for storing images ...

Page 55: ...n the CD DVD drive of your Macintosh 2 Double click the Installer icon The installer for the printer driver starts up 3 Click Install The installer installs the printer driver Installation starts 4 After the installation has been completed click Quit This completes the installation of the magicolor 2550 printer driver ...

Page 56: ...rinter and your computer If you are using a network connection use an 10Base T 100Base TX cable to connect the printer to a Ethernet network 2 Select Chooser from the Apple menu 3 Select the LaserWriter 8 icon from the icons on the left side of the Chooser The printer name appears in the Select a printer section on the right side of the Chooser 4 Select the printer 5 Click Create ...

Page 57: ...CA MINOLTA mc2550PS EN then click Select The printer setup dialog box appears 8 Select the options that are installed and then click OK The icon for the magicolor 2550 appears on the desktop With a USB connection 2550 appears With a network connection magicolor 2550 appears ...

Page 58: ...he options for the Paper Size scaling and page orientation Paper Select the desired Paper Size from the Paper pop up menu Scale If you want to enlarge or reduce the size of the printout enter the scale ratio 25 400 here Orientation Select either a vertical or horizontal page orientation for printouts Regardless of which paper size is selected the printer does not print within 0 157 inch 4 mm of th...

Page 59: ...Paper Size You can also specify a paper size that is not listed in the Paper Size pop up menu 1 Select Custom Paper Sizes from the pop up menu in the Page Setup dialog box The Edit Paper Sizes dialog box appears 2 Click New The following dialog box appears ...

Page 60: ...ins is inches To specify the unit of dimensions select cm or pts from the Units pop up menu 4 To add several different custom paper sizes click New and repeat step 3 To delete an existing custom paper size select the custom paper size from the list on the center of the dialog box and then click Delete 5 The custom paper size setting is saved and the name of the custom paper size can now be selecte...

Page 61: ... range of pages to be printed Background Printing This section contains options for spooling the print data for background or foreground print ing and the document printing time Color Matching This section contains options for Color Match ing Cover Page This section contains for specifying cover page settings Font Settings This section contains options for Font Docu mentation and Font Down loading...

Page 62: ...g These changes remain as the default settings until the configuration items are changed again Save as File This section contains options for saving the print image as a file and for the format of saved data Watermark This section contains options for watermark settings Job Retention This section contains options for Job Reten tion Quality Adjustment Set tings This section contains options for pri...

Page 63: ...inted Left unselected the printing is uncollated Pages Select All to print all pages in the open document To print a specific range of pages select From and then enter the beginning page number in the From text box and the ending page number in the To text box Paper Source Allows you to select the tray that the printer uses for the print job and to choose a different tray for the first page of the...

Page 64: ... saved on your computer until the print job is ready to be processed This allows you to continue working in your applications while the print job is processing If you don t have enough free file space on your computer to process a spool file select Foreground printing Print Time Allows you to assign a priority status to the print job and specify a particu lar time that the print job should be prin...

Page 65: ...vailable on your com puter Intent Allows you to specify the color matching configuration or allow for auto matic configuration This item is disabled grayed out unless ColorSync Color Matching is the selected Print Color setting Printer Profile Allows you to select from the printer profiles that are available ...

Page 66: ...lation to the remaining pages of the print job Cover Page Paper Source Allows you to select the paper tray containing the cover Paper Source page media The Cover Page contains information about the print job such as user name application document name date time printer and number of pages This option is disabled grayed out if Print Cover Page is set to None ...

Page 67: ...ont Downloading Preferred Format Allows you to select the preferred font format Always download needed fonts If selected fonts should always be downloaded to the printer Printer fonts are not used Never generate Type 42 format If selected Type 42 fonts are not generated Use Defaults Restores factory default settings for font downloading ...

Page 68: ...ob copy in the folder specified as the Job Documentation Folder and generating a job font log following the completion of the print job Job Documentation Folder Allows you to select the location of the Job Documentation Folder The folder selected holds a copy of the print jobs or job information of print jobs that are configured for job documentation Use the Change button to browse to and select a...

Page 69: ... the physical sheet Border Allows you to select a border to surround each logical page Print on Both Sides Allows you to configure the print job for duplex printing This setting is disabled grayed out unless an optional duplex unit is installed Binding Determines the orientation of the logical pages on the physical sheet so the printed media is oriented for binding on the short edge or long edge o...

Page 70: ...utput file PostScript Level Allows you to select from available PostScript levels Data Format Sends the print job data to the file in either ASCII or Binary format Font Inclusion Allows you to choose the fonts that are included with the Inclusion print job as it is saved to a file ...

Page 71: ...mark will not be visible Transparent The watermark text will be semi transparent The page content beneath the watermark will be visible Size Allows you to select watermark font size Font Allows you to select watermark font type Text Allows you to select watermark text Position Allows you to select watermark position Color Allows you to select watermark font color ...

Page 72: ...y deleted or the held job timeout occurs Stored Job Printer dose not print the job without the panel operation You can print desired copies through the panel You can print addi tional copies through the panel later If you stored the job with security ID you have to input it every time print job Printer keeps the job until it is deleted intentionally Secured Job Printer dose not print the job witho...

Page 73: ...st be set up with the Chooser to use the Hard Disk For details on selecting the Hard Disk with the Chooser refer to Selecting the Printer in the Chooser on page 40 Quality Adjustment Settings Resolution Allows you to select the resolution of the image Paper Type Allows you to select Paper Type Color Mode Allows you to select the color model that the printer uses for color printing ...

Page 74: ...ng Print Settings 58 Image Image RGB Source Allows you to select RGB color profiles for images Image RGB Intent Allows you to select RGB intent for images Image Halftone Allows you to select halftone for images ...

Page 75: ...t Settings 59 Graphic Graphic RGB Source Allows you to select RGB color profiles for graphics Graphic RGB Intent Allows you to select RGB intent for graphics Graphic Halftone Allows you to select halftone for graphics ...

Page 76: ...GB Source Allows you to select RGB color profiles for text Text RGB Intent Allows you to select RGB intent for text Text RGB Gray Treatment Allows you to select RGB gray treatment for text Text Halftone Allows you to select halftone for text ...

Page 77: ... 61 Simulation Simulation Profile Allows you to select RGB color profiles for simulation Simulation Match Paper Color Allows you to set Match Paper Color Simulation Gray Treatment Allows you to select Simulation gray treatment ...

Page 78: ... check the progress of print jobs double click the magicolor 2550 desktop printer icon In the Classic environment Print Monitor automatically starts up and the icon appears in the Dock Click the Print Monitor icon to check the status of print jobs ...

Page 79: ... a separate page Try printing from a different Web browser You can confirm it using the pre view function of the print dialog Double sided printing can not be selected If the printer is connected by USB select the installed options with the Chooser For details on selecting options with the Chooser refer to Selecting the Printer in the Chooser on page 40 In addition there are limitations on the med...

Page 80: ...Troubleshooting 64 ...

Page 81: ...3 Operation on Linux ...

Page 82: ... Hat Linux 9 0 CUPS 1 1 15 or later SuSE Linux 8 2 CUPS 1 1 15 or later This printer driver can also be used with Linux versions other than those listed above if CUPS 1 1 15 or later is installed Applications OpenOffice 1 0 1 or later Connecting the computer and printer USB connection Parallel connection Net work connection 10Base T 100Base TX RAM More than OS recommendation 128 MB or more is reco...

Page 83: ..._MINOLTA on the computer A ppd file for each language is available in the corresponding driv ers linux ppd language folder on the Software Utilities CD ROM Use the appropriate ppd file for the language When printing from OpenOffice use km2550 open ppd Other wise use km2550np ppd For details on the procedure for printing from OpenOffice refer to Example Using OpenOffice on page 76 2 From the Main M...

Page 84: ...ministration Web page appears 3 Click Add Printer A pop up window appears 4 Enter the user name and password for using root privileges and then click OK 5 Enter the printer name loca tion and description and then click Continue 6 Select a Device Port from the Device list then click con tinue TCP IP AppSocket HP Jet Direct USB USB Printer 1 KON ICA MINOLTA magicolor 2550 Parallel Parallel Port 1 ...

Page 85: ...r IP or Printer Hostname port Example Using Printer IP socket 192 168 1 190 9100 Using printer Hostname socket Hostname 9100 Hostname may be substituted by IP Address and Port is optional 8 Click Continue 9 Select KONICA MINOLTA click Continue 10 Select KONICA MINOLTA mc2550 PPD en then click Continue The following message appears ...

Page 86: ...r Driver Settings Displaying the Settings Page 1 Start up the Web browser 2 Enter the URL http local host 631 and then click Manage Printers Printer on localhost local domain window appears 3 Click Configure Printer The printer driver settings page appears ...

Page 87: ...ding position as Long Side Simplex or Short Side The default setting is Simplex Paper Size Specifies the paper size An irregular paper size cannot be selected Paper Source Specifies the paper source as Tray 1 Tray 2 or Auto The default setting is Tray 1 Paper Type Specifies the paper type as Printer Default Plain Paper Thick Transparency Letter head Label Postcard Envelope or Glossy The default se...

Page 88: ...e Color or Absolute Color The default setting is Photographic Image RGB Source Specifies RGB source for image as None sRGB Adobe RGB 1998 Apple RGB ColorMatch RGB or Blue Adjust RGB The default setting is sRGB Simulation Gray Treatment Specifies simulation gray treatment as Com posite Black Black and Gray or Black Only The default setting is Composite Black Simulation Match Paper Color Specifies M...

Page 89: ...rce Specifies RGB source for text as None sRGB Adobe RGB 1998 Apple RGB ColorMatch RGB or Blue Adjust RGB The default setting is sRGB Parameters Settings Disk Select Installed if the optional Hard Disk for the printer has been installed The default setting is Not Installed Duplexer Select Installed if the optional duplexing unit for the printer has been installed The default setting is Not Install...

Page 90: ...fidential secret standard topsecret or unclassified The default setting is None Ending Banner Specifies the ending banner as none classi fied confidential secret standard topse cret or unclassified The default setting is None Parameters Settings PS Binary Protocol Specifies the binary communications protocol BCP as None or BCP The default setting is None ...

Page 91: ... being used Example Using LPR Command With applications other than OpenOffice the following print dialog box appears 1 Click Properties in the Print dialog box 2 The Print Properties dialog box appears 3 Enter the command lpr P followed by the name of the printer and then click OK The Print dialog box appears again 4 Click Print to print the document ...

Page 92: ...g system being used First use km2550 open ppd to add the printer to the system For details on adding a printer to the system refer to Adding the Printer on page 68 1 From the main menu select Office then OpenOffice org Printer Setup The printer Administration dialog box appears 2 Click New Printer The Add Printer dialog box appears 3 Check that Add a printer is selected and then click Next The pri...

Page 93: ...directory 6 In the Selection of drivers list select KONICA MINOLTA mc2550 Ope nOffice PPD 7 Click OK The Add Printer dialog box appears again 8 Select KONICA MINOLTA mc2550 OpenOffice PPD and then click Next 9 In the command line enter lpr P followed by the name of the printer added first and then click Next 10 Change the printer name ...

Page 94: ...ation dialog box appears again 12 Click Close 13 From the main menu select Office then OpenOffice org Writer 14 Click Print in the File menu The Print dialog box appears 15 Select the name of the printer specified in the Ope nOffice printer settings 16 Click OK ...

Page 95: ... print jobs from a Web browser 1 Start up the Web browser 2 Enter the URL http local host 631 The CUPS Administration Web page appears 3 Click Manage Jobs A list of the currently active print jobs appear To check the status of completed print jobs click Show Complete Jobs ...

Page 96: ... 8x11 in Custom 15x20 cm or Custom 612x782 postscript points 2 The specified file must be a PS PDF or JPEG file Printing cannot be com pleted correctly from OpenOffice or any other Office application such as Kword Applications running under Linux have their own print settings Some of these functions may not be supported by this printer Observe the following for best printing results Settings made ...

Page 97: ...4 Printer Management Utilities ...

Page 98: ...n dialog 3 From the Main Menu dialog select Additional Software 4 After reviewing and accepting the license agreement choose the installa tion directory or use the default directory setting 5 Select Custom then click Next Click Easy to install all printer management utilities 6 Select KONICA MINOLTA Printer Management Utilities from the Prod uct list and select Custom from Setup Type pull down lis...

Page 99: ...5 Understanding the Ethernet Configuration Menus ...

Page 100: ...ENU PROOF PRINT MENU MENU PAPER MENU TCPIP IPX SPX ETHERTALK ENABLE DHCP BOOTP IP ADDRESS DEFAULT ROUTER IDLE MENU PRINT MENU ETHERNET MENU QUALITY MENU INTERFACE MENU ETHERNET SPEED ENABLE HTTP ENABLE AUTO IP SUBNET MASK FRAME TYPE NETZONE NETZONE2 NAME2 NAME PS PROTOCOL ...

Page 101: ...Ethernet Menu 85 MENU SERVICE MENU MENU LANGUAGE MENU SYSTEM DEFAULT ENABLE JOB TIMEOUT PARALLEL ACTIVE I F JOB TIMEOUT USB ...

Page 102: ...Ethernet menu options on your printer This menu provides access to all of the config urable network items Restart the printer after changing settings in the ETHERNET menu Press this key until the message window reads MENU PROOF PRINT MENU or if no optional hard disk is installed MENU PRINT MENU MENU INTERFACE MENU ...

Page 103: ...es TCP IP If YES is selected TCP IP is enabled If NO is selected TCP IP is disabled Options YES NO Default YES Purpose If there is a DHCP or BOOTP server on the network speci fies whether the IP address and other network information is automatically assigned by the DHCP or BOOTP server Options YES NO Default YES Purpose Sets the IP address of this printer on the network Range 0 255 for each xxx tr...

Page 104: ...ault 000 000 000 000 Purpose Sets the subnet mask value of the network The subnet mask allows you to limit access to your printer for exam ple according to departmental divisions Range 0 255 for each xxx triplet Use the Up and Down keys to increase or decrease each number use the Left and Right keys to move between trip lets Default 000 000 000 000 Purpose Specify whether or not HTTP is used Range...

Page 105: ...Talk Range Up to 16 characters Default MAGICOLOR 2550 Purpose Extension of EtherTalk Name to additional 16 characters making a total of 32 characters if required Range Up to 16 characters Default Blank Purpose Set the Zone Name for EtherTalk Range Up to 16 characters Default ETHERTALK ZONE Purpose Extention of Netzone to additional 16 characters making a total of 32 characters if required Range Up...

Page 106: ... the network and the transmission method for bi directional transmission Range AUTO 100 FULL DUPLEX 100 HALF DUPLEX 10 FULL DUPLEX 10 HALF DUPLEX Default AUTO Purpose Configures the port to process PostScript jobs as binary or quoted tagged binary Range Binary Quoted Binary Default Binary ...

Page 107: ...6 Using Crown Print Monitor ...

Page 108: ...k Start point to Set tings and then click Printers 2 Right click the printer icon and then click Properties The Properties dialog box for the printer appears 3 Click the Ports tab 4 Click Add Port The Printer Ports dialog box appears 5 From the Available port types list select Crown Port and then click New Port The Add Crown Port dialog box appears For Windows NT 4 0 select Crown Port from the Ava...

Page 109: ...ck Advanced to display the Configure Crown Port dialog box and then specify the advanced settings for the Crown port For details refer to Configure Crown Port on page 95 9 In the Printer Ports dialog box click Close 10 In the Properties dialog box for the printer click Close For Windows NT 4 0 click OK For Windows Me and 98 SE 1 Click Start point to Settings and then click Printer 2 Right click th...

Page 110: ...cal name of the port The logical name of the port is the description identifier for the port Each port name must be unique A maximum of 128 characters can be entered for the port name If nothing is entered in the IP Address text box the text entered in the Port Name text box is added to the IP Address text box Change the text as necessary 9 Click OK Click Advanced to display the Configure Crown Po...

Page 111: ...efault Setting Description Status update interval 5 seconds Specify the interval that Crown Print Moni tor updates the print manager with the status of the printer connected to this port Status request timeout 10 seconds Specify the length of time to wait for an answer from the printer until Crown Print Monitor notifies the print manager that there is no response from the printer ...

Page 112: ... timer is exceeded the print job is automatically stopped and deleted from the system If the job has been sent through a workstation and the time specified with the timer is exceeded the Windows XP 2000 NT4 Print Spooler appears and displays a message requesting confirmation to attempt answering again or to cancel the operation Whether or not there is an answer the print job is stopped and deleted...

Page 113: ...7 Network Printing ...

Page 114: ...ork environment you must make sure that the internal network addresses in the printer have been set In many cases you have to enter only a unique IP address However you may also have to enter a subnet mask and or a gateway router address depending on your network configuration requirements ...

Page 115: ...y other IP address or your network or any attached network You can do this in one of two ways Each is explained in detail in the following sec tions Using DHCP Setting the address manually Using DHCP If your network supports DHCP Dynamic Host Configuration Protocol the printer s IP address will be automatically assigned by the DHCP server when you turn on the printer Refer to Network Printing on p...

Page 116: ...ion When the IP address is changed add a new port or reinstall the printer driver CAUTION You should always notify your network s administrator before changing the printer s IP address 1 Turn on your PC and printer 2 When the printer s message window displays IDLE set the IP address Press this key until the message window reads IDLE MENU PROOF PRINT or if no optional hard disk is installed MENU PR...

Page 117: ...92 168 001 002 Use the and keys to move to each of the four number triplets Use the and keys to increase or decrease each number IP ADDRESS xxx xxx xxx xxx Press this key until the message window displays DEFAULT ROUTER 192 168 001 001 DEFAULT ROUTER 192 168 001 001 Use the and keys to move to each of the four number triplets Use the and keys to increase or decrease each number DEFAULT ROUTER xxx ...

Page 118: ...hat the correct IP address subnet mask and gateway have been set Press this key until the message window displays SUBNET MASK 255 255 255 000 SUBNET MASK 255 255 255 000 Use the and keys to move to each of the four number triplets Use the and keys to increase or decrease each number SUBNET MASK xxx xxx xxx xxx Press this key until the message window displays Press the key 4 times to return to READ...

Page 119: ...Connection 103 7 When the printer s message window displays IDLE install the printer driver and utilities MENU PROOF PRINT or if no optional hard disk is installed MENU PRINT MENU MENU PRINT MENU CONFIGURATION ...

Page 120: ... workstation to boot without requiring a hard or floppy disk drive DHCP DHCP Dynamic Host Configuration Protocol is a protocol for assigning dynamic IP addresses to devices on a network With dynamic addressing a device can have a different IP address every time it connects to the network In some systems the device s IP address can even change while it is still connected DHCP also supports a mix of...

Page 121: ...s of the printer or print job and cancel a previously submitted print job For more information on using IPP See Printing via IPP Internet Printing Protocol Windows Server 2003 XP 2000 on page 108 IPX SPX IPX SPX Internetwork Packet Exchange Sequenced Packet Exchange is a networking protocol developed by Novell It was used mainly in Netware envi ronments as the general LAN protocol where TCP IP has...

Page 122: ...cast is not a broadcast In theory broadcast messages are heard by every node on the network Multicast differs from broadcast because multicast messages are only heard by the nodes on the network that have joined the multicast group For obvious reasons network routers filter almost all broadcast traffic This means that broadcasts that are generated on one subnet will not be routed or forwarded to a...

Page 123: ... Windows environment If the Samba server software is used on Linux or UNIX services using SMB can be shared SMTP SMTP Simple Mail Transfer Protocol is a protocol for sending e mail This protocol was originally used to send e mail between servers however currently client e mail software use it to also send e mail to servers using POP ...

Page 124: ...the URL field in the next dialog box enter the printer s network path name in one of the following formats and then choose Next http ipaddress ipp Windows Server 2003 XP Windows cannot connect to the printer Either the printer name was typed incorrectly or the specified printer has lost its connection to the server For more information click Help Windows 2000 Could not connect to the printer You e...

Page 125: ...resides does not have the correct printer driver installed If you want to install the driver on your local computer click OK The reason for this is that you do not yet have a printer driver installed Choose OK 4 Choose Have Disk locate the directory on the CD ROM where the printer driver files are located for example driv ers windows 2000 XP 2003 ps english and then choose OK 5 Finish installing t...

Page 126: ...ete the printer driver and SMB port from the system 3 Use the Add Printer Wizard to install the printer as a local printer At this time cre ate a new local port and specify the SMB port name Some client functions are not available with the Point and Print feature when the server is running Windows XP Server 2003 2000 and the client computer is run ning Windows NT 4 0 Install the printer driver dir...

Page 127: ...8 Using PageScope Web Connection ...

Page 128: ...ator can still view the configuration settings and options but are not able to save or apply changes Display Language The language used in the PageScope Web Connection screens is specified from the System Administration Localization Languages page in the PageScope Web Connection Requirements To use PageScope Web Connection the following is required Windows Server 2003 XP 2000 Me 98SE NT4 0 Mac OS ...

Page 129: ...XP windows system32 drivers etc hosts z Windows Me 98SE windows hosts z Windows 2000 NT4 0 winnt system32 drivers etc hosts Through the printer s IP address The IP address of your printer is a unique number and therefore may be the preferred identification to enter especially if you have more printers active in your network The printer s IP address is listed on the configuration page Location of t...

Page 130: ... menu choose Internet Options 3 Select the Connections tab on the dialog box 4 Choose the LAN Settings button to display the Local Area Network LAN Set tings dialog box 5 Select Advanced in Proxy server to open the Proxy Set tings dialog box 6 In the Exceptions text box type a comma after the last entry and then type the printer name or the IP address of your printer 7 Choose OK three times to ret...

Page 131: ...P address of your printer 6 Choose OK to return to the main browser window 7 Enter the printer name or IP address in the URL Location box to access the printer home page Safari version 1 1 1 From the Apple menu choose Location and then click Network prefer ences 2 Click the Proxies tab in the Network preferences dialog box 3 In the Bypass proxy settings for these Hosts Domains list type in the nam...

Page 132: ...r options parameters associated with your selections To change a current setting click on the current setting and then select from the available choices or enter the new value In order to apply or save any changes made to the configuration set tings PageScope Web Connection must be logged in from Adminis trator Mode For details refer to Administrator Mode on page 117 Product name Links to main top...

Page 133: ...nection you must first enter Administrator Mode By default security is set to Disabled If PageScope Web Connection is accessed while security is Disabled all users can view and change or submit settings on the printer When security is set to Enabled users have to login to submit any changes 1 Type the password in the Admin Password text box The default password is SYSADMIN however once you have lo...

Page 134: ...ding the PageScope Web Connection Window 118 2 Choose the Login button If you type an incorrect password the following message displays Invalid Password Please check your input and try again Retype the password ...

Page 135: ...ription Printer Name Status Shows the name assigned to your printer and dis plays the current status of the printer just as it s dis played on the printer s control panel message window The status display allows you to remotely identify possible printer problems such as out of paper and out of toner Device Status Product image Identifies the type of printer that you are browsing The printer is pic...

Page 136: ...ifies whether the duplex option is Installed or Not Installed Hard Disk Identifies whether the optional Hard Disk is Installed or Not Installed Real Time Clock Identifies whether the Real Time Clock is Installed or Not Installed Tray 2 Identifies whether the optional Tray 2 is Installed or Not Installed Print Quality Displays the current Print Quality setting Logout botton Logs out of Administrato...

Page 137: ...ndling option settings The settings are arranged in 3 columns Current Custom and Factory Item Description Tray 1 Mode Configures Tray 1 to be defined by the settings on the keypad in CASSETTE mode or to be automati cally overridden by the driver in AUTO mode Choices Auto Cassette Default Auto Configuration Menu Equivalent MENU PAPER MENU INPUT TRAY TRAY 1 MODE ...

Page 138: ...Equivalent MENU PAPER MENU INPUT TRAY TRAY 2 MEDIA SIZE Media Type Identifies the media type currently set in the media tray Configuration Menu Equivalent MENU PAPER MENU INPUT TRAY TRAY 2 MEDIA TYPE Duplex Mode Duplex printing allows you to print on both sides of the media Choices are Off Prints simplex pages Shortedge Prints duplex pages so pages can be bound at the short edge Longedge Prints du...

Page 139: ...not progress to the output bin when the media jam occurred Choices Off On Default On Configuration Menu Equivalent MENU PAPER MENU PAGE RECOVERY Tray Chaining Tray Chaining allows the printer to switch from one paper source to another when the initial paper source is empty You can turn Tray Chaining on by selecting Yes Selecting No turns Tray Chaining off Choices No Yes Default Yes Configuration M...

Page 140: ... tray if tray chaining is active and continue printing Choices On Off Default Off Configuration Menu Equivalent MENU PAPER MENU INPUT TRAY AUTO CONTINUE Custom Paper Size Defaults Width Sets the width measurement for custom paper sizes Range 3 62 8 50 92 216 mm Default 3 62 92 mm Configuration Menu Equivalent MENU PAPER MENU INPUT TRAY CUSTOM WIDTH Height Sets the height measurement for custom pap...

Page 141: ...as the Custom settings Using the Restore Custom but ton you can change the parameter settings back to the Custom settings after changes are made Restore Custom button Changes all settings to the Custom values Restore Factory button Changes all settings to the Factory values Item Description ...

Page 142: ... Mapping options are only available if Optional Tray 2 is installed Item Description Tray Mapping Mode Used to turn tray mapping on and off Choices On Off Default On Configuration Menu Equivalent MENU PAPER MENU INPUT TRAY MAP MODE Logical Tray 0 9 Identifies the physical tray for each logical tray num ber Configuration Menu Equivalent MENU PAPER MENU INPUT TRAY MAP LOGICAL TRAY 0 9 Submit button ...

Page 143: ...ring the Printer 127 Reset button If you made changes to any of the parameter set tings but don t wish to apply the changes selecting this button restores the last submitted parameter settings Item Description ...

Page 144: ... current color matching and quality options The settings are arranged in 3 columns Current Custom Factory Item Description Print Quality Used to select the printing resolution Choices are Standard 600 600 dpi dots per inch color High 600 600 dpi with contone imaging Default High Configuration Menu Equivalent MENU SYSTEM DEFAULT PRINT QUALITY ...

Page 145: ...e value the higher the density of the color Range 1 5 Default 3 Configuration Menu Equivalent MENU QUALITY MENU DENSITY CONTROL Submit button Saves and applies any changes made Reset button If you made changes to any of the parameter set tings but don t wish to apply the changes selecting this button restores the last submitted parameter settings Save Custom button Saves the Current values of the ...

Page 146: ...tion Consumable items Identifies the type of consumable that is being moni tored Status bars Graphically represent the remaining life of the identi fied consumable item Percent Remaining Describes the amount of remaining life for the con sumable using a percentage of total life based on plane or face counts Type Shows the toner cartridge types ...

Page 147: ...Configuring the Printer 131 Administration Startup Options Resets ...

Page 148: ...nt MENU SYSTEM DEFAULT ENERGY SAVER 2 Hours is available on the model for America only The energy saver feature is disabled and enabled from the Energy Saver Mgt parameter described next Energy Saver Mgt Sets energy saver management on or off If On is selected Energy saver settings are active If Off is selected Energy saver settings are ignored Choices On Off Default On Configuration Menu Equivale...

Page 149: ... MENU SYSTEM DEFAULT STARTUP OPTIONS STARTUP PAGE Resets If None is selected no action is performed If Restore Factory is selected restores the factory default settings of the printer If Save Custom is selected saves any changes to the printer parameters as the Custom settings If Restore Custom is selected restores the Custom settings of the printer Choices None Restore Factory Save Custom Restore...

Page 150: ...ration Item Description Keypad Language Identifies the language of the keypad located on the printer The language selections appear in the message window in the corresponding language for example GERMAN appears as DEUTSCH Choices Czech English French German Italian Portuguese Spanish Japanese Default English Configuration Menu Equivalent MENU LANGUAGE ...

Page 151: ...xample GERMAN appears as DEUTSCH Choices Czech English French German Italian Portuguese Spanish Simplified Chinese Traditional Chinese Russian Japanese Default English Submit button Saves and applies any changes made Reset button If you made changes to any of the parameter set tings but don t wish to apply the changes selecting this button restores the last submitted parameter settings Item Descri...

Page 152: ...om address that appears on email generated by the printer Default Blank The value entered for this parameter must comply with RFC formatting standards name domain_name Commas semicolons colons and spaces are not allowed To Identifies the destination address of email generated by the printer Default Blank Subject Identifies the subject text that appears on email gen erated by the printer Default Bl...

Page 153: ... Test Default Off SMTP MAIL SERVER Mail Server Address Identity of your mail server Default 000 000 000 000 Change to this field requires a reboot of the printer before it will work Submit button Saves and applies any changes made Reset button If you made changes to any of the parameter set tings but don t wish to apply the changes selecting this button restores the last submitted parameter settin...

Page 154: ...rrent day month and year Configuration Menu Equivalent MENU SYSTEM DEFAULT DATE TIME Hour Min Sec Sets the current hour minute and second Configuration Menu Equivalent MENU SYSTEM DEFAULT DATE TIME Submit button Saves and applies any changes made Reset button If you made changes to any of the parameter set tings but don t wish to apply the changes selecting this button restores the last submitted ...

Page 155: ...the printer s security fea ture which requires users to enter the password to access or change printer information and configura tion Default Not checked Configuration Menu Equivalent MENU SYSTEM DEFAULT SECURITY CONFIG ENABLE Set Password Sets the printer password Range Up to 16 characters Default SYSADMIN Configuration Menu Equivalent MENU SYSTEM DEFAULT SECURITY CONFIG SET PASSWORD ...

Page 156: ... the above field If the password entered in this field doesn t match the text entered in the Set Password field the password is not set when the Submit button is selected Range Up to 16 characters Default Blank Submit button Saves and applies any changes made Reset button If you made changes to any of the parameter set tings but don t wish to apply the changes selecting this button restores the la...

Page 157: ...assistance with the printer Range Up to 64 characters Default KONICA MINOLTA Customer Support Contact Information Phone number Range Up to 128 characters Default http printer konicaminolta com Printer Help URL Help website address Range Up to 128 characters Default http printer konicaminolta com Corporate URL The KONICA MINOLTA website address Range Up to 128 characters Default http printer konica...

Page 158: ...ces sories Range Up to 128 characters Default http www q shop com Submit button Saves and applies any changes made Reset button If you made changes to any of the parameter set tings but don t wish to apply the changes selecting this button restores the last submitted parameter settings Item Description ...

Page 159: ...tem pages Item Description Print System Pages The system pages available in your printer are dis played in the list Select the page you would like to have printed and then select the Submit button After the Submitted message appears select OK Configuration Menu Equivalent MENU PRINT MENU CONFIGURATION The Reset button clears the selection indicator from the list ...

Page 160: ...ormation Displays the basic printer properties as well as page counts to date Installed Options Displays all printer options and identifies which options are installed in the printer Printer Interfaces Displays Parallel USB and Resident NIC Network Interface Card information Paper Settings Displays Tray configuration duplex setting and Special Pages information ...

Page 161: ...vides the follow ing information Item Description Supplies Status Displays the statistics of consumable items in the printer Page Information Displays printer statistics grouped by Sheets Printed by Media Size Sheets Printed by Media Type Total Normalized Counts and Normalized Coverage Information ...

Page 162: ...n installed hard disk Item Description None No disk operation is performed Format Flash Clears the Flash memory of the printer Configuration Menu Equivalent MENU SYSTEM DEFAULT FORMAT FOMRMAT FLASH Format Disk Formats the printer s internal hard disk erasing all data previously stored on the disk Configuration Menu Equivalent MENU SYSTEM DEFAULT FORMAT FOMRMAT DISK ...

Page 163: ...ngle copy is printed Choices Off On Print Default Off This option only appears if optional hard disk is installed Use Job Capture Print Job page to retrieve the captured jobs Submit button Click this button to perform the selected operation Reset button If you made changes to any of the parameter set tings but don t wish to apply the changes selecting this button restores the last submitted parame...

Page 164: ...ollowing information about recent print jobs Item Description JOB ID Each job that the printer receives is assigned a unique identification number STATUS Displays the current status of the print job OWNER If known displays the owner of the print job TITLE If known displays the title of the print job INTERFACES Displays the printer interface that was used to pro cess the incoming print job PAGES SH...

Page 165: ...ption Job ID Displays the Job ID of the stored job Job Type Displays the type of the stored job Job Displays the name of the stored job Owner If known displays the owner of the stored job Copies Displays the number of copies that the stored print job has been configured to print Displays the list of specified settings PIN Password field that is required on secured print jobs Submit button When cli...

Page 166: ...e formats can be printed using direct printing PS PSCL PDF TIF and JPEG Item Description File Name Contains the name of the file to be printed Browse button This button allows you to locate the file that you want to print After selecting a file the file name appears in the File Name text box Submit button Clicking this button sends the chosen file to the printer for printing ...

Page 167: ...tion page must be set to On or Print Item Description Job ID Sets the job ID that appeared in the Job Job List ing page Submit button Click this button to display a confirmation message Then click the UPLOAD button to save the job as a file Reset button If you made changes to any of the parameter set tings but don t wish to apply the changes selecting this button restores the last submitted parame...

Page 168: ... is disabled and any jobs sent to the printer through USB port are not printed All parameter settings for USB are also disabled Default Checked Configuration Menu Equivalent MENU INTERFACE MENU USB ENABLE Job Timeout Sets the number of seconds the interface waits for further data from the host before terminating a spooled print job Range 0 999 in seconds Default 60 Configuration Menu Equivalent ME...

Page 169: ...ter set tings but don t wish to apply the changes selecting this button restores the last submitted parameter settings Item Description Default Emulation Assigns the selected emulation as the default emu lation The default emulation is used whenever a print job without emulation identification is received Choices Automatic Postscript PCL5 PCL XL Hex Dump PDF Default Automatic Configuration Menu Eq...

Page 170: ...SYSTEM DEFAULT EMULATIONS AUTO DEFAULT Submit button Saves and applies any changes made Reset button If you made changes to any of the parameter set tings but don t wish to apply the changes selecting this button restores the last submitted parameter settings Save Custom button Saves the Current values of the parameters as the Custom settings Using the Restore Custom but ton you can change the par...

Page 171: ...oices On Off Default On Configuration Menu Equivalent MENU SYSTEM DEFAULT EMULATIONS POSTSCRIPT ERROR PAGE PS Protocol Ethernet Sets the binary communications protocol BCP Choices Binary Quoted Binary Default Binary Configuration Menu Equivalent MENU INTERFACE MENU ETHERNET PS PROTOCOL Submit button Saves and applies any changes made Reset button If you made changes to any of the parameter set tin...

Page 172: ...as the Custom settings Using the Restore Custom but ton you can change the parameter settings back to the Custom settings after changes are made Restore Custom button Changes all settings to the Custom values Restore Factory button Changes all settings to the Factory values Item Description ...

Page 173: ...configuration The settings are arranged in 3 columns Current Custom Factory Item Description Line Termination Sets the line termination value Choices CR CR LF CRLF CR CR LF LF CR CRLF LF LF CR CRLF LF CRLF Default CR CR LF CRLF Configuration Menu Equivalent MENU SYSTEM DEFAULT EMULATIONS PCL LINE TERMINATION ...

Page 174: ...TEM DEFAULT EMULATIONS PCL FONT POINT SIZE Symbol Set Sets the symbol set to be used Default PC8 Configuration Menu Equivalent MENU SYSTEM DEFAULT EMULATIONS PCL FONT SYMBOL SET Submit button Saves and applies any changes made Reset button If you made changes to any of the parameter set tings but don t wish to apply the changes selecting this button restores the last submitted parameter settings S...

Page 175: ...159 Download Font Form List Fonts PS Fonts The Print Download Font Form List Fonts PS Fonts window displays a list of PostScript fonts installed on the printer Configuration Menu Equivalent MENU PRINT MENU FONT LIST POSTSCRIPT ...

Page 176: ...List Fonts PCL Fonts The Print Download Font Form List Fonts PCL Fonts window displays a list of PCL Fonts installed on the printer and also the Index values of each font Configuration Menu Equivalent MENU PRINT MENU FONT LIST PCL ...

Page 177: ... Font Form List Directories Disk Drive window displays the list of files currently installed in the printer s hard disk Configuration Menu Equivalent MENU PRINT MENU DIRECTORY LIST A Hard Disk Not Installed message appears if no optional hard disk is installed in the printer ...

Page 178: ...st Directories FLASH Memory The Print Download Font Form List Directories FLASH Memory win dow displays the list of files currently installed in the printer s flash memory Configuration Menu Equivalent MENU PRINT MENU DIRECTORY LIST ...

Page 179: ...ove The Network Ethernet TCP IP window provides the following parameters for configuration Item Description Enable TCP IP If TCP IP is disabled you will not be able to access web pages or any other options through TCP IP port To enable TCP IP you will have to enable it from Con figuration Menu on the printer Default Checked Configuration Menu Equivalent MENU INTERFACE MENU ETHERNET TCPIP ENABLE ...

Page 180: ... DEFAULT ROUTER Host Name Sets the host name of the printer Domain Name Sets the name of the domain that the printer belongs to DNS Server Sets the address of the DNS server Up to three can be registered Automatic IP Settings Enable DHCP BOOTP Selecting this check box enables DHCP Default Checked Configuration Menu Equivalent MENU INTERFACE MENU ETHERNET TCPIP DHCP BOOTP Enable PING ARP Selecting ...

Page 181: ...Enable Port 9100 Selecting this check box enables Port 9100 Default Checked Submit button Saves and applies any changes made Reset button If you made changes to any of the parameter settings but don t wish to apply the changes selecting this button restores the last submitted parameter settings Item Description ...

Page 182: ...ed on the printer and all options on the web page will also be disabled Default Checked General Parame ters Ethernet Frame Type Sets the Ethernet Frame Type Choices Auto Ethernet 802 2 Ethernet 802 3 Ethernet II Ethernet SNAP Default Auto Configuration Menu Equivalent MENU INTERFACE MENU ETHERNET IPX SPX FRAME TYPE Operating Mode Sets the operating mode Choices Print Server Remote Printer Default ...

Page 183: ...ile Server Sets the name of the preferred file server Range Up to 47 characters Default Blank Preferred NDS Tree Identifies the NDS tree Range Up to 48 characters Default Blank Preferred NDS Con text Identifies the NDS context Range Up to 191 characters Default Blank Print Server Polling Rate Sets the time interval in seconds that passes between print server pollings Range 1 65535 in seconds Defau...

Page 184: ...communication through AppleTalk connec tion will be disabled Default Checked Printer Name Identifies the printer name Range Up to 32 characters Default magicolor 2550 Netzone Identifies the zone where the printer is located Range Up to 32 characters Default Submit button Saves and applies any changes made Reset button If you made changes to any of the parameter set tings but don t wish to apply th...

Page 185: ...web page will also be disabled Default Checked Printer Name Identifies the printer name Range Up to 128 characters Default KONICA MINOLTA magicolor 2550 Printer Location Identifies the location of the printer Range Up to 128 characters Default Blank Accept IPP Jobs When Enable is selected allows the printer to pro cess incoming IPP jobs Choices Enable Disable Default Enable Printer Make Model Iden...

Page 186: ...only Operations Supported This read only text lists the operations supported Submit button Saves and applies any changes made Reset button If you made changes to any of the parameter set tings but don t wish to apply the changes selecting this button restores the last submitted parameter settings Item Description ...

Page 187: ...to 15 characters Default WORKGROUP NetBIOS Name Sets the host name NetBIOS name of the printer Range Up to 15 characters Default KMBTxxxxxx Where x s are last 6 digits of MAC Address of the printer Printer Name Sets the printer name Range Up to 13 characters Default MC2550 Printer Description Sets the printer description Range Up to 32 characters Default Windows Printing Service Submit button Save...

Page 188: ...e printer and all SNMP communications will not work All options on this web page will also be disabled Default Checked SNMP NMS1 Community Sets the IP community of the printer Range Up to 32 characters Default public Access Identifies Read or Write access SNMP NMS2 Community Sets the IP community of the printer Range Up to 32 characters Default private Access Identifies Read or Write access ...

Page 189: ...ty Sets the community of the printer Default public Trap IP Address Sets IP address of the printer Default 255 255 255 255 Submit button Saves and applies any changes made Reset button If you made changes to any of the parameter set tings but don t wish to apply the changes selecting this button restores the last submitted parameter settings Item Description ...

Page 190: ...Configuring the Printer 174 SSL TLS Setting The Network Ethernet SSL TLS SSL TLS Setting page allows you to select the following SSL TLS settings that appear ...

Page 191: ...ng Page Set encryption strength Displays the Encryption Strength Setting Page Only available if a certificate is currently installed Remove Certificate Displays the Remove Certificate Setting Page Only available if a certificate is currently installed SSL TSL Mode Displays the SSL TLS Mode Setting Page Only available if a certificate is currently installed Back button Returns to the previous scree...

Page 192: ...o be used in creation of an SSL Certificate It is com prised of Printer Host Name DNS Server If DNS Server is un available only the host name is used as Common Name This text is read only Organization Specify the name of the group or organization Range Up to 64 characters Default Blank Organization Unit Specify the name of the post Range Up to 64 characters Default Blank Locality Specify the name ...

Page 193: ...3650 Default 30 Encryption Strength Specify the encryption level Choices 3DES_168bits RC4_128bits DES_56bits or RC4_40bits RC4_128bits DES_56bits or RC4_40bits DES_56bits or RC4_40bits Default 3DES_168bits RC4_128bits DES_56bits or RC4_40bits Back button Returns to the previous screen Submit button Creates the self signed certificate A few minutes are needed in order to create the certificate Rese...

Page 194: ...rised of Printer Host Name DNS Server If DNS Server is un available only the host name is used as Common Name Organization Specifies the name of the group or organization Range Up to 64 characters Default Blank Organization Unit Specifies the name of the post Range Up to 64 characters Default Blank Locality Specifies the name of the municipality Range Up to 128 characters Default Blank State Provi...

Page 195: ...d by ISO03166 Range Up to 2 characters Default Blank Back button Click to return to the Network Ethernet SSL TLS SSL TLS Setting page Submit button Click to create data for requesting that a certificate be issued Cancel button Resets all configuration settings to previous values Item Description ...

Page 196: ...tificate authority to request that a certificate be issued Item Description Certificate Request Displays the data that should be submitted to the certificate signing authority This is called CSR Cer tificate Signing Request This data is to be submit ted to the certificate signing authority by the user OK button Click to return to the Network Ethernet SSL TLS SSL TLS Setting page ...

Page 197: ...gth Specifies the encryption level Choices 3DES_168bits RC4_128bits DES_56bits or RC4_40bits RC4_128bits DES_56bits or RC4_40bits DES_56bits or RC4_40bits Default 3DES_168bits RC4_128bits DES_56bits or RC4_40bits Back button Click to return to the Network Ethernet SSL TLS SSL TLS Setting page Submit button Click to install the certificate Reset button If you made changes to any of the parameter se...

Page 198: ... Encryption Strength Specifies the encryption level Choices 3DES_168bits RC4_128bits DES_56bits or RC4_40bits RC4_128bits DES_56bits or RC4_40bits DES_56bits or RC4_40bits Default 3DES_168bits RC4_128bits DES_56bits or RC4_40bits Submit button Click to specify the encryption level Reset button Click to return to the Network Ethernet SSL TLS SSL TLS Setting page ...

Page 199: ...Certificate page allows you to delete the installed certificate Item Description Submit button Click to display a confirmation message Click Sub mit in the confirmation message to delete the certif icate Reset button Click to return to the Network Ethernet SSL TLS SSL TLS Setting page ...

Page 200: ...ws SSL to be enabled or disabled Item Description SSL TLS Mode If Enable is displayed SSL is enabled If Disable is selected SSL is disabled Choice Enable Disable Submit button Saves and applies any changes mode Reset button Click to return to the Network Ethernet SSL TLSL SSL TLS Setting page ...

Page 201: ... to check details of print jobs These options are only available if an optional hard disk is installed Item Description Enable Accounting If selected enables the parameter settings for Accounting Default Checked Reset Accounting Files Resets the accounting file located on the printer s internal hard disk Default Not checked Display Information Sets where the accounting records are to be dis played...

Page 202: ...ed in the Display Information field described above Choices All Last 10 Last 50 Last 100 Last 250 Last 500 None Default None Submit button Saves and applies any changes made Reset button If you made changes to any of the parameter set tings but don t wish to apply the changes selecting this button restores the last submitted parameter settings Item Description ...

Page 203: ...esets the accounting file located on the printer s internal hard disk Default Not checked Display Information Sets where the accounting records are to be dis played for your review Choices Upload to Host Display in PageScope Default Display in PageScope Number of Records to Display Sets the number of accounting file records that are to be displayed when Display in PageScope is selected in the Disp...

Page 204: ...ring the Printer 188 Reset button If you made changes to any of the parameter set tings but don t wish to apply the changes selecting this button restores the last submitted parameter settings Item Description ...

Page 205: ...AppleTalk PageScope Web Connection 168 Auto IP 88 B BOOTP 87 104 C Capture Print Job PageScope Web Connection 151 Certificate request PageScope Web Connection 178 Certificate Signing Request Data PageScope Web Connection 180 Chooser 40 Color Matching PageScope Web Connection 128 Configuration Network settings 84 Configuration Page PageScope Web Connection 144 Crown Print Monitor 82 92 ...

Page 206: ...Scope Web Connection 181 Installing Certificate 181 Crown Print Monitor 82 Download Manager Utility 82 Management Information Base 82 PageScope Network Setup 82 Printer driver 3 67 Printer Management Utility 82 Status Monitor 82 Internet Printing Protocol PageScope Web Connection 169 IP address 87 99 Manual setting 100 IPP 105 169 Printing via 108 IPX SPX 89 105 166 J Job Listing PageScope Web Con...

Page 207: ...80 Encryption strength 182 Install a certificate 181 Internet Printing Protocol 169 NetWare IPX SPX 166 Remove certificate 183 Request a certificate 178 Self Signed Certificate Setting 176 SNMP 172 SSL TLS Mode 184 SSL TLS Setting 174 TCP IP 163 Windows Printing Service 171 O Online help PageScope Web Connection 141 P Page setup settings 16 42 Custom paper size options 18 43 Page attributes option...

Page 208: ...Connection 155 Print Center 5 Print jobs Checking 62 79 Print Stored Job PageScope Web Connection 149 Print System Pages PageScope Web Connection 143 Print PageScope Web Connection 152 General 153 List Directories Disk Drive 161 List Directories FLASH Memory 162 List Fonts PCL Fonts 160 List Fonts PS Fonts 159 PCL 157 PostScript 155 USB 152 Printer name 113 Printer Setup Utility 5 AppleTalk 7 IP p...

Page 209: ...ageScope Web Connection Color Matching Quality 128 Configuration Page 144 Date Time 138 Disk Operations 146 E Mail Configuration 136 Localization Languages 134 Online help 141 Paper Handling 121 Print System Pages 143 Security 139 Startup Options Resets 131 Statistics Page 145 Summary 119 Supplies Status 130 Tray Mapping 126 T TCP IP PageScope Web Connection 163 Tray Mapping PageScope Web Connecti...

Page 210: ...Index 194 ...

Reviews: