background image

Repacking the Printer

6

Repack the Printer

If you need replacement packaging, in the United States, call MINOLTA-QMS Spares at 
1 (334) 633-4300 x 2530 and request part number 2600674-901 for the repacking kit. 
Refer to the Service & Support Guide or www.minolta-qms.com for locations outside the 
United States.

1

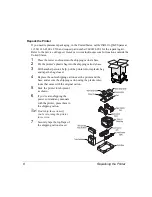
Place the lower cushions into the shipping carton’s base.

2

Put the printer’s plastic bag into the shipping carton’s base.

3

With another person’s help, put the printer into its plastic bag 
and tape the bag closed.

4

Replace the outer shipping carton over the printer and the 
base, and secure the shipping carton using the plastic inter-
locks that came with the original carton.

5

Pack the printer for shipment 
as shown.

6

If you’re also shipping the 
power cord and any manuals 
with the printer, place them in 
the shipping carton.

5

"

Don’t ship these items if 
you’re returning the printer
for service.

7

Securely tape the top flaps of 
the shipping carton closed. 

Summary of Contents for magicolor 2200 DeskLaser

Page 1: ...magicolor 2200 Repacking Guide 1760337 001A...

Page 2: ...num Pass Mobile AL 36618 All Rights Reserved This document may not be copied in whole or part nor transferred to any other media or language without written permission of MINOLTA QMS Inc Notice MINOLT...

Page 3: ...different location either nearby or to a distant location To avoid damage to your printer we advise you to follow the next instructions very carefully 1 Turn off the power to your printer 2 If the pri...

Page 4: ...plies must be replaced prior to re shipping the printer If you need replacement packaging in the United States call MINOLTA QMS Spares at 1 334 633 4300 x2530 and request part number 2600674 901 for t...

Page 5: ...off the printer 2 Remove the power cable and all interface cables Remove the Fuser Oil Roller WARNING The fuser unit can become extremely hot and cause severe burns Make sure the unit is cool before h...

Page 6: ...a duplex unit installed skip to the next section 1 Open the duplex cover and unhook the spring wire 2 Loosen the two thumbscrews until the duplexer moves freely away from the right side of the printe...

Page 7: ...it to the printer 2 Remove the upper media tray 3 Remove the brackets on the right and left in front that are securing the optional tray to the printer 4 Replace the upper media tray 5 With the help o...

Page 8: ...r s plastic bag into the shipping carton s base 3 With another person s help put the printer into its plastic bag and tape the bag closed 4 Replace the outer shipping carton over the printer and the b...

Reviews: