


E-10
4. Adjustment procedures
<Checking the paper reference position>
<Centering>
(1) Touch “Machine.”
(2) Touch “Printer Area.”
(3) Touch “Printer Image Centering Side 1.”
(4) Touch “LCT” and then press the Start key.
A test print will be produced.
(5) Measure width A of the test pattern on the back-
side of the test print produced and check that it
falls within the specified range.
Specifications: 3.0 mm ± 1.0 mm
• Adjusting the paper reference position
If the measured width A falls outside the speci-
fied range, enter the correction value using the
or
key.
(6) Produce another test print and check to see if
width A falls within the specified range.
Note:
If the use of the
or
key does not allow the
measurement to fall within the specified range,
perform the following steps.
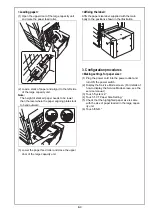
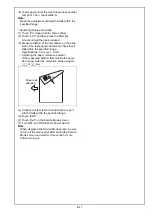
(7) Open the upper door of the large capacity unit.
Loosen the adjustment screws (four screws) and
make an adjustment by moving the paper guide
side plates to the left or right.
Note:
During adjustment, in order to keep the same dis-
tance between the paper guide side plates, place
a sheet of paper between the paper guide side
plates with 1.0 mm apart from each of the plates.
• When width A is greater than the specified range
Loosen the four screws and move both paper
guide side plates to the left then retighten the
four screws that have been loosened.
• When width A is smaller than the specified range
Loosen the four screws and move both paper
guide side plates to the right then retighten the
four screws that have been loosened.
Paper exit
direction
A