Konica Minolta DiMAGE X31 Instruction Manual Download Page 67

67

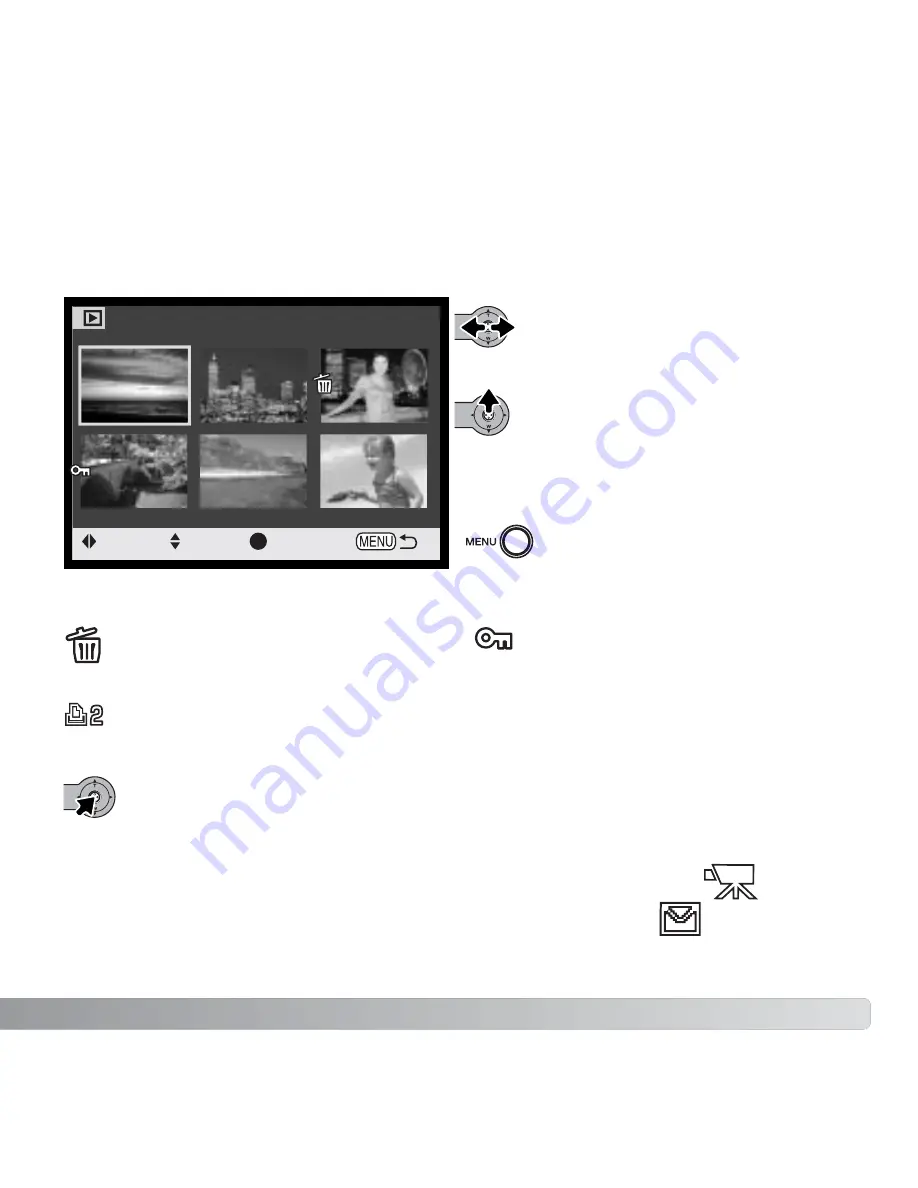
FRAME-SELECTION SCREEN

When a marked-frames setting is chosen on the menu, the frame-selection screen will
appear. This screen allows multiple image files to be chosen. 

Pushing the controller left and right
moves the yellow border to select the
image.

Moving the controller up selects the
frame; when selected, an indicator will
appear next to the image. Moving the
controller down will deselect the image
removing the indicator.

The menu button cancels the screen
and any operation made.

The garbage-can indicator shows the
image is selected for deletion.

The key indicator shows the image is
locked or selected to be locked.

Press the controller to complete the operation.

The printer indicator shows the image
is selected for DPOF printing. The
number of copies is shown on the right.

:move

:sel.

:enter

Movie file

E-mail copy file

Indicators may be displayed on the right of each index image to
indicate movie and E-mail Copy files.

Summary of Contents for DiMAGE X31

Page 1: ...INSTRUCTION MANUAL...

Page 2: ...l Camera manual Warranty card BEFORE YOU BEGIN Konica Minolta is a trademark of Konica Minolta Holdings Inc DiMAGE is a trademark of Konica Minolta Photo Imaging Inc Apple Macintosh and Mac OS are reg...

Page 3: ...Do not attempt to short or disassemble batteries Do not store batteries near or in metallic products Do not mix batteries of different types brands ages or charge levels Do not charge alkaline batteri...

Page 4: ...ped or subjected to an impact in which the interior especially the flash unit is exposed The flash has a high voltage circuit which may cause an electric shock resulting in injury The continued use of...

Page 5: ...When unplugging the AC adapter do not pull on the power cord Hold the plug when removing it from an outlet Do not damage twist modify heat or place heavy objects on the AC adapter cord A damaged cord...

Page 6: ...e amount of energy which may cause burns Do not apply pressure to the LCD monitor A damaged monitor may cause injury and the liquid from the monitor may cause inflammation If liquid from the monitor m...

Page 7: ...he instructions may cause harmful interference to radio communications However there is no guarantee that interference will not occur in a particular installation If this equipment does cause harmful...

Page 8: ...up and running section covers how to prepare the camera for use It contains important information about power supplies and memory cards The basic operation of this camera is covered in the recording...

Page 9: ...frame 43 White balance 44 Image quality 45 Exposure compensation 47 Color modes 48 Portrait 49 Special effects 50 Adding a frame or border 50 Creating side by side images 51 Navigating the advanced r...

Page 10: ...signal 85 Shutter signal 85 Auto power off 85 Date and time 86 Date format 86 Transfer mode 86 Data transfer mode 87 System requirements 87 Connecting the camera to a computer 88 Connecting to Window...

Page 11: ...print 102 Index print 102 Paper size 102 Sizes 102 Layout 102 Print quality 102 Data print 102 Printing DPOF files 103 Appendix 104 Troubleshooting 104 Removing the driver software Windows 106 Care a...

Page 12: ...hese surfaces clean Please read the care and storage instructions in the back of this manual p 107 Flash p 28 Lens Self timer lamp p 41 Main switch USB port p 88 Tripod socket Battery chamber door p 1...

Page 13: ...13 Recording mode switch p 22 Controller LCD monitor Menu button Strap eyelet p 17 Playback button p 32 Indicator lamp...

Page 14: ...d be turned off Slide the battery chamber door toward the front of the camera to release the safety catch 1 Open the door Insert the AA batteries as shown make sure the positive and negative battery t...

Page 15: ...ill shut down if an operation is not made within three minutes To restore power press the main switch The length of the auto power off period can be changed in section 2 of the setup menu p 85 When th...

Page 16: ...and HongKong AC 12 is for use in Japan AC 12C is for use in China and AC 12E is for use in all other areas Never connect the AC adapter to the camera while the camera is on For AC 12 series adapters c...

Page 17: ...ep the strap around your wrist in the event that the camera is accidentally dropped Pass the small loop of the hand strap through the strap eyelet on the camera body Pass the other end of the strap th...

Page 18: ...he indicator lamp is not red and blinking before changing the memory card otherwise the card may be damaged and data lost Insert the memory card all the way into the card slot and then release The car...

Page 19: ...when the card is protected images cannot be recorded If an attempt is made to record or delete an image with the camera the card locked message will appear and the LED lamp near the card slot will tur...

Page 20: ...The date and time may also have to be set when changing batteries if the clock and calendar reset Depending on the region the menu language may also have to be set To change the language see the came...

Page 21: ...setup menu p 78 Push the controller right to display the language settings Move the controller up or down to select the desired language Press the controller to set the language the setup menu will b...

Page 22: ...t Keep your elbows at your side and your feet shoulder width apart to hold the camera steadily When taking vertical pictures hold the camera so that the flash is above the lens with the shutter releas...

Page 23: ...picture but it also influences the depth of field and perspective Depth of field is the area between the closest object in focus and the fur thest object in focus As the lens zooms in to the telephot...

Page 24: ...and motion and is more pronounced at the telephoto position of the lens than at the wide angle position Although the warning appears the shutter can still be released If the warning appears place the...

Page 25: ...s Press the shutter release button all the way down 2 to take the picture After the shutter releases the indicator lamp next to the card slot will turn red and blink indicating image data is being wri...

Page 26: ...t This function is controlled with the shutter release button Place the subject within the focus frame Press and hold the shutter release button partway down to lock the focus The focus signal on the...

Page 27: ...tain situations In these situations the focus lock function p 26 can be used to focus on another object at the same distance as your main subject and then the image can be recomposed to take the pictu...

Page 28: ...ng the shutter cannot be released RECORDING BASIC OPERATION Flash charging Flash mode indicator is red Shutter is locked Flash ready Flash mode indicator is white Flash mode indicator If battery power...

Page 29: ...be within the flash range Because of the optical system the flash range is not the same at the lens wide angle position as it is at the telephoto position Wide angle position Telephoto position 0 2m...

Page 30: ...isplay and live image only Full display LCD MONITOR DISPLAY RECORDING MODE Controller The battery condition date imprinting and flash charging indicators can appear on the live image only display When...

Page 31: ...e button partway down to lock focus 1 When activated p 85 the focus signal beeps to confirm focus Press the shutter release button all the way down to take the picture 2 The mirror is a general pointi...

Page 32: ...ecording Date of recording Lock indicator p 69 Magnification display p 35 Image quality p 45 Battery condition indicator p 15 Frame number total number of images DPOF set indicator p 74 Folder number...

Page 33: ...S VIEWING IMAGES In the playback mode move the controller left and right to scroll through the images on the memory card The images can be scrolled faster by holding the controller to the left or righ...

Page 34: ...e image is highlighted with the border the date of recording the lock and printing status e mail copy indicator and the frame number of the image are displayed at the bottom of the screen When the con...

Page 35: ...the controller up increases the image magnification Moving the controller down decreases the image magnification To scroll the image press the controller Pressing the controller switches between the e...

Page 36: ...monitor Color mode p 48 When the menu button is pressed the main menu appears on the LCD monitor and the basic menu options can be set The following nine menu options are available in the main menu of...

Page 37: ...roller in the direction to highlight the appropriate menu option If the menu icon is struck through the menu function is disabled Selecting the menu icon in the main menu displays the advanced recordi...

Page 38: ...t the pupils of the subject s eyes The flash can be used when taking still images The flash mode is set with the main menu of the recording mode p 36 The active flash mode is displayed in the top left...

Page 39: ...era automatically balances the flash and background exposures When taking portraits ask your subject not to move after the flash burst the shutter will still be open for the background exposure The re...

Page 40: ...create a composite image of a nine frame series when the shutter release button is pressed once p 43 40 RECORDING ADVANCED OPERATION The drive modes control the rate and method images are captured In...

Page 41: ...are determined when the shutter release button is pressed do not stand in front of the camera when taking a self timer image Always confirm the focus with the focus signals before beginning the count...

Page 42: ...down to lock the exposure and focus for the series 1 Press and hold the shutter release button all the way down 2 to begin taking pictures When the shutter release button is pressed and held the camer...

Page 43: ...hutter release button all the way down 2 to begin the nine frame series Once the series starts the shutter button can be released the camera will continue taking pictures until all nine frames have be...

Page 44: ...even under mixed lighting conditions When the built in flash is used the white balance is set for the color temperature of the flash Preset white balance settings must be set before the image is taken...

Page 45: ...file size is determined by the scene some subjects can be compressed further than others 45 The number in the image quality option refer to the horizontal and vertical pixel dimensions of the image Th...

Page 46: ...be stored on the memory card at the camera s image quality settings If the setting is changed the frame counter adjusts accordingly Because the counter uses approximate file sizes the actual image ta...

Page 47: ...ller with controller customization P 54 47 EXPOSURE COMPENSATION The LCD monitor will display the exposure compensation indicator and the degree of compensation The change in exposure is visible in th...

Page 48: ...OR MODES Black and white neutral monochrome image Sepia warm tone monochrome image Posterization exaggerated high contrast images Soft focus images with a soft glow around highlights The color option...

Page 49: ...ht defocusing of the background Portrait is set in the main recording menu p 36 An indicator is displayed on the LCD monitor to show the portrait mode is active When auto reset is active p 55 the port...

Page 50: ...dvance 50 RECORDING ADVANCED OPERATION SPECIAL EFFECTS Adding a frame or border Off Frame Frame Border Side by side Compose the subject within the frame or border Take the picture as described in the...

Page 51: ...the basic recording section to complete the operation Processing starts after the shutter releases When completed the live image is displayed Creating side by side images Two images can be captured s...

Page 52: ...current setting highlighted To return to the menu options move the controller left The tab 1 at the top of the menu will be highlighted Move the controller left and right to highlight the appropriate...

Page 53: ...hr min On Off On Off Refer to the following sections for details on the menu options and their settings Folder name File memory On Off Std form Date form 2 Digital zoom Ctrl func SETUP Pressing the co...

Page 54: ...riate sections for information on the drive mode p 40 white balance p 44 flash mode P 38 and exposure compensation p 47 54 RECORDING ADVANCED OPERATION The white balance drive mode exposure compensati...

Page 55: ...in the movie recording mode AUTO RESET Flash mode p 38 Drive mode p 40 White balance p 44 Portrait p 49 Auto Single frame advance Auto Off Exposure compensation p 47 LCD monitor display p 30 Color mod...

Page 56: ...ted in three formats year month day month day year and day month year The date and date format are set in section 3 of the setup menu p 86 The date and time of recording can be printed directly on the...

Page 57: ...the images recorded with the digital zoom are interpolated to the set image quality size the quality of the images may not be equal to images taken without the digital zoom the greater the power of th...

Page 58: ...acter name The initial folder is named 100KM015 The first three digits are the folder s serial number which will increase by one each time a new folder is created The next two letters refer to Konica...

Page 59: ...mages can be previewed immediately after they have been captured Simply continue to hold down the shutter release button after taking a picture to display the image on the monitor Release the shutter...

Page 60: ...at can be recorded on the next movie clip Place the subject in the focus frames and press the shutter release button partway down to lock focus 1 Press the shutter release button all the way down and...

Page 61: ...320X240 and 160X120 Image size not only affects the resolution of the movie image but also changes the maximum length of the movie clip Recording time is only limited by the capacity of the memory ca...

Page 62: ...the live image only The flash is disabled Movies cannot be recorded when the red low battery warning is displayed The writing speed of the memory card in use may prematurely end the recording of a mo...

Page 63: ...the advanced functions on the playback menu play Press the controller to play back the displayed clip Move the controller left and right to display the movie Press the controller to pause the movie pr...

Page 64: ...ons are available 1 Delete to delete the displayed image p 68 2 Lock to lock the displayed image p 69 3 Add favorites to add a Favorite image to the camera memory p 70 4 View favorites to view Favorit...

Page 65: ...d down to highlight the new setting Once a setting has been selected the cursor will return to the menu options and the new setting will be displayed Changes can continue to be made To return to the p...

Page 66: ...All frames MarkedFrames Unlock all DPOF set This frame All frames MarkedFrames Index print Cancel all On Off Number of copies Date print On Off Refer to the following sections for details on the menu...

Page 67: ...e controller down will deselect the image removing the indicator The menu button cancels the screen and any operation made The garbage can indicator shows the image is selected for deletion The key in...

Page 68: ...be deleted Moving the controller up will mark the thumbnail with the delete indicator To deselect a file for deletion highlight it with the yellow border and move the controller down the delete indica...

Page 69: ...with the yellow border and move the controller down the lock indicator will disappear Continue until all the files to be locked are marked Press the controller to lock the marked thumbnails or press...

Page 70: ...ly turned on see page 71 A single still image displayed or highlighted in the playback mode can be copied to favorites by selecting the add to favorite function in the main playback menu p 64 Movie cl...

Page 71: ...ct the view Favorites icon The last Favorite added is displayed as well as the Favorites mode indicator If no Favorites are saved the no image message appears View View Favorites copy number total num...

Page 72: ...he favorite mode Favorites copies can be deleted only in the view Favorites mode Neither deleting p 68 all the frames in normal playback nor formatting the memory card erases Favorites Rotate display...

Page 73: ...icon from the main menu in the view Favorites mode p 71 SLIDE SHOW Press the controller to pause and restart the slide show presentation To cancel the presentation press the menu button The presentat...

Page 74: ...ING A DPOF PRINT ORDER DPOF print order for the image displayed or highlighted on the monitor can be created by selecting the DPOF icon on the main playback menu p 64 Creating a print order for a sing...

Page 75: ...reen will appear Move the controller left and right to highlight an image to be printed Moving the controller up will mark the image with the print indicator The number next to the indicator shows the...

Page 76: ...es printed per sheet differs between printers The information printed with the thumbnails can vary DATE PRINTING The date of recording can be printed with each image with DPOF compatible printers Date...

Page 77: ...E mail Copy makes a standard 640 X 480 VGA JPEG copy of a still image displayed or highlighted on the monitor These copy images can be easily transmitted by e mail E mail Copies are saved to the orig...

Page 78: ...setup icon on the main menu to display the setup menu Setup menu can be activated from any of the modes recording movie or playback mode enter Digital zoom File memory Folder name Off Off Std Select t...

Page 79: ...g the setup menu move the controller left and right to highlight the appropriate menu tab the menus will change as the tabs are highlighted Once a setting has been selected the cursor will return to t...

Page 80: ...min 10 min 5 min 3 min 1 min Espa ol Chinese Japanese English Deutsch Fran ais Power off 2 Enter Audio signals 1 Focus signal 2 Off Move the controller left and right to adjust the monitor brightness...

Page 81: ...een move the controller left and right to select the year month day hour or minute Move the controller up and down to change the value Press the controller to set the calendar and clock Date Time set...

Page 82: ...appear Choosing Yes will format the card choosing No will cancel the formatting operation A screen will appear to indicate the card has been formatted If the unable to use card message appears the in...

Page 83: ...he setup menu p 78 Image quality still Drive mode Flash mode 2048 X 1536 Standard Single frame advance Autoflash Digital zoom Off p 57 p 40 p 38 p 45 Image size movie 320 X 240 p 61 Exposure compensat...

Page 84: ...der name Standard p 58 Transfer mode Data storage p 86 LANGUAGE The language used in the menus can be changed The language is selected in section 1 of the setup menu p 78 AUDIO SIGNALS Every time a bu...

Page 85: ...ngth of the auto power off period is fixed at 10 minutes when the camera is connected to a computer SHUTTER SIGNAL When the shutter is released a shutter signal will give a positive confirmation of th...

Page 86: ...select the format and enter it by pressing the controller the new format will be displayed on the menu The date format does not affect date folder names p 58 The date format is set in section 3 of th...

Page 87: ...ca Minolta web site for the latest compatibility information North America http www konicaminolta us Europe http www konicaminoltasupport com Users with Windows 98 or 98 second edition will need to in...

Page 88: ...er the data transfer screen will be displayed 4 Attach the other end of the USB cable to the computer s USB port Make sure the plug is firmly attached The cam era should be connected directly to the...

Page 89: ...indow will open requesting instructions on what to do with the image data follow the directions in the window If the computer does not recognize the camera disconnect the camera and restart the comput...

Page 90: ...ructions on the screen No special driver software is required for other Windows operating systems Before connecting the camera to the computer place the DiMAGE Viewer CD ROM in the CD ROM drive The Di...

Page 91: ...B When the location is shown in the window click Next Manual installation To install the Windows 98 driver manually follow the instructions in the connecting the camera to a computer section on page 8...

Page 92: ...ating the CD ROM drive will vary between computers Click Next to install the driver in the system The last window will confirm the driver has been installed Click Finish to close the add new hardware...

Page 93: ...damaged in this operation Unplug the USB cable and turn off the camera Remake the USB connection by reattaching the cable and turning the camera on QUICKTIME SYSTEM REQUIREMENTS IBM PC AT Compatible P...

Page 94: ...Files and folders on the memory card can be deleted using the computer Never format the memory card from the computer always use the camera to format the card Only files recorded by the camera should...

Page 95: ...image is recorded it will be assigned a number one greater than the largest serial number in the folder File serial numbers can be controlled with the file number memory function in section 2 of the...

Page 96: ...Second Edition When more than one external device are connected to the computer repeat the procedure above except right click on the unplug or eject hardware icon This will open the unplug or eject ha...

Page 97: ...device icon and drop it into the trash Turn the camera off and then disconnect the USB cable A confirmation screen will appear to indicate the devices to be stopped Clicking OK will stop the device A...

Page 98: ...camera is connected to the printer The use of the AC adapter sold separately is recommended over the use of the battery USING PictBridge CHANGING THE MEMORY CARD DATA TRANSFER MODE Windows 98 and 98...

Page 99: ...y copies can be selected To deselect an image for printing move the controller down until the number of copies reaches zero Once printing begins the operation can be canceled by pressing the controlle...

Page 100: ...lects menu options and sets adjustments Once a setting has been selected the cursor will return to the menu options and the new setting will be displayed To return to the PictBridge screen press the m...

Page 101: ...Index print 1 3 The options that can be changed vary with the printer Printer setup Japanese Printer setup Border less 1 image sheet 2 image sheet 4 image sheet Printer setup Fine Off Printer setup D...

Page 102: ...paper size of the print can be specified in section 2 of the menu The printer setup option uses the size set with the printer The sizes option should be set first see below Sizes To set paper sizes d...

Page 103: ...DPOF file Before each print run check the printer settings refer to the printer manual A fully charged battery should be used when the camera is connected to the printer The use of the AC adapter sold...

Page 104: ...urned the cam era off The AC adapter is not connected properly Replace battery p 14 Press the main switch to restore power The length of the auto power off period can be changed in section 2 of the se...

Page 105: ...shutter speeds result in blurred images when the camera is hand held Use a tripod or flash p 38 The subject is beyond the flash range p 29 Move closer to the subject Problem Symptom Cause Solution Fo...

Page 106: ...ll be located in the universal serial bus controller or other devices location of the device manager Click on the locations to display the files The driver should be indicated with the camera name Und...

Page 107: ...with a soft clean dry cloth If the camera or lens comes in contact with sand gently blow away loose particles Wiping may scratch the surface To clean the lens surface first blow away any dust or sand...

Page 108: ...o data It is recommended that a copy of the card data be made Batteries Battery performance decreases with temperature In cold environments we recommend keeping spare batteries in a warm place such as...

Page 109: ...o not apply pressure to the surface of the LCD monitor it may be permanently damaged In cold temperatures the LCD monitor may become temporarily dark When the camera warms up the display will function...

Page 110: ...Recycling time 7 s approx LCD monitor 3 8 cm 1 5 inch TFT color Field of view 100 approx A D conversion 10 bit Recording media SD Secure Digital Memory Cards MultiMediaCards File formats JPEG Motion J...

Page 111: ...Minolta s standard test method with 2100mAh Ni MH batteries External power source AC adapter AC 6L AC 12 12U 12E 12GB or 12C Dimensions 86 W X 67 H X 24 5 D mm 3 39 W x 2 64 H x 0 96 D in Weight 115g...

Page 112: ......

Reviews: