background image

31

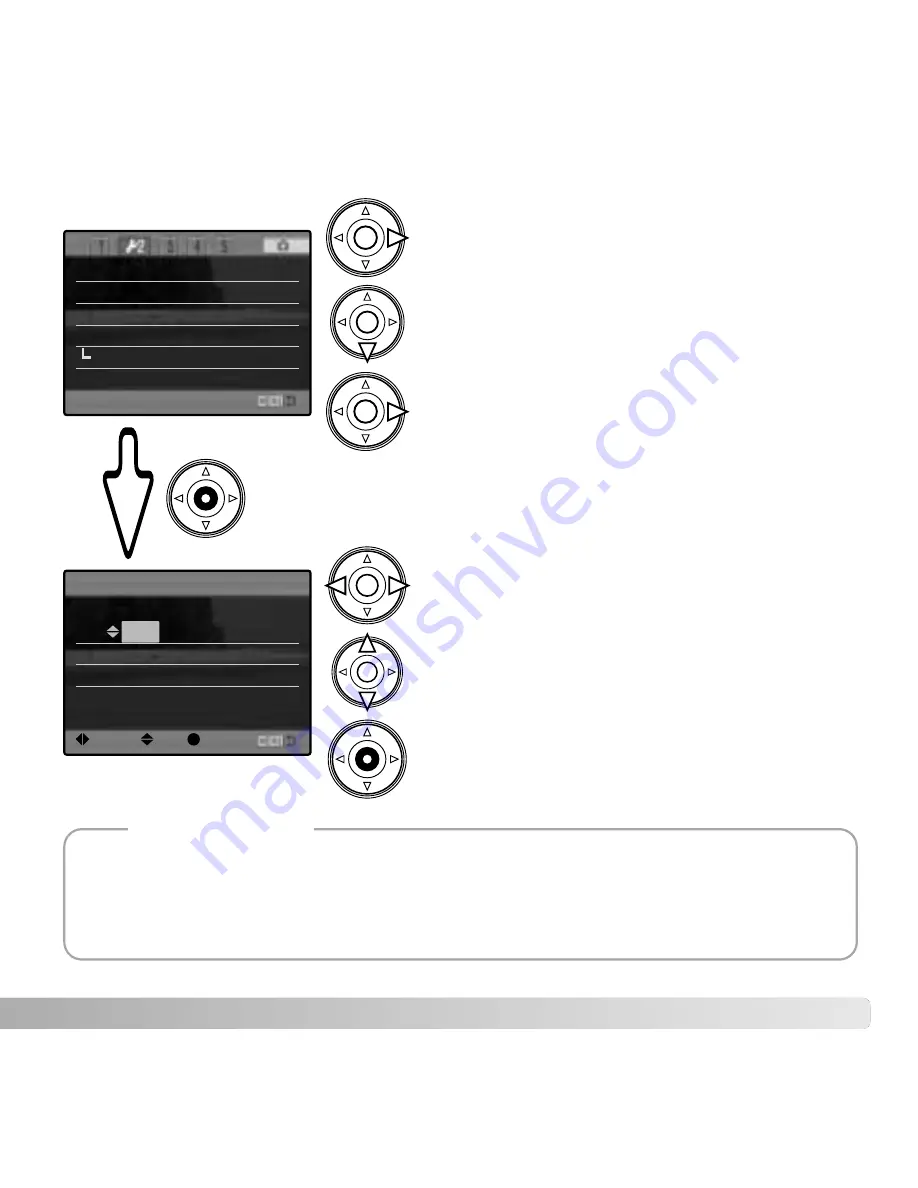
Use the right controller key to highlight the 2

nd

tab

at the top of the menu.

Use the down key to highlight the date/time-set
menu option.

Press the central button to display the date/time setting screen.

Use the left and right keys to select the item to be
changed. 

Press the central button to set the clock and
calendar. The setup menu will be displayed.

Press the right key. “Enter” will appear on the
right side of the menu.

Date/Time setting screen

Use the up and down keys to adjust the item. 

For customers in certain areas, the menu language must also be set. Highlight the language
option in section 1 of the setup menu. Press the right key to display the language settings.
Using the up/down keys, highlight the desired language. Press the central button to set the
highlighted language; the setup menu will be displayed in the selected language.

Camera notes

Custom set

Color mode

File # memory Off
Folder Name

Std. form

Select folder

100KM003

New folder

Date/Time set

2004

.     10 .     23

13  :   14

Date/Time set

:enter

:move

:sel

YYYY/MM/DD

Summary of Contents for DIMAGE A2 - SOFTWARE

Page 1: ...INSTRUCTION MANUAL ...

Page 2: ... mode is set in section 3 of the recording menu p 80 The live image on the monitors will reflect the selected color mode For more on the color mode see page 102 Natural Color and Adobe RGB reproduces the colors in the scene faithfully Vivid Color increases the saturation of the colors in the scene Solarization produces a partial reversal of tones and colors in the image ...

Page 3: ...rk of the Intel Corporation Microdrive is a trademark of the International Business Machines Corporation QuickTime is a trademark used under license Adobe is a registered trademark of Adobe Systems Incorporated All other brand and product names are trademarks or registered trademarks of their respective owners DiMAGE digital camera Lithium ion battery NP 400 Lithium ion battery charger BC 400 Neck...

Page 4: ...r leak Do not store the battery near or in metallic products Do not use the battery with any other products Only use the specified charger An inappropriate charger may cause damage or injury through fire or electric shock Do not use a leaking battery If fluid from the battery enters your eye immediately rinse the eye with plenty of fresh water and contact a doctor If fluid from the battery makes c...

Page 5: ... in injury The continued use of a damaged product or part may cause injuries or fire Keep the battery memory card or small parts that could be swallowed away from infants Contact a doctor immediately if an object is swallowed Store this product out of reach of children Be careful when around children not to harm them with the product or parts Do not fire the flash directly into the eyes It may dam...

Page 6: ...eat or place heavy objects on the AC adapter or charg er cord A damaged cord may cause damage or injury through fire or electric shock If these products emits a strange odor heat or smoke discontinue use Immediately remove the battery taking care not to burn yourself as the battery may become hot with use The continued use of a damaged product or part may cause injuries or fire Take the product to...

Page 7: ... monitor A damaged monitor may cause injury and the liquid from the monitor may cause inflammation If liquid from the monitor makes contact with skin wash the area with fresh water If liquid from the monitor comes in contact with the eyes immediately rinse the eyes with plenty of water and contact a doctor When using the AC adapter and charger insert the plug securely into the electrical out let T...

Page 8: ...pplies sold separately 25 Inserting and changing a memory card 26 Turning on the camera 28 Handling the camera 28 Adjusting the viewfinder and monitor 29 Diopter adjustment 29 Setting the date and time 30 Basic recording 32 Setting the camera to record images automatically 32 EVF and LCD monitor display 32 Basic recording operation 33 Focus lock 34 Automatic monitor amplification 34 Focus signals ...

Page 9: ...riority A 54 Shutter priority S 55 Shutter speed range and camera sensitivity ISO 55 Manual exposure M 56 Bulb exposures 57 Attaching a remote cord sold separately 57 Digital Subject Programs 58 Exposure and flash compensation 59 Using the function dial 60 Drive modes 61 Bracketing 62 Continuous advance 64 Interval 66 Self timer 68 Metering modes 69 White balance 70 Custom white balance calibratio...

Page 10: ...on wireless remote flash 91 Flash control 92 AEL button 94 Recording mode reset 95 Interval setup 96 Bracketing setup 96 Sharpness 97 Data imprinting 98 Electronic keyboard 99 Instant playback 100 Voice memo 101 Color mode 102 About Adobe RGB 103 Noise reduction 103 Monitor amplification 104 Magnification button 105 Flex Digital Magnifier 105 DSP Digital Subject Program setup 106 Tracking AF 106 A...

Page 11: ...121 Index playback format 121 Copy 122 Slide Show 124 About DPOF 126 DPOF setup 126 Date imprint 127 Index print 127 Cancel print 127 Viewing images on a television 128 Setup menu 129 Opening the setup menu 129 Navigating the setup menu 130 LCD brightness 132 Shortcut help 132 Transfer mode 135 EVF auto switch 135 Video output 135 Language 135 Custom setup 136 File number memory 136 Folder name 13...

Page 12: ... Auto power save Data transfer mode 151 Memory card folder organization 152 Disconnecting the camera from the computer 154 Windows 98 98 second edition 154 Windows Me 2000 Professional and XP 154 Macintosh 155 Changing the memory card data transfer mode 156 Removing the driver software Windows 157 PictBridge 158 Notes on printing errors 159 Navigating the PictBridge menu 160 Troubleshooting 164 Wh...

Page 13: ...13 LCD monitor care 170 Copyright 170 Before important events or journeys 171 Questions and service 171 Notes 172 Index 174 Technical specifications 176 Battery Pack BP 400 178 Filter examples 179 ...

Page 14: ... ring p 46 Focal length index Zooming ring Lens Card slot door p 26 Self timer lamp p 68 Built in flash p 36 Strap eyelet p 20 Microphone NAMES OF PARTS The focal length scale on the zooming ring is given in 35mm focal length equivalents The DiMAGE Viewer software supplied with the camera can display the actual focal length used to capture the recorded image as well as the equivalent focal length ...

Page 15: ...e mode p 38 112 Manual exposure p 56 Display information button p 45 Shutter priority p 55 Aperture priority p 54 Program exposure p 51 Auto recording p 52 Memory recall p 73 Portrait subject program p 58 Sports action subject program p 58 Sunset subject program p 58 Night portrait subject program p 58 Exposure mode dial Anti shake button p 37 Exposure compensation button p 59 Rear control dial El...

Page 16: ...ipod socket Memory set p 72 Metering modes p 69 Drive modes p 61 White balance p 70 Camera sensitivity p 74 Function dial p 60 Digital Effects Controller p 78 Flash sync terminal p 76 Accessory shoe Speaker Custom white balance button p 71 Custom function p 136 Battery chamber lock p 23 Battery chamber p 23 ...

Page 17: ... for clarity The single frame advance and continuous advance indicators are displayed in the same area of the data panel The frame counter cannot exceed 999 When the number of recordable images exceeds this 999 will be displayed The frame counter will continue to count down when the number of recordable images falls below one thousand Shutter speed and aperture display exposure flash compensation ...

Page 18: ...Shutter speed display 23 Manual focus indicator p 46 18 Macro mode indicator p 49 22 Drive mode indicator p 61 19 Focus signal p 35 21 Frame counter p 83 27 Magnification display p 47 105 26 Image size display p 82 25 Image quality indicator p 82 24 Battery condition indicator p 24 4 Mode indicator 3 Flash signal p 36 A Focus frame B Spot metering area p 69 D AF sensors C Flex Focus Point p 48 1 M...

Page 19: ...ompensation p 59 14 Folder name p 137 13 Folder number image file number Histogram 3 Date of capture The dark area of the histogram shows the luminance distribution of the recorded image from black left to white right Each one of the 256 vertical lines indicates the relative proportion of that light value in the image The histogram can be used to evaluate exposure and contrast but displays no colo...

Page 20: ...lies ATTACHING THE CAMERA STRAP REMOVING THE LENS CAP Using your thumb and index finger pinch the inside or outside tabs of the lens cap to remove When the camera is not in use always replace the lens cap Attach the camera strap to the strap eyelets as shown The tip of the strap should pass under the buckle 2 1 2 Always keep the camera strap around your neck in the event that you drop the camera ...

Page 21: ...se With one of the large petals to the top slide the hood onto the end of the lens Turn it 90 clockwise until it it clicks into place The lens hood can be attached or removed with the lens cap on the camera To detach the lens hood turn it 90 counterclockwise and remove The lens hood is used to control stray light from entering the lens and causing flare When using the camera under bright light the...

Page 22: ...s on the bottom of the battery with the tabs on the charger unit Slide the battery into the unit Plug the power cord into the back of the charger unit 1 Plug the other end of the cord into a live household outlet The included AC cord is designed for the current of the sales region Only use the cord in the region it was purchased For more on the AC cable see page 167 Slide and lift the battery to r...

Page 23: ...r Push the battery into the chamber until the latch clicks into place This digital camera uses one NP 400 lithium ion battery Before using the battery read the safety warnings on pages 4 of this manual When replacing batteries the camera should be off To remove a battery slide the battery latch to the side of the battery chamber the battery will spring out Close the battery chamber door and slide ...

Page 24: ...on the display until the batteries are changed AUTO POWER SAVE To conserve battery power the camera will turn off the monitors and unnecessary functions if an operation is not made within three minutes The data panel remains on To restore power press the shutter release button partway down or press the main switch The length of the auto power save period can be changed in section 3 of the setup me...

Page 25: ...Pack Kit EBP 100 is a portable power source and significantly extends the operating time of the camera The kit contains a high power lithium ion battery holder and charger The battery holder and charger are also available separately Remove the DC terminal cover from the right 1 The cover is attached to the body to prevent loss Insert the mini plug of the AC adapter or battery pack into the DC term...

Page 26: ...y card care and handling see page 169 Open the card slot door in the direction indicated Always turn off the camera and confirm the access lamp is not lit before inserting or removing a memory card otherwise the card may be damaged and data lost Insert a memory card all the way into the card slot Insert the card so the face is toward the front of the camera Always push the card in straight Never f...

Page 27: ...the card slot door 4 A memory card used in another camera may have to be formatted before being used If the unable to use card message appears the card should be formatted with the camera A memory card can be formatted in section 1 of the playback menu p 120 When a card is formatted all the data on the card is permanently erased If the card error message appears press the central button of the con...

Page 28: ...hold the camera steadily HANDLING THE CAMERA TURNING ON THE CAMERA Access lamp Press the main switch to turn on the camera The access lamp glows briefly and an audio signal sounds to indicate the power is turned on The audio signal can be turned off with the setup menu p 141 If the camera shuts down immediately after it is turned on the battery power is low See page 22 on how to charge the battery...

Page 29: ...viewfinder can be tilted between 0 and 90 Simply grip the finder between your fingers and move it to the position desired DIOPTER ADJUSTMENT ADJUSTING THE VIEWFINDER AND MONITOR Always store the camera with finder and monitor against the body The LCD monitor can be tilted between 20 and 90 Grip the top of the monitor and pull to tilt it down The bottom of the monitor can then be swung up ...

Page 30: ...To change the language see the camera notes on the following page Turn on the camera While holding down the function button 1 press the menu button 2 to open the setup menu The central button of the controller selects menu options and sets adjustments Navigating the menu is simple The up down and left right keys of the controller move the cursor and change settings on the menu LCDbrightness Shortc...

Page 31: ...de of the menu Date Time setting screen Use the up and down keys to adjust the item For customers in certain areas the menu language must also be set Highlight the language option in section 1 of the setup menu Press the right key to display the language settings Using the up down keys highlight the desired language Press the central button to set the highlighted language the setup menu will be di...

Page 32: ...tography effortless The Auto exposure mode acts like the program mode except that the many of the recording functions are reset each time it is selected see page 52 for more information Metering mode indicator p 69 Shutter speed display Aperture display Drive mode indicator p 61 Focus signal p 35 Frame counter p 17 83 Image size display p 82 Image quality indicator p 82 Mode indicator Focus frame ...

Page 33: ...hen the focus is set an AF sensor will briefly appear in the live image to indicate the point of focus The focus signals p 35 on the monitors will confirm that the image is in focus If the focus signal is red the camera was unable to focus on the subject Repeat the previous steps until the signal is white The shutter speed and aperture value will change from white to black indicating the exposure ...

Page 34: ... When the focus is set an AF sensor will briefly appear on the live image to indicate the point of focus Without lifting your finger from the shutter release button recompose the subject within the image area Press the shutter release button all the way down to take the picture AUTOMATIC MONITOR AMPLIFICATION In extremely low light conditions when the camera sensitivity gain has reached its limit ...

Page 35: ... another object at the same distance as your main subject and then the image can be recomposed to take the picture 35 If the AF system cannot focus on a certain subject focus lock can be used with an object at the same distance as the main subject or the camera can be focused manually p 34 White focus indicator focus confirmed Red focus indicator the subject is too close or a special situation is ...

Page 36: ...he lens wide angle position as it is at the telephoto position Wide angle position Telephoto position 0 5m 3 8m 1 6 ft 12 5 ft 0 5m 3 0m 1 6 ft 9 8 ft Flash warning In backlit situations a white indicator appears to recommend the use of the flash The white flash indicator appears when the flash is ready to fire The red flash indicator appears when the flash is charging After taking a picture the O...

Page 37: ...se of a tripod is recommended Anti shake is not effective with a tripod mounted camera turn off the Anti shake function to conserve power The Anti shake system minimizes the affect of camera shake a slight blurring caused by subtle hand motion Camera shake is more pronounced at the telephoto setting than at the wide angle Anti shake is employed when the shutter speed falls below a certain limit de...

Page 38: ...s selected with the movie menu p 112 For more on movie recording see page 114 38 BASIC RECORDING MOVIE RECORDING Recording indicator Recording time in seconds Place the subject in the center of the live image and press the shutter release button partway down to set the focus Use the focus signal to confirm focus Total recording time for the next movie clip 1 Press the shutter release button all th...

Page 39: ...F display the live image will only be displayed in the electronic viewfinder Under bright light the image is easier to see in the EVF than on the LCD monitor LCD monitor display the live image will only be displayed on the LCD monitor Located on the back of the camera the display mode switch controls which monitor is active The three position switch allows the choice between automatic display and ...

Page 40: ... Frame number total number of images Image size p 82 Image quality p 82 Time of capture Sensitivity setting p 74 Degree of exposure compensation p 59 Folder name p 137 Folder number image file number Histogram p 19 Images can be viewed in the Quick View or playback modes This section covers the basic functions in both modes The playback mode has additional menu functions see page 116 BASIC PLAYBAC...

Page 41: ...een The camera will return to playback mode DELETING SINGLE IMAGES Use the left right keys to highlight Yes No will cancel the operation Confirmation screen When in the Quick view or playback mode use the left right keys of the controller to scroll through the images on the memory card To view the histogram of a still image press the up key Press the down key to return to single frame playback Del...

Page 42: ...of recording voice memo indicator the lock and printing status and the frame number of the image are displayed at the bottom of the screen The highlighted image can be deleted using the QV delete button p 41 or an accompanying audio track can be played by pressing the central button of the controller When the display information button is pressed again the highlighted image will be displayed in th...

Page 43: ... function Use the four way key to scroll the image Press and hold the four way key to scroll continuously The locator shows the area of the image being viewed The front and rear control dials can change the magnification Press the menu or magnification button to exit the enlarged playback mode Press the display information button i to hide or show he guidance bar and display indicators 1 Scroll Zo...

Page 44: ...ntroller to pause the movie pressing the controller again will resume the playback Play Rew Vol Fwd Pause Use the left right keys of the controller to rewind or fast forward the movie clip Use the up down keys to adjust the volume of the audio track When the movie is paused pressing the up down keys will jump to the first or last frame of the movie clip The guidance bar and display indicators can ...

Page 45: ...he built in or a compatible Minolta flash unit is used The histogram of a recorded image may not show the same distribution as the real time histogram ADVANCED RECORDING This section contains detailed information on the camera s recording functions and operation Read the sections pertaining to your interest and need DISPLAY INFORMATION BUTTON Standard display Focus frame only Live image only Real ...

Page 46: ...o move the area anywhere in the live image for off center subjects Press the shutter release button partway down to engage the subject lock the focus signal will confirm focus If the subject moves or the camera is panned the focus area will follow the subject Focus and exposure will change as the subject moves and lighting conditions change Press the shutter release button all the way down to take...

Page 47: ...the camera 3264 X 2448 2560 X 1920 2080 X 1560 and 1600 X 1200 size images are resized to 1600 X 1200 3264 X 2176 images are resized to 1600 X 1064 The pixel dimension of 640 X 480 size images do not change Magnification display 47 Manual focus the MF indicator is displayed in the lower right corner of the monitors to indicate the focus mode Approximate location of the CCD plane Use the focusing r...

Page 48: ...e Flex Focus Point in the live image Press and hold the center button of the controller to activate the Flex Focus Point the wide focus frames are replaced with a central cross Press the shutter release button partway down to focus the FFP turns red briefly to confirm focus Pressing the central button of the controller returns the focus point to the center of the image area To return to the wide f...

Page 49: ...ustments to image size The macro indicator is displayed in the lower right corner of the monitors Make sure the subject is within the macro focusing range MACRO MODE Wide angle position Telephoto position 0 3 0 6m 12 24 in 0 25 0 6m 10 24 in Macro mode indicator Approximate location of the CCD plane Because of the high image magnification hand holding cameras during close up photography is very di...

Page 50: ... 58 Sports action subject program p 58 Sunset subject program p 58 Night portrait subject program p 58 Exposure mode indicator The AE lock button locks the automatic exposure system This function allows the exposure to be set by a gray card or reference target outside the scene When using flash in the P or A exposure modes slow shutter sync is active p 87 The operation of the AE lock button can be...

Page 51: ...tion determined by the camera The built in flash cannot be used with program shift The camera gives priority to the flash exposure once the flash is raised any changes made with program shift will be canceled As described in the basic recording operation p 33 press the shutter release button partway down until the shutter speed and aperture value are displayed PROGRAM SHIFT PS PA Turn either the f...

Page 52: ...ti shake On p 37 White balance Auto p 70 White balance shift 0 p 70 Custom white balance Memory reset to daylight p 70 Camera sensitivity ISO Auto p 74 Metering mode Multi segment p 69 Contrast compensation 0 p 79 Color saturation compensation 0 p 78 Filter 0 p 79 Focus area Wide focus frames p 33 Image size 3264 x 2448 p 82 Image quality Fine p 82 Flash mode Fill flash p 86 AEL button AE hold p 9...

Page 53: ...plification Auto p 104 Monitor amplification Manual exp Exposure priority p 104 DSP setup DSP Digital Subject Programs p 106 p 106 Subject tracking AF On p 107 Spot AE area Center spot p 107 Direct manual Focus DMF Off p 94 AE Lock Off Magnification button Digital zoom p 105 p 108 EVF mode Quality 30fps p 136 Custom setup Depth of field preview ...

Page 54: ...o f 11 at the lens telephoto position If the aperture value is beyond the shutter speed range the shutter speed display will blink on the data panel and turn red on the monitors With the camera sensitivity ISO set to auto p 74 the shutter speed may not change when the aperture is adjusted because the shutter speeds can be adjusted in fine steps When photographing scenes with very bright objects su...

Page 55: ... Press the shutter release button partway down to activate the exposure system the corresponding aperture will be displayed When using flash the shutter speed should be set to the flash duration of flash unit to prevent underexposure A maximum shutter speed of 1 1000s is recommended when using the built in flash and 1 250s when using a compatible Minolta flash unit The yellow and white Anti shake ...

Page 56: ...verexposed If the monitors are black increase the exposure until the image is visible decrease the exposure if the monitors are white The recording menu can be used to constantly display a live image regardless of the exposure setting p 104 MANUAL EXPOSURE M To set the shutter speed turn the front control dial To set the aperture turn the rear control dial The appropriate display will turn blue as...

Page 57: ...n the manual exposure mode M The maximum exposure time depends on the camera sensitivity setting see page 55 The use of a tripod and a remote cord is recommended for bulb exposures The camera s exposure system cannot be used to calculate bulb exposures The use of a separate light meter is recommended BULB EXPOSURES ATTACHING A REMOTE CORD SOLD SEPARATELY The optional remote cords RC 1000S or RC 10...

Page 58: ...of the sun could damage the CCD Between exposures turn off the camera or cover the lens Night portrait for deep subtle night scenes When used with flash the subject and background exposures are balanced Use a tripod to eliminate blurring from camera shake The flash can only be used with close subjects such as with a portrait of a person When using the flash ask your subjects not to move after the ...

Page 59: ... panel aperture display and on the monitors After the setting is made the shutter speed and aperture displays will indicate the actual exposure Flash compensation Exposure compensation Press the exposure compensation button 1 Use the front control dial 2 to set exposure compensation The indicators are enlarged when being adjusted Use the rear control dial 3 to set flash compensation Press the shut...

Page 60: ...Use the rear control dial 4 to select between options of various functions like a 10 second and 2 second self timer or a specific custom white balance register Press the shutter release button partway down or press the function button to complete the operation Changes are displayed on the monitors Also see camera notes on page 65 Memory set to store camera settings p 72 Metering mode changes the m...

Page 61: ... camera s internal buffer memory becomes full the frame counter turns yellow on the monitors Time must be given for this data to be written to the memory card Wait for the indicator to turn white before capturing more images High speed continuous advance to take a series of three images at approximately 2 7 frames per second p 64 Interval and time lapse movie to take a series of still images and a...

Page 62: ...tal Effect bracket for filter color saturation or contrast brackets Set the contrast color saturation or filter to the desired level the bracket series is from the Digital Effects Control setting to one unit under to one unit over See the Digital Effects Control section on page 78 to set the contrast color saturation and filter Single frame advance bracket the same as the continuous advance bracke...

Page 63: ...imum level 5 one bracket will be made at 6 5 4 6 A RAW image cannot exceed the maximum and minimum levels and will contain two identical brackets 5 4 5 A black and white Filter bracket is made to the settings before and after the set Filter p 79 If Filter 10 is selected the bracket series will be 10 9 0 Compose the picture as described in the basic recording section p 33 Press and hold the shutter...

Page 64: ...ode Continuous advance captures a maximum of three images at 1 8fps When used with continuous autofocus the camera adjusts the focus during the series The live image is briefly displayed between frames High speed continuous advance captures a maximum of three full size images at 2 7fps The rate of capture decreases with images smaller than 3264 X 2448 Focus is locked with the first frame regardles...

Page 65: ... standard and high speed continuous advance but the rate of capture is reduced because the flash must recharge between frames 1 To change function dial or Digital Effects Controller settings quickly simply press and hold the center dial or controller button 1 and select the setting with the front and rear control dials 2 Release the center button of the function dial or Digital Effects Controller ...

Page 66: ...e a series of still images specified within the parameters set on the recording menu Interval and time lapse movie to create a series of still images and a 640 X 480 movie clip specified within the parameters set on the recording menu The movie file is played back at four frames per second 3 4 2 1 Turn the function dial to the drive mode position 1 Press the function button in the center of the di...

Page 67: ...n the frame counter Image size and quality settings can be changed to increase the number of pictures that can be saved on the memory card Press the shutter release button to begin the series During the interval series the monitors will be turned off to conserve power Int will be displayed on the data panel and the data panel frame counter will countdown the remaining frames in the interval series...

Page 68: ...ocus with the focus signals before beginning the countdown p 35 3 4 2 1 Turn the function dial to the drive mode position 1 Press the function button in the center of the dial 2 Turn the front control dial to select the self timer drive mode 3 Use the rear control dial 4 to switch between a ten second and two second delay Press the shutter release button partway down or press the function button t...

Page 69: ... When this mode is selected a small circle will appear in the middle of the live image indicating the measuring area The spot allows precise exposure measurements of a particular object without being influenced by extremely bright or dark areas within the scene When using spot metering with the Flex Focus Point p 48 the spot circle can move with the focus point This function is selected in section...

Page 70: ...e accordingly When the built in flash is used the white balance is set for the color temperature of the flash When set no indicators appear on the data panel or monitors Daylight Tungsten Fluorescent Cloudy Shade Flash Preset white balance to set the white balance to a specific light source The rear control dial can be used adjust the white balance in seven levels 3 to 3 4 to 2 for fluorescent Exc...

Page 71: ...f the ambient light A blank piece of white paper is an ideal surface and can easily be carried in a camera bag Shooting tips If an error occurs during calibration a message will appear on the monitors Press the controller to cancel the message and press the menu button to cancel the register selection screen the custom white balance indicator will be yellow to indicate the error Recalibrate using ...

Page 72: ...tings are replaced Press the central button of the controller 2 to complete the operation The menu button cancels the operation without saving the settings 2 1 Five sets of camera settings can be saved This saves time under frequently repeating conditions by eliminating the need to set the camera Except for functions like subject programs data imprinting voice memo and instant playback most record...

Page 73: ...isters are selected the camera settings are displayed on the screen Press the central button of the controller 3 to apply the settings to the camera The menu button cancels the operation without recalling the settings To recall another set of settings in a different register turn the exposure mode dial to another position and then back to MR to open the memory recall screen Saved memory settings c...

Page 74: ...ed range As the ISO value doubles the camera sensitivity doubles changing the ISO between 100 and 200 200 and 400 or 400 and 800 changes the camera sensitivity by one stop or 1 Ev p 111 A change between 100 and 800 changes the camera sensitivity by a factor of 8 or three stops High ISO settings 400 800 can allow the photographer to hand hold the camera in low light conditions without the need of a...

Page 75: ...ange is measured from the CCD Because of the optical system the flash range is not the same at the lens wide angle position as it is at the telephoto position To extend the versatility of the camera an accessory flash unit sold separately can be used Always remove the accessory flash when the camera is not in use and replace the accessory shoe cap to protect the contacts ATTACHING AN ACCESSORY FLA...

Page 76: ...ed when another flash unit is connected to the flash sync terminal both flash units will fire However the camera s automatic flash control systems will not provide correct exposures To use the built in flash as a fill light use manual flash control p 92 The use of custom white balance is recommended p 71 When calibrating the camera use the shutter speed and aperture settings require for the final ...

Page 77: ...re setting on the live image The shutter can be released during depth of field preview In Auto P and S exposure modes the aperture value is automatically displayed Except for the manual exposure mode the exposure is not fixed and changes with the lighting conditions The aperture can be changed during depth of field preview in A and M exposure modes the live image may flash as the aperture is adjus...

Page 78: ...ss the shutter release button partway down to set the adjustment Also see camera notes on page 65 The Digital Effects Controller can adjust image contrast color and saturation Changes are instantly visible on the monitors before the image is captured Contrast Color saturation Filter 1 2 3 3 The color saturation of a scene can be adjusted within eleven levels 5 with the Digital Effects Controller C...

Page 79: ...ke a warming filter A negative adjustment makes the image cooler When used with the black and white color mode the Filter can tone the neutral monochrome image in eleven steps The Filter effect cycles from neutral to red to green to magenta to blue and returning to neutral The zero position is neutral Black and white filter settings have no effect on RAW images The overall color of a scene can be ...

Page 80: ... setting needs to be changed Press the right controller key to display the settings the current setting is indicated by an arrow To return to the menu options press the left key Use the up down key to highlight the new setting If Enter is displayed press the central button of the controller to open the next screen Press the central button of the controller to select the highlighted setting Once a ...

Page 81: ...ions p 95 To set the interval drive mode parameters p 66 To bracket with 0 3Ev or 0 5Ev steps p 96 To imprint data on a recorded image p 98 To play back images after they are recorded p 100 To imprint to the image or Exif data p 98 To attach audio to images after instant playback p 101 To select color or B W images and color space p 102 To increase or decrease image sharpness p 97 To apply noise r...

Page 82: ...52 It can require more than 10 seconds to save RAW or TIFF files the frame counter turns yellow and no images can be captured during this period Only full size images can be taken with RAW image quality RAW images require special processing before they can be used refer to the DiMAGE Viewer software manual Some camera functions cannot be used with the RAW image quality setting See page 84 for more...

Page 83: ...image taken may not change the counter or may decrease it by more than one When the frame counter displays zero it indicates no more images at the image size and quality settings can be captured Changing those settings may allow more images to be saved to the card Camera Notes The number of images that can be stored on a memory card is determined by the size of the card and the file size of the im...

Page 84: ...es to the live image on the monitors but the stored data may not be influenced by the setting The black and white color mode has no effect on the final image a raw image taken in the black and white color mode can be restored to a color picture However black and white filter effects p 79 are not applied to a RAW image The saturation difference between the Natural Color and Vivid Color modes is pre...

Page 85: ...played at the same resolution images appear to have the same amount of detail but the dimensions of the image increases with the number of pixels except for the 640 X 480 image the other pictures are too large to be displayed on this page When the images are enlarged to the same dimensions the difference in the recorded image size affects the resolution of details 3264 X 2448 Cropped ...

Page 86: ...gs are used priority is given to the active setting s color temperature Fill flash can be used as the main or supplementary light In low light conditions the flash will act as the main source of illumination and overpower the ambient light Under strong sunlight or in backlit situations the fill flash can reduce harsh shadows FILL FLASH RECORDING MENU Red eye reduction is used when taking photograp...

Page 87: ...t the ambient light exposure will be balanced to bring out the details in the background with the flash exposure for the subject Because shutter speeds can be longer than usual the use of a tripod is recommended 1 Set the camera to the P or A exposure mode p 50 2 Frame the subject on the monitors 3 Press and hold the AE lock button to lock the exposure 4 Press the shutter release button partway do...

Page 88: ...e subject See your local camera dealer about Minolta lighting accessories On camera flash Wireless Remote flash Set the camera to the wireless flash mode in section 1 of the recording menu p 80 This will simultaneously set the flash to the wireless mode and set the camera to the flash s wireless channel Slide the cap off the accessory shoe p 75 Slide the Program Maxxum 5600HS D or 3600HS D flash o...

Page 89: ...or WL will be displayed in the top left corner of the live image The number next to it indicates the channel in use The flash signal will turn white when the flash is charged 2 1 When the 5600HS D and 3600HS D flash is charged the AF illuminator on the front of the unit will blink 2 Take a picture as described in the basic recording section on page 33 The flash units can be test fired by pressing ...

Page 90: ...t 0 5 m1 1 6 ft1 1 4 m 4 6 ft 1 0 m 3 2 ft 0 7 m 2 3 ft 2 0 m 6 6 ft 2 0 m 6 6 ft 1 4 m 4 6 ft 1 4 m 4 6 ft 1 0 m 3 2 ft 2 8 m 9 2 ft 0 5 m1 1 6 ft1 0 7 m 2 3 ft 1 0 m 3 2 ft 1 Maximum flash to subject distance 3600HS D 3 6 m 11 8 ft 2 Maximum flash to subject distance 3600HS D 2 5 m 8 2 ft 5600HS D 4 0 m 13 1 ft 3 Maximum flash to subject distance 3600HS D 4 0 m 13 1 ft 4 Maximum flash to subject...

Page 91: ...lt The 5600HS D and 3600HS D flash units can be reset simultaneously with the camera Simply mount the flash unit in the accessory shoe and change the wireless flash mode setting on the menu to another flash mode This camera does not have a preset flash sync speed In program P or aperture priority A exposure mode the shutter speed will not fall below the camera shake limit unless the slow sync func...

Page 92: ...ystem with information from a pre flash exposure Unlike conventional TTL flash metering ADI is not influenced by the reflectance of the subject or background ensuring optimum flash exposures Pre flash TTL calculates flash exposure with a pre flash only This mode must be used when using close up filters or filters that reduce the amount of light entering the camera such as neutral density filters P...

Page 93: ...L when the bounce flash or wireless remote function is used or the flashes are connected to the camera with an off camera cable Pre flash TTL automatically activates when using the macro flash units When using bounce flash with the Maxxum Program Flash 2500 D set TTL with the metering mode switch on the flash unit or pre flash TTL on the recording menu on the camera When using the Maxxum Program f...

Page 94: ...e AEL button is released AE toggle Press and release the AEL button to lock the exposure To cancel the exposure lock press the AEL button again AE hold AE toggle Exposure is determined with the spot metering area Press and release the AEL button to lock the exposure the spot circle is displayed To cancel the exposure lock press the AEL button again Exposure is determined with the spot metering are...

Page 95: ...advance p 61 Anti shake On p 37 White balance Auto p 70 White balance shift 0 p 70 Metering mode Multi segment p 69 Contrast compensation 0 p 79 Color saturation compensation 0 p 78 Filter 0 p 79 Focus area Wide focus frames p 33 Flash mode Fill flash or red eye reduction1 p 86 Flash control ADI p 92 Sharpness Normal p 97 1 The flash mode is reset to whichever of the two modes was last set Button ...

Page 96: ... up down controller keys to highlight the parameter to be changed and then press the right controller key Use the up down keys to change the parameter Use the left controller key to return to the parameters Continue until the parameters are set Press the center of the controller to complete the operation The menu button closes the screen and cancels any changes BRACKETING SETUP 0 3 Ev bracket 0 5 ...

Page 97: ... is recorded Sharpness is set in section 3 of the recording menu p 80 If any setting other than normal is selected the sharpness indicator is displayed on the monitors Menu options Hard Normal Soft Increases the sharpness of the image accentuating details No filter applied Softens the details of the image ...

Page 98: ...u option Data imprinting function disabled Prints the date and time the image was taken To imprint alphanumeric characters When this option is selected the electronic keyboard opens p 99 To imprint text with a serial number As each successive image is captured the ID number will increase by one When this option is selected the electronic keyboard opens p 99 The serial number is reset every time th...

Page 99: ...he operation highlight the enter key and press the controller To cancel the operation press the menu button To delete text move the cursor into the text block at the top of the screen Use the cursor to highlight the character to be deleted Press the QV delete button to delete the character To replace a character highlight the character in the text block then highlight the new character on the keyb...

Page 100: ...series of images is captured the entire series will be erased 100 Pressing the display information button switches between displaying the image with and without the guidance bar RECORDING MENU After an image is captured it can be displayed on the monitors for two or ten seconds before being saved When using the continuous advance or continuous advance bracketing drive mode an index display is used...

Page 101: ...ecording will stop when the fifteen second recording period has ended or by pressing the center button of the controller A voice memo is attached to the last image of a continuous advance or continuous advance bracketing series p 61 The voice memo can be played back in Quick View and the playback mode p 115 Recording audio stop Microphone When making audio recordings be careful not to touch or cov...

Page 102: ...oys the sRGB color space Adobe RGB like Natural Color this color mode reproduces the colors in the scene faithfully but uses the extended gamut of the Adobe RGB color space Solarization produces a partial reversal of tones in the image Exposure compensation function can be used to accentuate the solarization effect p 59 The Digital Effects Controller cannot be used This color mode does not affect ...

Page 103: ...ust be active and the color space set to Original Color Space Adobe RGB in the color preferences window see color matching in the advanced setup section in the DiMAGE Viewer manual DiMAGE Viewer version 2 2 or later is required to open Adobe RGB images taken with this camera ABOUT ADOBE RGB This function reduces the affect of dark noise caused by long exposures Noise reduction is only applied to e...

Page 104: ...lified image and not the final values of the exposure Normal the monitor image is not amplified in low light When using the manual M exposure mode p 56 two other options are available Exposure priority the live image reflects the set exposure Automatic monitor amplification is disabled Display priority the live images is displayed regardless of the exposure settings This allows the image to be com...

Page 105: ...gnifier p 132 MAGNIFICATION BUTTON Color mode Nat sRGB Sharpness Normal Noise reductn On Monitor amp Auto Manual exp Exp priority Mag button Digital zoom FLEX DIGITAL MAGNIFIER The Flex Digital Magnifier is a focusing aid for manual focus p 46 The live image can be magnified by X3 3 It is activated with the recording menu see above This function is disabled in the other focusing modes Magnificatio...

Page 106: ...in section 4 of the recording menu p 80 When off the position of the focus area can still be changed with the four way keys of the controller AE LOCK AE autoexposure lock can be turned off and on in section 4 of the recording menu p 80 When AE lock is on the exposure is locked when the shutter release button is pressed partway down the shutter speed and aperture displays turn black to confirm the ...

Page 107: ... Direct manual focus is activated in section 4 of the recording menu p 80 Direct manual focus is canceled when continuous AF or manual focus p 46 is in use 1 As described in the basic recording operation section p 33 press the shutter release button partway down to lock the focus 1 the focus signal will turn white DMF will be displayed next to the drive mode indicator While holding the shutter rel...

Page 108: ...February 20th 1962 John Glenn became the first American to orbit the Earth On board his Friendship 7 spacecraft was a Minolta Hi matic camera to record that historic event The 4 hour 55 minute and 23 second flight orbited the Earth three times at an average speed of 28 000 kph 17 500 mph Mr Glenn visited our Sakai camera factory in Japan on May 24th 1963 to plant a palm tree to celebrate the occas...

Page 109: ...d to make the exposure Usually landscape photographs use a large depth of field large aperture value to keep the foreground and background in focus and portraits use a shallow depth of field small aperture value to separate the subject from the background Depth of field also changes with focal length The smaller the focal length the greater the depth of field the longer the focal length the shallo...

Page 110: ...t and washed out By compensating the exposure detail is brought out in the leaves and the stones and water appear richer When using fill flash to reduce harsh shadows caused by bright illumination or direct sunlight flash compensation can change the ratio between the highlights and shadows The fill flash will affect the darkness of the shadows without affecting the area illuminated by the main lig...

Page 111: ...n is of course very warm near the horizon and very blue at noon The daylight preset white balance setting is for beautiful sunny days When the weather is overcast the color is cooler When the main light source is skylight light from the blue sky rather than the direct light of the sun the resulting color is very blue The shade preset white balance is designed for this condition Artificial lighting...

Page 112: ...cated by an arrow To return to the menu options press the left key Use the up down key to highlight the new setting If Enter is displayed press the central button of the controller to continue Press the central button of the controller to select the highlighted setting Once a setting has been selected the cursor will return to the menu options and the new setting will be displayed Changes can cont...

Page 113: ...rger the file sizes Image size is set in the movie menu Movies can be recorded at two frame rates 15 fps and 30 fps The higher the frame rate the smoother the moving image and the larger the file sizes Frame rate is set in the movie menu The computer environment may affect the playback of 544x408 30fps movies If image size or frame rate is changed the frame counter displays the approximate number ...

Page 114: ...splay information button p 45 White balance p 70 Manual focus p 46 Macro mode p 49 MOVIE RESET This menu function resets the movie mode When selected a confirmation screen will appear choosing Yes resets the following functions and settings No cancels the operation Exposure compensation 0 0 p 59 Contrast compensation 0 p 79 Color saturation compensation 0 p 78 Filter 0 p 79 Image size 544x408 p 11...

Page 115: ... playback voice memos as well as the playback mode s menu functions The menu navigation section covers basic menu operation It is followed by detailed descriptions of the menu settings Voice memos can be played back in Quick View and the playback mode See page 101 on how to record voice memos Play Vol Stop During playback use the up down keys of the controller to adjust the volume Press the menu b...

Page 116: ...tion whose setting needs to be changed Press the right controller key to display the settings the current setting is indicated by an arrow To return to the menu options press the left key Use the up down key to highlight the new setting If Enter is displayed press the central button of the controller to open the next screen Press the central button of the controller to select the highlighted setti...

Page 117: ... one memory card to another p 122 To protect images from deletion p 121 To specify the index playback format p 121 To play back images automatically p 124 To select the images for the Slide Show p 124 To specify how long each image is played back p 124 To repeat the Slide Show presentation automatically p 124 To select images for DPOF printing p 126 To print the date of capture with each print p 1...

Page 118: ... deselects the image removing the indicator The file is selected for deletion The file is locked or selected to be locked The file is selected for the slide show or to be copied to another memory card The image is selected for printing The number next to the indicator shows the number of copies requested The left right keys of the controller move the yellow border to select the image The menu butt...

Page 119: ...l the images to be deleted are marked Press the controller to continue the confirmation screen will appear or press the menu button to cancel the operation and return to the playback menu On the confirmation screen highlighting and entering Yes will delete the marked images The delete function will only erase unlocked images If an image is locked it must be unlocked before it can be deleted Single...

Page 120: ...menu Although it is recommended to format a CompactFlash card with the camera a card can be formatted with a computer The card must be formatted on a Windows system using a FAT or FAT32 file system When a memory card is formatted all data on the card is erased VIEW FOLDER Delete Format View folder Lock Copy Index format 9 frames 100KM003 Recorded images are stored in folders on the memory card To ...

Page 121: ...ion screen p 118 will be displayed Use the left right keys of the controller to highlight the image to be locked Pressing the up key will mark the thumbnail with the lock indicator To unlock an image highlight it with the yellow border and press the down key the lock indicator will disappear Continue until all the images are marked Press the controller to lock the marked frames or press the menu b...

Page 122: ...d Press the central button of the controller to continue or press the menu button to cancel the operation and return to the playback menu When the controller is pressed a screen with four messages will be displayed the messages are highlighted as the copying procedure is executed If too many images have been selected a warning will appear and the copy routine will be canceled Divide the number of ...

Page 123: ...section 1 of the playback menu p 116 Copied to 101KM_CP OK Innovation and creativity has always been a driving force behind our products The Electro zoom X was purely an exercise in camera design It was unveiled at Photokina in Germany in 1966 The Electro zoom X was an electronically controlled aperture priority mechanical SLR with a built in 30 120mm f 3 5 zoom lens giving twenty 12 X 17mm images...

Page 124: ...f images displayed total number of images in the presentation Press the central button of the controller to pause and restart the presentation To cancel the presentation press the menu button or the down key of the controller Slide show Playback All frames Duration 5 sec Repeat No Use the left right keys of the controller to advance to the next image or return to the previous one ...

Page 125: ...the down key the check indicator will disappear Continue until all the images have been edited Press the controller to set the marked frames or press the menu button to cancel the oper ation and return to the playback menu To select the period each image will be displayed during the slide show To start the slide show presentation Pressing the central button of the controller will pause the present...

Page 126: ... SETUP This frame To create a DPOF file for the image displayed or highlighted in playback mode All frames To create a DPOF file for all images in the folder specified in section 1 of the playback menu Marked frames To choose a group of images to be printed or when the number of copies for each image varies When selected the frame selection screen will appear p 118 Use the left right keys of the c...

Page 127: ...n screen will appear choosing and entering Yes will execute the operation and cancel the print and index print order All frames C To cancel all printing files on the memory card All frames F To cancel the printing file in the folder CANCEL PRINT INDEX PRINT To create an index print of all the images in the folder select the Yes option To cancel an index print simply change the setting to No If an ...

Page 128: ...on The playback mode display will be visible on the television screen 7 View images as described in the playback section Use the television controls to adjust the volume of the audio playback Because of the broadcast standard used to display television images image quality and resolution will appear lower than when displayed on a computer monitor 128 ADVANCED PLAYBACK VIEWING IMAGES ON A TELEVISIO...

Page 129: ... press the menu button 2 to open the setup menu LCDbrightness Shortcut help Transfer mode Data storage EVF auto swtch Auto EVF LCD Video output NTSC Language English 1 2 Image size Quality Flash mode Flash control AEL button Reset The setup menu can be accessed from the recording movie or playback menus Use the left right keys of the controller to highlight the setup tab Press the central button o...

Page 130: ... be changed Press the right controller key to display the settings the current setting is indicated by an arrow To return to the menu options press the left key Use the up down key to highlight the new setting If Enter is displayed press the central button of the controller to open the next screen Press the central button of the controller to select the highlighted setting Once a setting has been ...

Page 131: ... images p 137 To set the camera s clock and calendar p 138 To reset camera functions p 139 To change or turn off audio signals p 141 To change or turn off focus signals p 141 To change or turn off the shutter sound effect p 142 To adjust or turn off the volume of camera signals p 142 To set the auto power save period p 142 To specify when Anti shake is applied p 143 To activate Full time AF p 143 ...

Page 132: ...s the central button of the controller to set the level and complete the operation Press the menu button to close the screen without applying any changes SHORTCUT HELP The shortcut help shows button commands to open the LCD brightness screen change the focusing screens switch between the digital zoom and Flex Digital Magnifier open the setup menu or reset the camera To close the help screen press ...

Page 133: ...nu Digital zoom selected on the menu If the digital zoom is not activated press and hold the function button 1 then press the magnification button 2 to activate the Flex Digital Magnifier The image can be scrolled using the four way keys of the controller when magnified If the digital zoom is active the display switches between the digital zoom and the Flex Digital Magnifier Flex Digital Magnifier...

Page 134: ...nly resets the recording mode or movie mode depending on the position of the mode switch Refer to page 95 to see which functions reset in the recording mode and page 114 for the movie mode 1 2 Hold down the function button 1 and press the exposure compensation button 2 to switch the EVF mode between Quality 30fps and Motion 60fps Each time this shortcut is used the active EVF mode is briefly displ...

Page 135: ...s provided with DiMAGE Capture to activate this option EVF AUTO SWITCH This option controls the auto display function in the recording and movie mode p 39 Two setting are available Auto EVF LCD the EVF s eye sensors switch between the EVF and LCD monitor automatically EVF auto on the LCD monitor is turned off and the eye and grip sensors activate the EVF when in use This setting will help conserve...

Page 136: ...elect the setting 3 Press the shutter release button partway down or press the function button to complete the operation Also see camera notes on page 65 3 3 2 1 FILE NUMBER MEMORY When file number memory is selected if a new folder is created the first file stored in the folder will have a number one greater than the last file saved This allows multiple folders to be created to store images by ca...

Page 137: ... folder with the corresponding date When a new folder is created the serial number in the image file name is reset to 0001 unless file number memory is active For more information on folder organization and file names see page 152 100KM003 10140223 Standard Date 137 SELECT FOLDER This option allows the selection of existing folders In quick view or playback mode the images in the selected folder c...

Page 138: ...review File memory Off Folder Name Std form Select folder 100KM003 New folder Date Time set Every folder name begins with a three digit index number When the electronic keyboard activates three digits will be displayed in the register This number cannot be changed Every time a new folder is created the folder number will increase automatically by one greater than the highest folder number on the m...

Page 139: ...e p 37 Drive mode Single frame advance p 61 White balance Auto p 70 Custom white balance registers Settings deleted Daylight p 70 Camera sensitivity ISO Auto p 74 Metering mode Multi segment p 69 Memory Reset to default settings p 72 Contrast compensation 0 p 79 Color saturation compensation 0 p 78 Filter 0 p 79 Focus area Wide focus frames p 33 Image size 3264 X 2448 p 82 Image quality Fine p 82 ...

Page 140: ...y p 104 Magnification button Digital zoom p 105 DSP setup DSP p 106 Subject Tracking AF On p 106 AE lock Off p 106 Display mode Single frame playback p 40 Index format 9 frames p 121 Playback Slide Show All frames p 124 Duration Slide Show 5 seconds p 124 Repeat Slide Show No p 124 Movie menu Playback menu Spot AE area Center spot p 107 Direct Manual Focus DMF Off p 107 EVF mode Quality 30fps p 10...

Page 141: ...rmation No p 145 AUDIO SIGNALS Every time a button is pressed an audio signal gives a positive confirmation of the operation The audio signals can be turned off in section 3 of the setup menu p 130 The tone of the signal can also be changed signal 1 is electrical and signal 2 is mechanical Reset default Audio signals 1 Focus signal 1 Shutter FX 1 Volume 2 Power save 3 min FOCUS SIGNALS When the sh...

Page 142: ... shut down Press the main switch to restore power SHUTTER FX VOLUME The volume of the audio signals and sound effects can be increased or decreased in section 3 of the setup menu p 130 If the volume is turned off the audio signals focus signal and shutter FX are disabled A shutter sound effect gives positive audio confirmation when the shutter is released The sound effects can be turned off in sec...

Page 143: ...me AF continually focuses the camera so the monitor image is always sharp When the grip sensor is on full time AF is activated when the camera is held the eye sensor is also employed when using the EVF With the grip sensor off full time AF is always active when using the LCD monitor and activated by the eye sensors when using the EVF When full time AF is on the EVF mode p 108 frame rate is set to ...

Page 144: ...SS F no F no SS SS F no P Program exposure A Aperture priority S Shutter priority Front dial Front dial Front dial Rear dial Rear dial Rear dial PS shift PA shift Aperture Aperture Shutter speed Shutter speed PS shift Aperture Shutter speed Exposure comp Exposure comp Exposure comp PA shift Aperture Shutter speed Exposure comp Exposure comp Exposure comp PS shift PA shift Aperture Aperture Shutter...

Page 145: ...setup menu changes the front and rear control dial operation in the manual M exposure mode Three options are available Front dial Rear dial Shutter speed Aperture SS F no F no SS Shutter speed Aperture Program manual Programmed manual both shutter speed and aperture are used to change the exposure following the camera s program line When using this camera with the optional supplementary lenses the...

Page 146: ...ww konicaminolta us Europe http www konicaminoltasupport com Users with Windows 98 or 98 second edition will need to install the driver software on the included DiMAGE software CD ROM p 148 No special driver software is required for other Windows or Macintosh operating systems Customers who have bought a previous DiMAGE digital camera and have installed the Windows 98 driver software must repeat t...

Page 147: ...camera s monitors turn off To change the card while the camera is connected to a computer see page 156 With the camera properly connected to Windows XP or Mac OS X a window opens to download the image data follow the instructions in the window A drive icon or volume appears with other operating systems the volume name varies with memory card and operating system If the computer does not recognize ...

Page 148: ... instructions on the screen No special driver software is required for other Windows operating systems AUTOMATIC INSTALLATION Before connecting the camera to the computer place the DiMAGE Viewer CD ROM in the CD ROM drive The DiMAGE installer menu should automatically activate To automatically install the Windows 98 USB driver click on the starting up the USB device driver installer button A windo...

Page 149: ...ive at Win98 USB When the location is shown in the window click Next Manual installation To install the Windows 98 driver manually follow the instructions in the connecting the camera to a computer section on page 147 When the camera is plugged into the computer the operating system will detect the new device and the add new hardware wizard window will open Place the DiMAGE Viewer CD ROM in the CD...

Page 150: ...nating the CD ROM drive will vary between computers Click Next to install the driver in the system The last window will confirm the driver has been installed Click Finish to close the add new hardware wizard Restart the computer When the my computer window is opened a new removable disk icon will be displayed Double click on the icon to access the camera s memory card see page 152 ...

Page 151: ...be damaged in this operation Unplug the USB cable and turn off the camera Remake the USB connection by reattaching the cable and turning the camera on QUICKTIME SYSTEM REQUIREMENTS To install QuickTime follow the instructions in the installer Macintosh users can download the latest version of QuickTime free of charge from the Apple Computer web site at http www apple com IBM PC AT Compatible Penti...

Page 152: ...ine fine or standard image Misc The misc folder contains DPOF print files p 126 PICT0004 JPE Extra fine fine or standard image when using embedded Adobe RGB 100KM003 10140223 TIFF image 102KM_CP From left to right standard folder date folder p 137 and copy folder p 122 PICT0002 THM PICT0002 MRW RAW image PICT0005 THM PICT0005 MOV Movie clip PICT0003 WAV PICT0003 s voice memo file PICT0004 THM File...

Page 153: ...reater than the largest file number in the folder File numbers can be controlled with the file number memory function in section 2 of the setup menu p 136 Image files contain exif tag data This data includes the time and date the image was recorded as well as the camera settings used This data can be viewed with the camera or the DiMAGE Viewer software If a camera image is opened in an image proce...

Page 154: ...ject hardware icon located on the task bar A small window will open indicating the device to be stopped WINDOWS 98 98 SECOND EDITION When more than one external device are connected to the computer repeat the procedure above except right click on the unplug or eject hardware icon This will open the unplug or eject hardware window after clicking on the small window indicating the unplug or eject ha...

Page 155: ...g the mass storage device icon and drop it into the trash Disconnect the USB cable A confirmation screen will appear to indicate the devices to be stopped Clicking OK will stop the device A third and final screen will appear to indicate the camera can be safely disconnected from the computer click OK Turn off the camera and then disconnect the USB cable MACINTOSH ...

Page 156: ...WS 98 98 SECOND EDITION 1 Turn off the camera 2 Change the memory card 3 Turn on the camera to remake the USB connection WINDOWS ME 2000 PROFESSIONAL AND XP MACINTOSH 1 Stop the USB connection using the unplug or eject hardware routine p 154 2 Turn off the camera 3 Change the memory card 4 Turn on the camera to remake the USB connection 1 Stop the USB connection by dragging the drive icon into the...

Page 157: ...be located in the universal serial bus controller or other devices location of the device manager Click on the locations to display the files The driver should be indicated with the camera name Under certain conditions the driver name may not contain the camera name However the driver will be indicated by either a question mark or exclamation point 5 Click on the driver to select it 6 Windows 2000...

Page 158: ...on the PictBridge screen Enlarged playback activated with the magnification button can be used to examine image files on the screen Confirm the transfer mode option in section 1 of the setup menu is set to PTP Connect the camera to a PictBridge compatible printer using the camera s USB cable The larger plug on the cable is connected to the printer Open the AV out USB port cover and insert the smal...

Page 159: ...ry is exhausted before the print run is complete printing is canceled Use a fully charged battery or the optional AC adapter If a minor problem occurs during printing such as the paper runs out follow the procedure recommended for the printer no action is required for the camera If a major printer error occurs press the center of the controller to end the routine Refer to the printer manual for th...

Page 160: ... the current setting highlighted If Start is displayed press the center of the controller to continue Use the up down keys to highlight the new setting Once a setting has been selected the cursor will return to the menu options and the new setting will be displayed To return to the PictBridge screen press the menu button Read the following sections on information on the menu options Pressing the m...

Page 161: ...imum number of fifty images can be printed Reset to cancel changes made with the batch print option or with the print selection screen Index print An index print of all still images on the memory card can be made The quality and size of the print can be specified with the camera menu The number of images per page varies with the printer The print setup confirmation screen is displayed before the p...

Page 162: ...The printer setup option uses the options set with the printer The date of capture and the file name can be selected for printing Data printing can also be disabled with the menu Layout The layout of the print can be set The printer setup option uses the layout parameters of the printer Borderless printing can be specified with the camera as well as the number of images per page The following are ...

Page 163: ...layed an index print is counted as one Press the central button of the controller to begin printing or press the menu button to return to the PictBridge menu Once printing begins the operation can be canceled by pressing the center of the controller The printing finished message indicates the end of the operation press the center of the controller and turn the camera off to end the routine No of p...

Page 164: ...tact a Konica Minolta service facility Err displayed on the data panel The camera is hot or it has been left in a very hot environment Turn off the camera and allow it to cool If Err is still dis played on the camera after it cools remove and replace the battery or power cord Shutter will not release 000 is dis played on the frame counter Memory card is full and unable to store an image at the ima...

Page 165: ...aken indoors or in low light situations with out flash Slow shutter speeds result in blurred images when the camera is hand held Use Anti shake or a tripod change the camera sensitivity to a higher setting p 74 or use the flash p 36 While using flash the pic tures are too dark The subject is beyond the flash range p 75 Move closer to the subject or change the camera sensitivity to a higher setting...

Page 166: ...ymptom Cause Solution Live image turns black and white Camera used under low light conditions With still images automatic monitor amplification activates under low light conditions p 34 Although the live image is black and white the recorded still image will be color In movie recording the Night Movie mode will record black and white images WHEN USING FILTERS Polarizing filters and close up lenses...

Page 167: ... 130 Region Product code When using an optional remote cord RC 1000S or RC 1000L or when operating the camera with the optional DiMAGE Capture software the cord and USB cable must have the supplied ferrite core FRC 100 attached The ferrite core reduces harmful interference Slide a thin blunt object under the two latches on the core to open it The core must be placed on the end of the cable that is...

Page 168: ...th wet hands may damage the camera When at the beach or near water take care not to expose the camera to water or sand Water sand dust or salt can damage the camera Do not leave the camera under direct sunlight Do not point the lens directly at the sun the CCD may be damaged STORAGE Store in a cool dry well ventilated area away from dust and chemicals For long periods of disuse store the camera in...

Page 169: ...ctronic components The following may cause data loss or damage Improper use of the card Bending dropping or subjecting the card to impact Heat moisture and direct sunlight Static electrical discharge or electromagnetic fields near the card Removing the card or interrupting the power supply while the camera or a computer is accessing the card reading writing formatting etc Touching the electrical c...

Page 170: ...ed recording or duplication of such material may be contrary to copyright laws Taking pictures or images of performances exhibitions etc is prohibited without approval and can infringe on copyright Images protected by copyright can only be used under the provisions within the copyright laws BATTERIES Battery performance decreases with temperature In cold environments we recommend keeping spare bat...

Page 171: ... no responsibility for any damage or loss incurred by equipment malfunction QUESTIONS AND SERVICE If you have questions about your camera or charger contact your local camera dealer or write to the Konica Minolta distributor in your area Before shipping your camera or charger for repair please contact a Konica Minolta Service Facility ...

Page 172: ...172 NOTES NOTES ...

Page 173: ...the instructions may cause harmful interference to radio communications However there is no guarantee that interference will not occur in a particular installation If this equip ment does cause harmful interference to radio or television reception which can be determined by turning the equipment off and on the user is encouraged to try to correct the interference by one or more of the following me...

Page 174: ...ata panel 17 Data imprinting 98 Date and time Displayed 19 153 Setup 20 138 Delete 41 100 119 Depth of field preview 77 136 Digital Effects Bracket 62 Controller 78 79 179 Diopter adjustment 29 Display Enlarged 43 Formats 42 45 Histogram 19 40 41 Index 42 121 Playback 19 Recording 18 45 DMF Direct Manual Focus 105 107 DPOF print 126 127 152 Electronic keyboard 98 99 138 Ev 59 111 EVF mode 108 134 ...

Page 175: ... screen 118 Image File name 152 153 Size 82 83 85 Quality 82 84 Interval Drive mode 66 Setup 96 Time lapse movie 66 Lock 121 Macro 37 49 Manual focus 47 Memory 72 73 106 Memory card Changing 26 27 Format 27 120 153 Monitor Amplification 34 104 Display 18 19 PictBridge 158 Playback Enlarged 43 Index 42 121 Instant 100 Movie 44 Single frame 40 41 Voice memo 115 Quick View 40 Recording Basic operatio...

Page 176: ...tofocusing system Video AF Shutter CCD electronic shutter plus mechanical shutter Built in flash recycling time 5s approx Viewfinder LCD 11 mm 0 44 in color filter type VGA full color display Monitor LCD 46 mm 1 8 inch low temperature polysilicon TFT Field of view Approximately 100 A D conversion 12 bits Recording media Type I and II CompactFlash cards 170MB 340MB 512MB and 1GB IBM Microdrives Fil...

Page 177: ...n battery LCD monitor on Dimensions 117 0 W X 85 0 H X 113 5 D mm 4 61 W X 3 35 H X 4 47 D in Weight Approximately 565g 19 8 oz without batteries or memory card Operating temperature 0 40 C 32 104 F Operating humidity 5 85 noncondensing Lithium ion Battery Charger BC 400 Input voltage AC 100 240V 50 60Hz Weight 86g 3 0 oz Dimensions 65 W X 90 H X 30 D mm 2 56 W X 3 54 H X 1 18 D in Lithium ion Bat...

Page 178: ...00mAh Ni MH batteries 560 frames 290 frames Based on the following test conditions full size images standard image quality EVF off LCD monitor on flash used with 50 of frames no instant playback no voice memo Approximate continuous playback performance With two NP 400 lithium ion batteries With six 2100mAh Ni MH batteries 480 minutes 270 minutes Based on the following test conditions LCD monitor o...

Page 179: ...179 Filter levels with color images Filter settings with black and white images For more on Filter effects see page 79 FILTER EXAMPLES 2 1 3 4 5 1 2 3 4 5 0 ...

Page 180: ... 2003 Konica Minolta Camera Inc under the Berne Convention and the Universal Copyright Convention 9222 2720 11 SY A312 Printed in Japan 1AG6P1P1776 0 43325 53276 4 ...

Reviews: