Konica Minolta 7013 Quick Reference Download Page 16

Level one function

Level two function

Level three function

Summary of setting

Default setting

Page

A. Autodial Entries

1.One-touch Dial

01.Enter One-Touch

Select one-touch key and register the fax dial numbers and names,

(Max. 55 locations.)

also group numbers on one-touch dial keys.

3.2

If you register the name, you can use the telephone index feature.
If you register the group number, you can use the group dialing.

02.Erase One-Touch

Erase the registration in a one-touch key.

3.3

2.Speed Dial

01.Enter Speed-Dial

Select speed-dial number and register the fax dial numbers and

(Max. 145 locations.)

names, also group numbers as Speed-Dial numbers.

3.4

If you register the name, you can use the telephone index feature.
If you register the group number, you can use the group dialing.

02.Erase Speed-Dial

Erase the registration in a speed-dial number.

3.5

3.Program One-Touch

01.Enter P One-Touch

Program several operations for a function you frequently use.

3.34

This key can reduce several steps to a simple press of a key.

02.Erase P One-Touch

Erase the programming in a programmable one-touch key.

3.48

B. User Settings

1.Machine Settings

01.Cassette Size

Select the size of paper in the paper cassette.

A4

1.9

02.Protect Passcode

Enter the protection passcode for using the security features.

3.49

03.Soft Key

Program to turn on or off any functions with just pressing this key.
Soft key 1:

SORT

See left.

3.16

Soft key 2:

FAX&COPY

Soft key 3:

BYPASS

04.Silent Mode

Mute your machine.

Off

4.8

05.Sleep Mode

Conserve power.

On

4.9

06.Fax & Copy

Make a copy of your document each time it transmit.

Off

3.20

07.Primary Mode

Determine the primary mode, Fax mode or Copy mode.

None

4.9

08.Service Mode

For technical support. Do not set this setting to on unless an 

Off

authorized technician asks you to do so.

09.Paper Source

Select paper source (paper cassette and bypass tray) for 

For Fax / Copy

4.9

fax reception or copying.

10.2-Bin Tray*

1

Select the paper tray for delivery.
• Copy exit

Lower tray

• Received fax document exit

Upper tray

4.9

• List exit

Upper tray

• PC-Fax print exit*

2

Upper tray

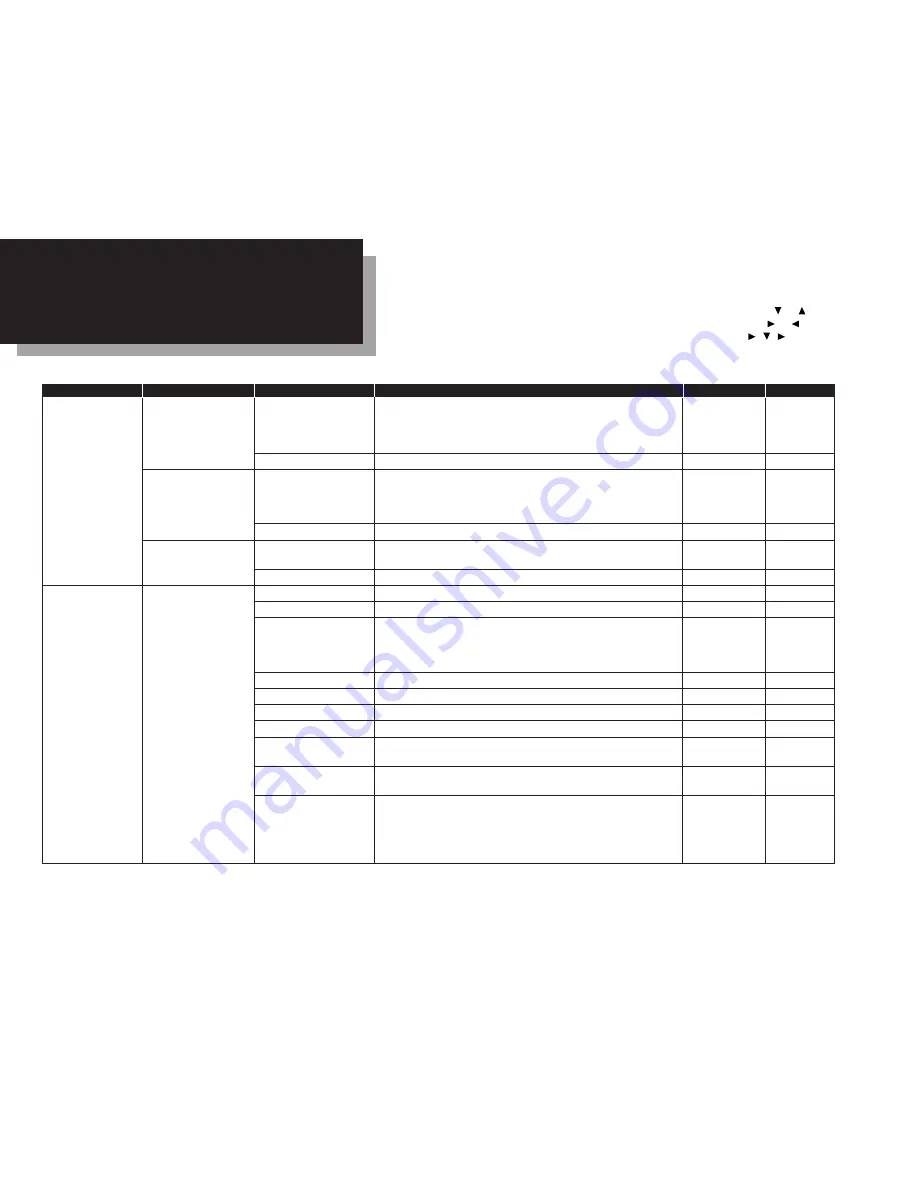
Using this function table, you can find the 

short-cut

operation you want at a glance. For example, if

you want to enter a one-touch dial, press 

Program key,

A

, 1, 0, 1,

ENTER

.

Also you can search functions using the Program key and the cursor key. Press 

or 

of the cursor

key to go down or up in this table. To go to the right or left in this table, press 

or 

of the cursor

key. For example, if you want to enter a Speed-Dial, press 

Program key,

,

,

,

ENTER

.

Note:

“Page” in the rightest column in this table means the pages in the Konica 7013 Operating
Instructions.

16

Function table

*1: This option appears only if the optional 2-Bin tray has been installed.

*2: This option appears only if the optional RS-232C interface has been installed.

Summary of Contents for 7013

Page 1: ...3 Broadcast page 4 Cancel sending a fax page 5 Making a copy Basic copy page 6 Sort copy page 7 Enlarged Reduced copy page 8 Using the Bypass tray page 10 Just in case Clearing original document jams...

Page 2: ...e one touch key 1 or Press SPEED DIAL TEL INDEX and enter the three digit identifier for the speed dial number using the numeric keypad You can set up to 50 sheets of A4 A5 or F4 sized documents in th...

Page 3: ...to Fax mode 1 Place the document on the platen glass face down and align it to the right front corner Close the platen cover 3 For ways to enter the fax number refer to step 3 on page 2 Enter the fax...

Page 4: ...he one touch key 1 or Press SPEED DIAL TEL INDEX and enter the three digit identifier for the speed dial number using the numeric keypad MONITOR MONITOR MONITOR CALL MONITOR MONITOR CALL GROUP Press C...

Page 5: ...d the number you want to cancel MONITOR MONITOR MONITOR CALL MONITOR MONITOR CALL GROUP Press COMM CANCEL CONFIRM 1 Press STOP 4 If you want to cancel the command shown press CANCEL CANCEL If you want...

Page 6: ...PY FAX to change to Copy mode 1 Press START 5 Adjust the following if necessary Select the document size by pressing the DOCUMENT SIZE Select the document type and the contrast 3 Set the document in t...

Page 7: ...s or until the setting you want appears 3 Press ENTER to save the setting Enter the number of copies using the numeric keypad 4 Helpful Tip Press SORT to turn the sort setting to on or off When the so...

Page 8: ...utomatically to fit on the paper size you selected program the following setting in advance 1 Press Program key B 3 0 4 ENTER 2 Select Enlarge Reduce by using or of the cursor key 3 Press ENTER Helpfu...

Page 9: ...Adjust the ratio by 1 percent increments using or of the cursor key You can set the ratio between 50 and 200 Adjust by 1 percent increments 1 Press 2 Enter your desired ratio 50 to 200 using the numer...

Page 10: ...on the platen glass face down 2 Open the bypass tray on the right side of your machine Pull out the hopper of the bypass tray and pull the release lever Hopper Release lever 3 Place the paper on the b...

Page 11: ...ing paper size appears If you select Other press Then press or until your desired recording paper size appears Set Bypass Ppr A4 Enter 6 When you use transparency film select Other then OHP Press STAR...

Page 12: ...out if the document jammed during transmission In this step if more than 60 seconds passes without pressing any keys the machine will begin to send or copy the document s stored during this operation...

Page 13: ...document If you cannot remove it go to step 2 Otherwise skip to step 3 1 Open the inner cover Remove the original document 2 Make sure both sides are snapped down securely If the document has become...

Page 14: ...en the top cover and the machine CAUTION Slide the printer cover release and open the printer cover 2 Remove the toner and drum cartridge 3 Pull up the top cover release and open the top cover 1 Shiel...

Page 15: ...med paper CAUTION Gently close the printer cover 6 Reset the toner and drum cartridge 5 Remove the jammed paper 4 Press firmly on the both sides of the cover until you hear it click Gently close the t...

Page 16: ...3 Soft Key Program to turn on or off any functions with just pressing this key Soft key 1 SORT See left 3 16 Soft key 2 FAX COPY Soft key 3 BYPASS 04 Silent Mode Mute your machine Off 4 8 05 Sleep Mod...

Page 17: ...ceived fax messages in memory and after print them Off 3 49 12 PIN Mode Prevent unauthorized long distance calls Off 3 51 13 Passcode Enter passcode for limiting polling access 3 15 14 Audible alarm W...

Page 18: ...ode Box Create the F Code box 3 25 02 Erase F Code Box Erase an empty F Code box 3 32 5 Batch Tx 01 Set Batch Box Create the Batch box 3 11 02 Erase Batch Box Erase an empty batch box 3 13 D Doc Manag...

Page 19: ...atch boxes 3 12 16 Batch Doc List Print a list of the document stored in the batch boxes 3 12 17 Macros List Print a list of Macro keys 3 19 2 Printer Functions 01 Demo Page 4 Print the highlight feat...

Page 20: ...Konica Business Machines Deutschland GmbH Lilienthalstrasse 1 D 21337 Luneburg Germany Tel 49 4131 886 320 Fax 49 4131 886 307 D88 90320 60...

Reviews: