background image

67

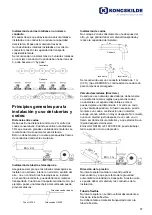
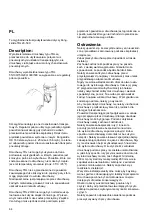
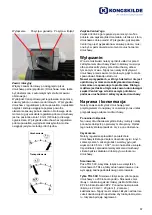
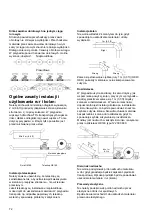
Wyłączenie 

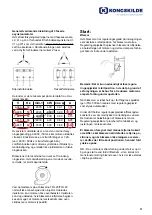
Pozycja w gwiazdę   Pozycja w trójkąt

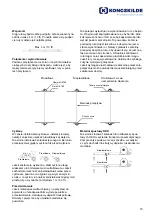
Zawór rotacyjny

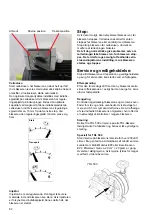
Włączyć zawór obrotowy po osiągnięciu przez 

dmuchawę pełnej prędkości. (Dmuchawa może także 

być dostarczona z automatycznym startem zaworu 

obrotowego).

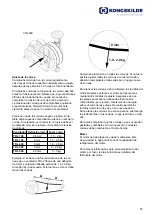
Wydajność transportowa jest regulowana za pomocą 

zasuwy poboru na zaworze obrotowym. W przypadku 

dmuchaw z regulatorem poboru powietrza, największa 

objętość zostaje osiągnięta poprzez powolne 

otwieranie zasuwy poboru zaworu obrotowego aż do 

momentu, gdy wskaźnik regulatora poboru dmuchawy 

jest na poziomie około 10 mm (3/8 cala) od lewego 

ogranicznika. W przypadku dmuchaw bez regulatora 

poboru powietrza, wydajność maksymalną można 

osiągnąć jedynie metodą prób i błędów.

Uruchamianie

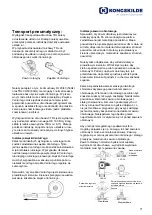
Transportowanie

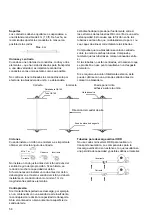
Zwężka Venturi’ego

Zwężka Venturi’ego reguluje się samoczynnie. Nie 

pobiera ona większej ilości materiału, niż taka, z którą 

dmuchawa sobie poradzi. W przypadku, gdy zwężka 

Venturi’ego jest wyposażona w zasuwę poboru, musi 

ona być w pełni otwarta w momencie uruchomienia 

dmuchawy.


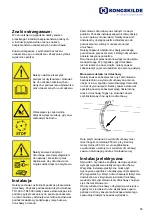
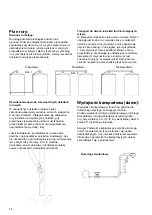
Wyłączanie:

W razie możliwości należy opróżnić układ rur przed 

zatrzymaniem dmuchawy. Zawór obrotowy musi więc 

albo zostać zatrzymany przed dmuchawą, albo w 

tym samym czasie. Nigdy nie należy zatrzymywać 

dmuchawy przed zaworem obrotowym, gdyż to może 

spowodować blokadę układu rur.

Nawet w przypadkach, w których układ rur nie jest 

opróżniony w momencie zatrzymania dmuchawy, 

normalnie nie spowoduje to problemów. Dlatego 

możliwe jest także utrzymanie zaworu obrotowego/

zwężki Venturi’ego w takim samym położeniu 

podczas uruchamiani i zatrzymywania dmuchawy.

Naprawa i konserwacja:

Należy zawsze zatrzymać dmuchawę przed 

przystąpieniem do naprawy i konserwacji oraz unikać 

przypadkowego włączenia dmuchawy.

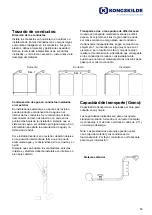
Ponowne dokręcanie

Na nowej dmuchawie wszystkie śruby i wkręty należy 

ponownie dokręcić po pierwszym dniu pracy. Oprócz 

tego należy stale sprawdzać, czy są one dokręcone.

Czyszczenie

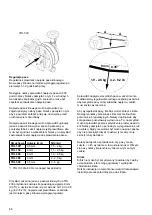
Należy regularnie sprawdzać powierzchnie 

dmuchawy/silnika pod kątem obecności pyłu i innych 

zanieczyszczeń. Jeżeli grubość warstwy pyłu jest 

większa niż 0,5 mm / 0,02", musi ona zostać usunięta. 

Częstotliwość sprawdzania/czyszczenia dmuchawy/

silnika będzie zależała od ilości pyłu w otoczeniu 

dmuchawy.

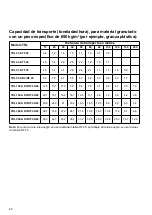
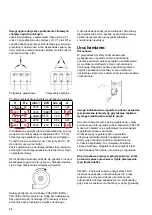
Smarowanie

Poza TRL 500, wszystkie łożyska we wszystkich 

dmuchawach TRL są fabrycznie nasmarowane i nie 

wymagają żadnego dodatkowego smarowania.

Tylko TRL 500: 

Smarować łożyska po stronie pasa 

dmuchawy co 200 roboczogodzin. Stosować smar 

litowy o minimalnej jakości takiej, jak Mobil Mobilux 

EP2 lub Esso Beacon EP2. Ponownie nasmarować 

ilością ok. 20 cm3 = 20 gram (1,2 cala kw.) 

każdorazowo. Nigdy nie smarować łożysk nadmiernie. 

Jeżeli obudowa jest napełniona zbyt dużą ilością sma

-

ru, łożyska będą się nagrzewać.

Summary of Contents for TRL 150

Page 1: ...TRL 20 500 High pressure blowers Manual Betriebsanleitung Manuel de service Instrucciones de funcionamiento Podręcznik użytkownika Brugsanvisning ...

Page 2: ... the inlet or outlet opening of the blower during operation The blower should be installed in an accessible loca tion for maintenance and repair The working area around the blower should be clear and trip free Make sure to have adequate lighting when working on the blower To avoid any unintentional contact with the rotor pipes of minimum 850 mm length with a diameter of maxi mum Ø200 mm must be in...

Page 3: ... to the room housing the blower is sufficient See that there is sufficient access for fresh air to the room from which the blower takes the suction air The blower is designed for indoor use In cases where the blower is placed outside always protect is from fall by using a cover Mounting pipe system for blower Always secure pipes mounted directly on the blower outlet by using clamps with bolts in a...

Page 4: ...n full operating current a properly dimensioned fuse will melt in case the motor is not started in star position General notes regarding connection of 3 phase asynchronous motors If the power lines with phase sequences L2 L1 and L3 are connected to the connection points U1 V1 and W1 as shown below the motor rotates anticlockwise viewed from the shaft end The direction of rotation can be changed by...

Page 5: ...ven in cases where the piping system is not clean when the blower is stopped this normally will not cause problems It is therefore also possible to keep the rotary valve venturi in the same position while starting and stopping the blower Service and maintenance Always stop the blower prior to repair and maintenance and avoid unintentional start of the blower Retightening On a new blower all bolts ...

Page 6: ...of a TRL 200 is applied resulting in a deflection of 9 mm 0 35 and the force used is between 1 9 and 2 8 kg 4 2 and 6 2 lbs the tension is correct If the force is less the belts need to be tightened A A 4 2 6 2 lb 0 35 1 9 2 8 kg 9 mm Check the tension of all the belts In case it is not pos sible to adjust one set of belts so that all the belts have the proper tension the whole set must be re plac...

Page 7: ...TRL100 at 60Hz Intake net regulation throttle and bolt clamp TRL 75 Intake net aperture and bolt clamps For TRL75 applies If the blower is used for purposes where there is a low back pressure e g drying of grain the air capacity may be so large that the motor protection relay switches off due to motor overload If this is the case mount the ring supplied in the pres sure side of the blower as illus...

Page 8: ...shown in section Electrical installation Open container to allow air to escape Replace seals Tighten or replace the V belts See section Service and maintenance The shutter is not released from start position or the function of the shutter is impeded by impurities and ne eds to be cleaned Use the correct feed See section Conveying capa city Reverse the feed see arrow on rotary valve venturi Conveyi...

Page 9: ...rial will easily fall down into the airstream If the rotary valve is placed in the opposite direction the material will not fall down into the airstream Rotary valve Venturi Also ensure that the rotor runs in the correct direction The rotor shall rotate so that the grain falls into the air entry side of the rotary valve If the rotary valve is seen as illustrated below the rotor shall run clockwise...

Page 10: ...amage to the material and there will be a loss of capacity It is recommended to use a heavier 1 m 3 3 ft pipe OKR OKD following each bend to compensate for wear Diverters When using diverters the same applies as mentioned above for bends however if space is narrow 1 m 3 3 ft between a bend and a diverter is recommended If necessary the installation of a bend following the diverter in the outlet di...

Page 11: ...13 ft Furthermore it is recommended to support the pipe as close to the bends as possible Connections and centering When connecting the pipes bends and other material which are designed for high speed conveying it is important to center the pipes as precisely as possible at the connecting points Do not rely on centering the pipe with the clamps alone The clamp is designed for pressing the OK pipe ...

Page 12: ...s 2 Right Condensed water in outdoor piping systems With outdoor piping systems condensed water will arise in the pipes especially in the winter time Therefore it is recommended to disconnect a pipe or a bend at the lowest points when the system is not to be used for a longer time in order to avoid water accumulation and rust If diverters are installed outdoor these should stay in the middle posit...

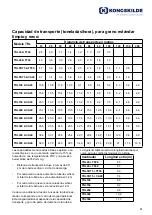
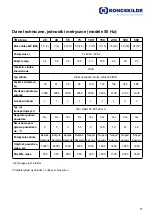
Page 13: ... 8 TRL 55 RV RF 20 8 3 7 0 6 1 5 3 4 7 4 2 3 3 2 8 2 3 1 7 TRL 100 RV RF 40 20 14 8 13 1 11 3 9 8 8 6 7 6 6 1 4 9 4 1 3 0 1 9 TRL 150 RV RF 40 20 22 1 18 7 16 2 14 1 12 5 11 1 8 8 7 2 5 9 4 4 2 8 TRL 200 RV RF 40 20 25 6 24 2 21 18 4 16 3 14 5 12 0 9 9 8 0 6 5 4 4 TRL 300 RV RF 40 20 36 7 31 4 27 4 24 1 21 6 19 4 16 0 13 4 11 4 9 1 6 6 TRL 500 RV RF 40 20 50 3 44 7 40 2 36 4 33 2 30 5 26 0 22 6 20...

Page 14: ...2628 28880 24912 21605 18959 16755 13478 10802 9039 6614 4189 TRL 150 RV RF 40 20 48721 41226 35714 31085 27557 24471 19400 15873 13007 9700 6173 TRL 200 RV RF 40 20 56437 53351 46296 40564 35935 31966 26455 21825 17637 14330 9700 TRL 300 RV RF 40 20 80908 69224 60406 53131 47619 42769 35273 29541 25132 20062 14550 TRL 500 RV RF 40 20 110891 98545 88624 80247 73192 67240 57319 49824 44092 36817 28...

Page 15: ... 6 33 1 28 8 25 4 22 7 20 4 16 8 14 1 12 0 9 6 6 9 TRL500 CA40 52 9 47 0 42 3 38 3 34 9 32 1 27 4 23 8 21 17 6 13 6 The above capacities apply to cleaned grain of a mois ture content of max 15 at an air temperature of 20 C and a barometric pressure of 760 mm Hg Lengths include two 90 bends 4 m vertical pipe outlet cyclone For each metre increase in the vertical pipeline the total pipeline is incre...

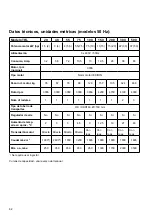
Page 16: ...tor kg 35 67 76 96 129 157 195 324 468 Rotor rpm 3000 3000 3000 3000 3650 4200 4700 4100 4300 No of rotors 1 1 1 1 1 1 1 2 3 Reccommended conveying pipe OK OKR160 Ø 160 mm Air intake regulator No No Yes No Yes Yes Yes Yes Yes Blower is heating air by app C 2 3 3 4 5 9 12 5 19 27 46 Motor connection Direct Direct Direct Direct Belt Belt Belt Belt Belt Max air volume m3 1900 2600 1800 3200 1800 1800...

Page 17: ...Norm motor IEC DIN Weight incl motor lbs 460V 100 168 280 406 430 779 1046 Weight incl motor lbs 575V 100 166 287 406 455 763 1057 Rotor rpm 3600 3600 3600 4200 4700 4100 4300 No of rotors 1 1 1 1 1 2 3 Reccommended conveying pipe OK OKR160 Ø 6 3 Air intake regulator No No Yes Yes Yes Yes Yes Blower is heating air by app C 35 37 48 54 66 81 115 Motor connection Direct Direct Direct Belt Belt Belt ...

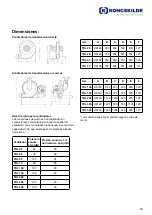
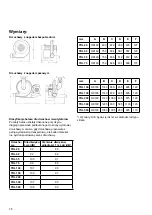
Page 18: ...759 834 397 557 123 TRL 55 OK160 759 836 412 572 125 TRL 75 OK160 759 826 451 699 115 Direct driven 60Hz models inch A B C D E F TRL 30 OK160 24 8 27 4 16 1 22 0 5 9 TRL 50 OK160 27 8 27 4 16 1 22 0 5 9 TRL 100 OK160 29 9 33 3 17 2 26 9 5 4 Dimensions D and E will vary according to motor type Belt driven 50Hz models mm A B C D E F TRL 100 OK160 1140 830 435 695 120 TRL 150 OK160 1140 830 435 695 1...

Page 19: ...d gesichert sein um zu verhindern dass das Gebläse versehentlich gestartet wird Fassen Sie niemals mit der Hand in die Ein oder Austrittsöffnung des Gebläses während es in Betrieb ist Das Gebläse sollte an einem für Wartungs und Reparaturarbeiten leicht zugänglichen Ort installiert werden Der Arbeitsbereich um das Gebläse herum sollte sauber und stolperfrei sein Sorgen Sie für ausreichende Beleuch...

Page 20: ...s am Austritt des Hochdruckgebläses montierte Rohr muss eine Mindestlänge von 850 mm und einen maximalen Durchmesser von 200 mm haben um jeglichen Kontakt mit dem Gebläse Zellenrad schleusen Rotor zu verhindern Elektromontage Überprüfen Sie ob der Netzanschluss vor Ort den Anforderungen der elektrischen Betriebsmittel entspricht Die Förderluft erhitzt sich während sie das Gebläse durchströmt wodur...

Page 21: ...ern Dreieck Schalter so ist es immer mit dem Schalter in Stern Stellung zu starten Sobald der Rotor nicht weiter beschleunigt ist auf Dreieck Stellung umzu schalten wodurch die volle Leistung erreicht wird Alle Elektroinstallationen sind gemäß den aktuellen örtlichen Richtlinien durchzuführen Wird das Gebläse ab Werk mit Schaltkasten geliefert findet sich dort ein Schaltplan Allgemeine Hinweise be...

Page 22: ...mgebung des Gebläses ab wie oft eine Kontrolle Reinigung des Gebläses und des Motors erforderlich ist Schmierung Mit Ausnahme des TRL 500 sind die Lager aller TRL Gebläse ab Werk geschmiert und bedürfen keiner weiteren Schmierung Speziell für das TRL 500 gilt Die Lager an der Riemenseite des Gebläses sind alle 200 Arbeits stunden abzuschmieren Bitte verwenden Sie lithiumverseifte Fette mit einer Q...

Page 23: ...Riemen pannung korrekt wenn eine Kraft zwischen 1 9 und 2 8 kg erforderlich ist um diese Durchbiegung zu erreichen Wird weniger Kraft aufgewandt sind die Riemen zu spannen TRL 500 1 9 2 8 kg 9 mm A A Kontrollieren Sie stets alle Riemen Ist es nicht möglich einen Satz Riemen so zu spannen dass alle Riemen die erforderliche Spannung haben ist der ganze Riemensatz auszutauschen Um die Riemen zu spann...

Page 24: ...g TRL 55 TRL 100 bei 60Hz Eintrittsgitter Drosselklappe und Schraubkupplung TRL 75 Eintrittsgitter Blende und Schraubkupplung Für das TRL 75 gilt Wird das Gebläse für Einsatzzwecke mit niedrigem Gegendruck verwendet z B für die Trocknung von Getreide kann die Luftleistung so hoch werden dass der Motorschutzschalter wegen Überlastung des Motors auslöst Ist dies der Fall montieren Sie den im Lieferu...

Page 25: ...siehe Abschnitt Elektrischer Anschluss Öffnen Sie den Behälter damit die Förderluft en tweichen kann Dichtungen austauschen Keilriemen spannen oder austauschen Siehe Ab schnitt Wartung Einlassregler ist in Startposition verriegelt oder seine Funktion durch Verschmutzung gehemmt Sorgen Sie für korrekte Einspeisung Siehe Abschnitt Förderkapazität Zellenradschleuse Injektor umdrehen siehe Pfeil auf Z...

Page 26: ...eitung spielt für die Förder leistung eines TRL Gebläses eine große Rolle Deshalb sind untenstehende Anweisungen bei der Rohrleitungsinstallation für das Gebläse zu befolgen Dient das TRL Gebläse der pneumatischen Förderung ist eine Zellenradschleuse oder ein Injektor einzusetzen um das Material in die Rohrleitung einzuspeisen Die Gebläse TRL 20 TRL 40 dürfen normalerweise nicht ohne Injektor betr...

Page 27: ...n da es eine zu hohe Geschwindigkeit bekommen würde Zudem besteht die Gefahr sowohl das Material als auch die Rohrleitung Bögen zu beschädigen Hingegen reduziert sich die Kapazität erheblich wenn Material durch viele Zellenradschleusen in derselben Rohrleitung gefördert wird Maximal 3 Zellenradschleusen in einer Rohrleitung sind daher zu empfehlen Bei mehr als 3 Zellenrad schleusen kann ein Bypass...

Page 28: ... Prüfen Sie die Lücke zwischen Kupplung und Rohr sorgen Sie dafür dass sie auf beiden Seiten gleich ist Unterziehen Sie die Rohrleitung hinsichtlich ihrer Geradlinigkeit einer Sichtprüfung Sind die Rohre nicht zentriert führt der höhere Abnutzungsgrad an der Verbindung zu schnellerem Verschleiß Wird eine vollständig dichte Verbindung gewünscht können Sie die Anschlussstelle vor Montage der Kupplun...

Page 29: ...Richtig Kondenswasser bei Rohrsystemen im Freien Bei Rohrsystemen im Freien kann sich besonders im Winter in den Rohren Kondenswasser bilden Wird ein Rohrsystem längere Zeit nicht genutzt empfiehlt es sich daher ein Rohr oder einen Bogen am tiefsten Punkt zu trennen um Wasseransammlungen und Rost zu vermeiden Sind Rohrweichen im Freien montiert sollten diese in mittlerer Position stehen damit sich...

Page 30: ... 5 3 4 7 4 2 3 3 2 8 2 3 1 7 TRL 100 RV RF 40 20 14 8 13 1 11 3 9 8 8 6 7 6 6 1 4 9 4 1 3 0 1 9 TRL 150 RV RF 40 20 22 1 18 7 16 2 14 1 12 5 11 1 8 8 7 2 5 9 4 4 2 8 TRL 200 RV RF 40 20 25 6 24 2 21 18 4 16 3 14 5 12 0 9 9 8 0 6 5 4 4 TRL 300 RV RF 40 20 36 7 31 4 27 4 24 1 21 6 19 4 16 0 13 4 11 4 9 1 6 6 TRL 500 RV RF 40 20 50 3 44 7 40 2 36 4 33 2 30 5 26 0 22 6 20 0 16 7 12 9 Bemerkung Oberhal...

Page 31: ...ge m TRL20 TF20 4 5 TRL40 TF40 5 7 TRL55 75 TF55 5 9 TRL55 75 CA20 7 4 TRL100 8 9 TRL150 9 2 TRL200 9 6 TRL300 10 2 TRL500 11 3 Förderleistung Tonnen Stunde für standardmäßig vorgereinigtes und getrocknetes Getreide Typ Förderlänge in Metern 10 20 30 40 50 60 80 100 120 150 200 TRL20 TF20 2 5 2 0 1 7 1 4 1 2 1 0 0 7 0 5 TRL40 TF40 4 3 3 6 3 0 2 6 2 3 2 0 1 6 1 2 TRL55 75 TF55 4 7 3 9 3 3 2 9 2 5 2...

Page 32: ...U min 3000 3000 3000 3000 3650 4200 4700 4100 4300 Anzahl Rotoren 1 1 1 1 1 1 1 2 3 Empfohlener Förderrohrtyp OK OKR160 Ø 160 mm Lufteinlassregler Nein Nein Ja Nein Ja Ja Ja Ja Ja Das Gebläse erwärmt die Luft um ca C 2 3 3 4 5 9 12 5 19 27 46 Motoranschluss Direkt Direkt Direkt Direkt Keilrie men Keilrie men Keilrie men Keilrie men Keil rie men Luftleistung ca m h 1900 2600 1800 3200 1800 1800 180...

Page 33: ...eistung Lwa dB Schalldruck in 1 meter Abstand LpA dB TRL 20 92 83 TRL 40 92 82 TRL 55 105 91 TRL 75 99 85 TRL 100 101 90 TRL 150 109 97 TRL 200 TRL 300 107 93 TRL 500 108 93 mm A B C D E F TRL 20 OK160 630 672 330 478 127 TRL 40 OK160 759 834 397 557 123 TRL 55 OK160 759 836 412 572 125 TRL 75 OK160 759 826 451 699 115 mm A B C D E F TRL 100 OK160 1140 830 435 695 120 TRL 150 OK160 1140 830 435 69...

Page 34: ... sur le ventilateur Pour éviter tout contact involontaire avec le rotor des tuyaux d une longueur minimale de 850 mm et d un diamètre maximal de Ø200 mm doivent être installés sur les raccords d admission et de sortie Ces tuyaux doivent être installés avec des colliers de serrage à vis où des outils sont nécessaires pour le démontage Utilisez toujours le collier de sécurité spé ciale fournie avec ...

Page 35: ...ngueur minimale de 850 mm avec un diamètre de 200 mm maximum afin d éviter toute possibilité de contact avec le rotor du ventilateur vanne rotative lors du montage du tuyau Installation électrique Vérifiez que l alimentation électrique correspondent aux spécifications requises par le ventilateur Toutes les installations électriques doivent être effec tuées conformément à la législation en vigueur ...

Page 36: ...mitée de manière à ne pas dépasser le courant nominal du moteur voir la plaque signalétique du moteur Démarrage Ventilateur Dans les cas où le ventilateur est équipé d un régula teur d admission d air pensez à le verrouiller En position de départ avant de démarrer le moteur Le régulateur d admission d air limite la capacité d air du ventilateur afin de réduire la charge du moteur et donc la consom...

Page 37: ...it arrêtée avant le ventilateur soit simultanément Ne jamais arrêter le ventilateur avant l écluse car cela pourrait boucher le système de tuyauterie Même dans les cas où le système de tuyauterie n est pas propre lorsque le ventilateur est arrêté cela ne pose normalement pas de problèmes Il est donc également possible de maintenir la vanne rotative le venturi dans la même position lors du démarrag...

Page 38: ...raissez les roulements du côté de la courroie de soufflante toutes les 200 heures de travail Utilisez une graisse à base de lithium de qualité minimale comme Mobil Mobilux EP2 ou Esso Beacon EP2 Regrease avec env 20 cm3 20 grammes à chaque fois Ne jamais trop graisser les roulements Si le boîtier contient trop de graisse les roulements chaufferont Tension des courroies Vérifiez régulièrement la te...

Page 39: ...ection commande de réglage et collier de serrage à boulon TRL 75 Grille de protection cône d admission et colliers de serrage à boulons Le principe suivant s applique à TRL75 Si le ventilateur est utilisé à des fins où règne une basse contre pression notamment pour le séchage des céréales le débit d air risque d être tellement élevé que le relais de protection moteur s arrêtera en raison d une sur...

Page 40: ... dans la section Installation élec trique Ouvrir le conteneur pour permettre à l air de s échapper Remplacez les joints Serrer ou remplacer les courroies trapézoïdales Voir la section Service et maintenance L obturateur n est pas relâché depuis la position de démarrage ou le fonctionnement de l obturateur est gêné par les impuretés et les nébuleuses à net toyer Utilisez le bon flux Voir la section...

Page 41: ...onséquent lisez attentivement les instructions suivantes concernant la mise en place du système de tuyauterie Lors de l utilisation du ventilateur TRL pour le transport pneumatique la matière doit être introduite dans le système de canalisation par une vanne rotative ou un venturi Veuillez noter que les ventilateurs TRL 20 40 50Hz et TRL 30 50 60Hz ne doivent normalement pas fonctionner sans ventu...

Page 42: ...transport La vitesse élevée endommagera la matière et les tuyaux coudes Tuyau flexible N essayez pas de souffler dans les sections de tuyau de descente flexible Des dommages sur la matière et à la conduite flexible se produiront Principes généraux pour l ins tallation et l utilisation de tuyaux et coudes Distance entre les coudes Il doit y avoir une distance minimale de 2 m 6 6 pieds entre chaque ...

Page 43: ...st fait l effet du cyclone est plus ou moins neutralisé S il est nécessaire d installer un coude avant le cy clone celui ci doit s orienter dans le même sens que le cyclone ou un tuyau droit d au moins 1 m 3 3 pieds doit être installé entre eux Pertes de charges Par exemple si une matière est transportée dans un conteneur avec une sortie d air inadéquate la contre pression réduira la capacité de t...

Page 44: ... les tuyauteries extérieures de la condensa tion se formera dans les tuyaux surtout en hiver Par conséquent il est recommandé de déconnecter un tuyau ou un coude aux points les plus bas lorsque le système ne doit pas être utilisé pendant une période prolongée afin d éviter l accumulation d eau et la rouille Si les bypass sont installés à l extérieur ils doivent rester en position médiane afin que ...

Page 45: ...55 RV RF 20 8 3 7 0 6 1 5 3 4 7 4 2 3 3 2 8 2 3 1 7 TRL 100 RV RF 40 20 14 8 13 1 11 3 9 8 8 6 7 6 6 1 4 9 4 1 3 0 1 9 TRL 150 RV RF 40 20 22 1 18 7 16 2 14 1 12 5 11 1 8 8 7 2 5 9 4 4 2 8 TRL 200 RV RF 40 20 25 6 24 2 21 18 4 16 3 14 5 12 0 9 9 8 0 6 5 4 4 TRL 300 RV RF 40 20 36 7 31 4 27 4 24 1 21 6 19 4 16 0 13 4 11 4 9 1 6 6 TRL 500 RV RF 40 20 50 3 44 7 40 2 36 4 33 2 30 5 26 0 22 6 20 0 16 7...

Page 46: ...6 9 TRL500 CA40 52 9 47 0 42 3 38 3 34 9 32 1 27 4 23 8 21 17 6 13 6 Les capacités sus mentionnées s appliquent aux grains nettoyés avec une teneur en eau de 15 au maximum à une température de l air de 20 C et une pression atmosphérique de 760 mm Hg Les valeurs sont basées sur 2 coudes à 90 4 m de tuyau vertical cyclone de déchargement Pour chaque mètre ajouté à la longueur des tuyaux verticaux la...

Page 47: ... DIN Poids moteur compris kg 35 67 76 96 129 157 195 324 468 Rotor tours min 3000 3000 3000 3000 3650 4200 4700 4100 4300 Nombre de rotors 1 1 1 1 1 1 1 2 3 Type de tuyauterie OK OKR160 Ø 160 mm Entrée d air Av régulateur No No Oui No Oui Oui Oui Oui Oui Elévation de la tem pérature de l air par app C 2 3 3 4 5 9 12 5 19 27 46 Connection moteur Direct Direct Direct Direct Belt Belt Belt Belt Belt ...

Page 48: ...wa dB La plus grande pres sion 1 m LpA dB TRL 20 92 83 TRL 40 92 82 TRL 55 105 91 TRL 75 99 85 TRL 100 101 90 TRL 150 109 97 TRL 200 TRL 300 107 93 TRL 500 108 93 mm A B C D E F TRL 20 OK160 630 672 330 478 127 TRL 40 OK160 759 834 397 557 123 TRL 55 OK160 759 836 412 572 125 TRL 75 OK160 759 826 451 699 115 mm A B C D E F TRL 100 OK160 1140 830 435 695 120 TRL 150 OK160 1140 830 435 695 120 TRL 2...

Page 49: ...ento y evite cualquier arranque del mismo de manera accidental Nunca introduzca sus manos en la sección de entrada o salida del ventilador mientras éste se encuentre en funcionamiento En caso de que vibraciones extrañas o ruido pare el ventilador inmediatamente y solicite una revisión del mismo No realice Vd mismo ningún tipo de reparación en el rodete del ventilador En case de que el rodete esté ...

Page 50: ...o de aire fresco al recinto donde se ubica el equipo sea suficiente El ventilador está diseñado para su uso en interiores En caso de tener que montarlo en el exterior proteja siempre el ventilador mediante un tejadillo Montaje de los tubos en el ventilador Siempre es necesario montar las tuberías directamente en la salida de ventilador de aspiración mediante el uso de abrazaderas con tornillos de ...

Page 51: ...venturi puede omitirse si el volumen de aire está limitado eléctricamente ver placa motor Puesta en marcha Ventilador En aquellos modelos que van equipados con regulador de aire recuerde fijarlo en la posición de arranque antes de poner en marcha el ventilador El regulador de aire limita el caudal de aire del ventilador con el fin de no sobrecargar el motor y por tanto limitar la punta de consumo ...

Page 52: ...so en aquellos casos en que los conductos no estén libres de material cuando se pare el ventilador ésto normalmente no causará problemas Por tanto es también posible mantener la válvula tajadera de la válvula rotativa venturi en la misma posición durante la puesta en marcha paro del ventilador Servicio y mantenimiento Pare siempre el ventilador antes de efectuar cualquier trabajo de reparación o m...

Page 53: ...a una deflexión de 9 mm y la fuerza utilizada está entre 1 9 y 2 8 kg la tensión es la adecuada Si la fuerza es menor debe tensar las correas Compruebe la tensión en todas las correas Si no fuera posible ajustar todas las correas a la misma tensión deberán reemplazarse todas ellas por un juego nuevo de correas Para tensar las correas deben aflojarse los tornillos del motor Desplace entonces el mot...

Page 54: ...55 TRL100 a 60Hz Rejilla de entrada regulación y abrazaderas de tornillo TRL 75 Rejilla de entrada abertura y abrazaderas de tornillo Para TRL75 Si el ventilador se utiliza para aplicaciones donde exis ta una baja pérdida de carga del circuito como por ejemplo secado de grano el caudal de aire resultante puede ser demasiado elevado y hacer saltar el térmico por sobrecarga de motor Si este fuera el...

Page 55: ...er aparta do Cableado Abra el contenedor para partir la sa lida del aire Cambie las juntas Tense o cambia las correas Ver apartado Mantenimiento La válvula no se ha liberado de la posición de arranque o el funcionami ento de la válvula está impedido por suciedad Use una correcta alimentación Ver apartado Transporte neumático Cambie el sentido de giro la rotativa ver flecha del sentido de giro El s...

Page 56: ...aterial caiga fácilmente en el interior de la tubería Válvula rotativa Venturi Deflector Caudal de aire CAD 40 CAD 30 CAD 20 Compuerta para regu lar la alimentación de material Compuerta Correcto Incorrecto Tolva de entrada considerablemente mayor que el conducto de alimentación CAD 50 Si la válvula rotativa se coloca en el sentido equivocado el material no caerá en el interior de la tubería Asegú...

Page 57: ...ón de codos No coloque 2 codos directamente uno después del otro ya que podría dañar el material transportado y reduce la capacidad del sistema Se recomienda usar un conducto reforzado de 1 m 3 3 ft tipo OKR OKD a continuación de cada codo para compensar el desgaste Válvula desviadoras Diverters Cuando se usen válvulas desviadoras debe tenerse en cuenta las mismas reglas que para los codos no obst...

Page 58: ...ado Cuando se unen tramos de conductos codos y otros elementos que han sido diseñados para transportar a una alta velocidad es importante centrar los conductos en las uniones tanto como sea posible No confíe en tener alineados los conductos solo por efecto de la abrazadera de unión La abrazadera está diseñada para presionar fuertemente entre sí los extremos de las tuberías OK con el fin de una alt...

Page 59: ...e agua en conductos instalados en el exterior En instalaciones exteriores en épocas de invierno puede producirse condensación de agua en el interior de los conductos Se recomienda por tanto desconectar un tramo de tubería o un codo en los puntos más bajos de la instalación siempre que el sistema no vaya a ser utilizado por algún tiempo Con ello también se evitará la acumulación de agua y la formac...

Page 60: ... 0 0 8 TRL 55 RV RF 20 8 3 7 0 6 1 5 3 4 7 4 2 3 3 2 8 2 3 1 7 TRL 100 RV RF 40 20 14 8 13 1 11 3 9 8 8 6 7 6 6 1 4 9 4 1 3 0 1 9 TRL 150 RV RF 40 20 22 1 18 7 16 2 14 1 12 5 11 1 8 8 7 2 5 9 4 4 2 8 TRL 200 RV RF 40 20 25 6 24 2 21 18 4 16 3 14 5 12 0 9 9 8 0 6 5 4 4 TRL 300 RV RF 40 20 36 7 31 4 27 4 24 1 21 6 19 4 16 0 13 4 11 4 9 1 6 6 TRL 500 RV RF 40 20 50 3 44 7 40 2 36 4 33 2 30 5 26 0 22 ...

Page 61: ...6 6 9 TRL500 CA40 52 9 47 0 42 3 38 3 34 9 32 1 27 4 23 8 21 17 6 13 6 Las capacidades mencionadas arriba se aplican a ce reales limpios con un contenido máximo de 15 de humedad a una temperatura de 20 C y una presión barométrica de 760 mm Hg Distancia de transporte incluye 2 curvas de 90 4 m de tubería vertical ciclón de descarga Por cada metro que se aumenta la tubería vertical el total de la tu...

Page 62: ... 157 195 324 468 Rotor rpm 3000 3000 3000 3000 3650 4200 4700 4100 4300 Núm of rodetes 1 1 1 1 1 1 1 2 3 Tipo de tubería de transportes OK OKR160 Ø 160 mm Regulador de aire No No Si No Si Si Si Si Si Aumento de temp aire en aprox C 2 3 3 4 5 9 12 5 19 27 46 Transmisión motor Directa Directa Directa Directa Cor reas Cor reas Cor reas Cor reas Cor reas Caudal máx m3 1900 2600 1800 3200 1800 1800 180...

Page 63: ... Lwa dB Presión sonora a 1 m de distancia LpA dB TRL 20 92 83 TRL 40 92 82 TRL 55 105 91 TRL 75 99 85 TRL 100 101 90 TRL 150 109 97 TRL 200 TRL 300 107 93 TRL 500 108 93 mm A B C D E F TRL 20 OK160 630 672 330 478 127 TRL 40 OK160 759 834 397 557 123 TRL 55 OK160 759 836 412 572 125 TRL 75 OK160 759 826 451 699 115 mm A B C D E F TRL 100 OK160 1140 830 435 695 120 TRL 150 OK160 1140 830 435 695 12...

Page 64: ...ność podczas pracy na posadz kach z cienką warstwą granulatu Granulat może spowodować że posadzka będzie bardzo śliska Należy zawsze zatrzymać dmuchawę przed przystąpieniem do naprawy i konserwacji oraz unikać przypadkowego włączenia dmuchawy Nigdy nie wolno wkładać swoich dłoni do otworu wlo towego lub wylotowego dmuchawy w trakcie jej pracy W przypadku nienormalnych wibracji lub hałasu należy na...

Page 65: ...cje elektryczne muszą być wykonywane zgodnie z obowiązującymi przepisami W przypadkach w których dmuchawa jest fabrycznie dostarczona ze skrzynką sterowniczą dmuchawy wewnątrz skrzynki sterowniczej dmuchawy znajduje się schemat sterowania Obroty wirnika dmuchawy odbywają się w kierunku zgodnym z kierunkiem ruchu wskazówek zegara patrząc od strony zasysania Niezapewnienie tego spowoduje drastyczny ...

Page 66: ...ążony Zwężkę Venturiego można jednak pominąć jeżeli wydajność dmuchawy jest ograniczona w ten sposób że prąd znamionowy silnika nie jest przekroczony patrz tabliczka znamionowa na silniku Uruchamianie Dmuchawa W przypadkach w których dmuchawa jest wyposażona w regulator poboru powietrza na poborze powietrza należy pamiętać o zablokowaniu jej w położeniu startowym przed uruchomieniem dmuchawy Regul...

Page 67: ...e spowodować blokadę układu rur Nawet w przypadkach w których układ rur nie jest opróżniony w momencie zatrzymania dmuchawy normalnie nie spowoduje to problemów Dlatego możliwe jest także utrzymanie zaworu obrotowego zwężki Venturi ego w takim samym położeniu podczas uruchamiani i zatrzymywania dmuchawy Naprawa i konserwacja Należy zawsze zatrzymać dmuchawę przed przystąpieniem do naprawy i konser...

Page 68: ...a Regularnie sprawdzać napięcie pasa klinowego Nowe pasy klinowe normalnie wymagają regulacji po pierwszych 1 2 godzinach pracy Następnie należy sprawdzać napięcie pasa co 500 godzin pracy Należy pamiętać o tym że w trudnych warunkach eksploatacyjnych konieczne może być częstsze sprawdzanie napięcia pasa Napięcie pasa klinowego można sprawdzać po zdjęciu pokrywy osłony pasa Należy pamiętać o tym a...

Page 69: ... przy 60 Hz siatka wlotowa przepustnica regulacyjna i klamra skręcana na śrubę TRL 75 Siatka wlotowa redukcja i klamra skręcana na śrubę Dotyczy TRL75 Jeśli dmuchawa jest używana do celów w których występuje niski opór np przy suszeniu granulatu wydajność powietrza może być tak duża że przekaźnik zabezpieczający silnik wyłącza się z powodu przeciążenia silnika W takim przypadku zamontuj dostarczon...

Page 70: ...k obrotu Patrz dział Okablowanie Otworzyć pojemnik aby umożliwić ulatnianie się po wietrza Wymienić uszczelki Napiąć lub wymienić pasy klinowe Patrz dział Kon serwacja Nie następuje zwolnienie zasuwy z położenia star towego lub funkcjonowanie zasuwy jest utrudnione przez zanieczyszczenia Należy użyć odpowiedniej nadawy Patrz dział Wydajność transportowa Zmienić kierunek nadawy sprawdzić strzałkę n...

Page 71: ...portowa dmuchaw TRL zależy od ustawienia układu rur Dlatego należy uważnie przeczytać poniższe instrukcje dotyczące ustawień układu rur W przypadku stosowania dmuchawy TRL do transportu pneumatycznego materiał musi być podawany do układu rurowego za pomocą zaworu obrotowego lub zwężki Venturi ego Należy pamiętać o tym że dmuchawy RL 20 40 50Hz oraz TRL 30 50 60Hz nie mogą być normalnie eksp loatow...

Page 72: ...runek przepływu Rura OK160 Teleskop OK160 Right Wrong Wrong 1 m 3 3 ft 9 0 45 4 5 Nieprawidłowo Prawidłowo Min 2 m 6 6 ft Instalacja kolan Nie wolno wkładać 2 kolan tyłem do tyłu gdyż spowoduje to uszkodzenie materiału i utratę wydajności Zaleca się stosowanie cięższej rury 1 m 3 3 ft OKR OKD po każdym kolanie w celu skompensowania zużycia Rozdzielacze W przypadku użycia zasilaczy to samo dotyczy ...

Page 73: ...odparty albo zawieszony na odcinku maks 4 m 13 ft Ponadto zaleca się podpar cie rury możliwie jak najbliżej kolan Połączenia i wyśrodkowanie Podczas przyłączania rur kolan i innych materiałów służących do szybkiego transportu ważne jest aby maksymalnie precyzyjnie wycentrować rury w punk tach przyłączeń Nie polegać wyłącznie na wycentrowaniu rur z obejma mi Obejma jest zaprojektowana tak aby bardz...

Page 74: ...nych układach rurowych W zewnętrznych układach rurowych ilość skondensowanej wody wzrośnie w rurach zwłaszcza w okresie zimowym Dlatego zaleca się odłączenie rury lub kolana w najniższych punktach gdy przewiduje się wyłączenie układu z użytkowania przez dłuższym okres czasu w celu zapobieżenia nagromadzenia się wody i rdzy Jeżeli rozdzielacze są instalowane na zewnątrz powinny one pozostać w położ...

Page 75: ...1 0 0 8 TRL 55 RV RF 20 8 3 7 0 6 1 5 3 4 7 4 2 3 3 2 8 2 3 1 7 TRL 100 RV RF 40 20 14 8 13 1 11 3 9 8 8 6 7 6 6 1 4 9 4 1 3 0 1 9 TRL 150 RV RF 40 20 22 1 18 7 16 2 14 1 12 5 11 1 8 8 7 2 5 9 4 4 2 8 TRL 200 RV RF 40 20 25 6 24 2 21 18 4 16 3 14 5 12 0 9 9 8 0 6 5 4 4 TRL 300 RV RF 40 20 36 7 31 4 27 4 24 1 21 6 19 4 16 0 13 4 11 4 9 1 6 6 TRL 500 RV RF 40 20 50 3 44 7 40 2 36 4 33 2 30 5 26 0 22...

Page 76: ...25 4 22 7 20 4 16 8 14 1 12 0 9 6 6 9 TRL500 CA40 52 9 47 0 42 3 38 3 34 9 32 1 27 4 23 8 21 17 6 13 6 Powyższe wydajności dotyczą oczyszczonego ziarna o zawartości wilgoci maks 15 przy temperaturze powi etrza wynoszącej 20 C i ciśnieniu barometrycznym 760 mm Hg Długości obejmują dwa kolana 90 4 m rury pi onowej cyklon wylotowy Dla każdego metra wzrostu w rurze pionowej całkowity wymiar rurociągu ...

Page 77: ...irnika 3000 3000 3000 3000 3650 4200 4700 4100 4300 Liczba wirników 1 1 1 1 1 1 1 2 3 Typ rur transportujących OK OKR160 Ø 160 mm Regulator poboru powietrza No No Yes No Yes Yes Yes Yes Yes Dmuchawa pod grzewa powietrze o ok C 2 3 3 4 5 9 12 5 19 27 46 Połączenie silnika Bezpoś złączenie Bezpoś złączenie Bezpoś złączenie Bezpoś złączenie Napęd pasowy Napęd pasowy Napęd pasowy Napęd pasowy Napęd pa...

Page 78: ...Lwa dB Ciśnienie dźwięku w odległości 1 m LpA dB TRL 20 92 83 TRL 40 92 82 TRL 55 105 91 TRL 75 99 85 TRL 100 101 90 TRL 150 109 97 TRL 200 TRL 300 107 93 TRL 500 108 93 mm A B C D E F TRL 20 OK160 630 672 330 478 127 TRL 40 OK160 759 834 397 557 123 TRL 55 OK160 759 836 412 572 125 TRL 75 OK160 759 826 451 699 115 mm A B C D E F TRL 100 OK160 1140 830 435 695 120 TRL 150 OK160 1140 830 435 695 12...

Page 79: ...tion og vedligeholdelse Det er ikke tilladt at foretage reparationer på blæserens rotor Hvis rotoren er beskadiget skal den udskiftes Brug ikke motorer og transmissioner som giver blæse ren højere omdrejningstal end den er beregnet til Transportluften opvarmes når den passerer gennem blæseren Blæserens overflader kan derfor blive var me Pas derfor på ved berøring af blæseren Alle el installationer...

Page 80: ...oldelse Sørg også for at der er tilstrækkelig tilgang af køleluft til rummet hvor blæseren skal opstilles Vær opmærksom på at der er tilstrækkelig friskluft tilførsel til rummet som blæseren tager indsugnings luften fra Blæseren er beregnet til indendørs brug Hvis blæse ren placeres udendørs skal den overdækkes så den er beskyttet mod nedbør Tilkobling af rørsystem til højtryksblæserens afgang Rør...

Page 81: ...der ikke startes i stjerne positionen Generelt vedrørende tilslutning af 3 fasede asynkronmotorer Hvis strømforsyningsledningerne med fasesekvensen L2 L1 og L3 er forbundet til forbindelsespunkterne U1 V1 og W1 som vist nedenfor drejer motoren mod uret set fra akselenden Rotationsretningen kan ændres ved at bytte forbindelserne mellem 2 faser Stjerneforbindelse Trekantforbindelse Herunder er vist ...

Page 82: ...en blokeres Det vil dog normalt ikke give problemer selv om rørledningen ikke blæses ren før blæseren stop pes Det er derfor også muligt at fastholde celle slusens injektorens indstilling mens blæseren startes og stoppes Service og vedligeholdelse Stop altid blæseren ved reparation og vedligeholdelse og sørg for at den ikke kan startes ved en fejltagelse Efterspænding Efter den første dags drift m...

Page 83: ...il en TRL 200 så den får en nedbøjning på 9 mm er rem spændingen korrekt hvis der skal anvendes en kraft mellem 1 9 og 2 8 kg til at give denne nedbøjning Hvis der skal anvendes en mindre kraft skal remmene strammes 1 9 2 8 kg 9 mm A A Kontroller alle remme Hvis det ikke er muligt at justere alle remme så de bliver lige stramme skal hele sættet udskiftes Når remmene skal strammes løsnes boltene so...

Page 84: ... TRL 75 Indsugningsgitter blænde og boltkobling Der må ikke anvendes lynkoblinger på blæserens ind og afgang se afsnittet Sikkerhedshenvisning For TRL75 gælder Hvis blæseren anvendes til formål hvor der er et lavt modtryk f eks tørring af korn kan luftydelsen blive så stor at motorværnet kobler ud fordi motoren bliver overbelastet Hvis dette er tilfældet monteres den medfølgende ring i blæserens a...

Page 85: ...øbsretning for blæser er vist i afsnittet El tilslutning Åbn så transportluften kan komme væk fra containeren Udskift tætningerne Stram eller udskift kileremmene Se afsnittet Service og vedligeholdelse Spjældet er låst i startposition eller funktionen er hæmmet af uren heder og skal renses Brug den rigtige cellesluse injektor se afsnittet Transportkapacitet Vend celleslusen injektoren se pilen på ...

Page 86: ...des luften op i rotoren så materialet ikke kan falde ud Cellehjulet i celleslusen skal dreje den rigtige vej Cellehjulets omdrejningretning skal sikre at materialet falder ned i den side der vender mod blæseren Cellesluse Injektor Forkert Korrekt Ledeplade Flow retning CAD 40 CAD 30 CAD 20 Skod for regulering af korntilstrømning Skod Rigtigt Forkert Tragt eller stort indløb med betydelig større di...

Page 87: ...n bøjning da dette stykke er udsat for et større slid fra materialet Flow retning OK160 rør OK160 teleskoprør Korrekt Forkert Forkert 1 m 9 0 45 4 5 Min 2 m Fordelere Ved brug af fordeler gælder det samme som ved brug af bøjninger man kan dog hvis pladsen er trang nø jes med 1 meter mellem en evt bøjning og fordeleren Det kan hvis nødvendigt accepteres at der placeres en bøjning lige efter fordele...

Page 88: ... Samlinger og centrering Ved samlingen af rør bøjninger og andet materiale der er beregnet til transport ved høj lufthastighed er det vigtigt at få centreret rørene så præcist som muligt ud for hinanden Man kan ikke altid regne med at røret centreres af spændebåndet alene Spændebåndet er udformet så ledes at det klemmer OK vulsterne meget hårdt sam men for at sikre en meget høj tæthed Dette bevirk...

Page 89: ...ere at udføre service på dels er der kun det halve slid på rørene frem for hvis alt materiale til begge siloer skulle gennem samme rør Kondensvand i udendørs rørsystemer Ved udendøres rørsystemer vil der specielt om vinteren opstå kondensvand i rørene Derfor bør man når systemet skal stå ubrugt længe afmontere et rør eller en bøjning på de laveste punkter for at undgå vandsamlinger og heraf rust E...

Page 90: ...3 7 0 6 1 5 3 4 7 4 2 3 3 2 8 2 3 1 7 TRL 100 RV RF 40 20 14 8 13 1 11 3 9 8 8 6 7 6 6 1 4 9 4 1 3 0 1 9 TRL 150 RV RF 40 20 22 1 18 7 16 2 14 1 12 5 11 1 8 8 7 2 5 9 4 4 2 8 TRL 200 RV RF 40 20 25 6 24 2 21 18 4 16 3 14 5 12 0 9 9 8 0 6 5 4 4 TRL 300 RV RF 40 20 36 7 31 4 27 4 24 1 21 6 19 4 16 0 13 4 11 4 9 1 6 6 TRL 500 RV RF 40 20 50 3 44 7 40 2 36 4 33 2 30 5 26 0 22 6 20 0 16 7 12 9 Bemærk O...

Page 91: ... 9 6 6 9 TRL300 CA40 38 6 33 1 28 8 25 4 22 7 20 4 16 8 14 1 12 0 9 6 6 9 TRL500 CA40 52 9 47 0 42 3 38 3 34 9 32 1 27 4 23 8 21 17 6 13 6 Ovennævnte kapaciteter gælder for rent korn med vandindhold på max 15 ved lufttemperatur på 20 C og barometertryk på 760 mm Hg Tallene er baseret på 2 stk 90 bøjninger og 4 m lodret rør udløbscyklon For hver meter den lodrette rørlængde øges øges den samlede rø...

Page 92: ...5 324 468 Rotor omdr min 3000 3000 3000 3000 3650 4200 4700 4100 4300 Antal rotorer 1 1 1 1 1 1 1 2 3 Anbefalet type transportrør OK OKR160 Ø 160 mm Indsugnings reguleringsspjæld Nej Nej Ja Nej Ja Ja Ja Ja Ja Blæseren opvarmer luften ca C 2 3 3 4 5 9 12 5 19 27 46 Motortilkobling Direkte Direkte Direkte Direkte Kilerem Kilerem Kilerem Kilerem Kilerem Max luft time m3 1900 2600 1800 3200 1800 1800 ...

Page 93: ...0 92 83 TRL 40 92 82 TRL 55 105 91 TRL 75 99 85 TRL 100 101 90 TRL 150 109 97 TRL 200 TRL 300 107 93 TRL 500 108 93 mm A B C D E F TRL 20 OK160 630 672 330 478 127 TRL 40 OK160 759 834 397 557 123 TRL 55 OK160 759 836 412 572 125 TRL 75 OK160 759 826 451 699 115 mm A B C D E F TRL 100 OK160 1140 830 435 695 120 TRL 150 OK160 1140 830 435 695 120 TRL 200 OK160 1140 1000 435 875 120 TRL 300 OK160 12...

Page 94: ...on 1 800 m3 h à diffé rentes pressions en fonction du type de ventilateur En transport pneumatique en règle générale plus la pression dans le système est élevée plus le taux de transfert est élevé NOTA El caudal máximo suministrado por los ventiladores TRL con regulador de aire es aproximadamente 1 800 m3 h a diferentes presiones dependiendo del modelo de ventilador En una regla general en transpo...

Page 95: ... declares that Kongskilde blowers type TRL 20 500 Are produced in conformity with the following EC directives Machinery Directive 2006 42 EC Electro Magnetic Compatibility Directive 2014 30 EC Low Voltage Directive 2014 35 EC Kongskilde Industries A S Sorø 01 07 2016 Mogens Rüdiger CEO ...

Page 96: ...80 Sorø Tel 45 72 17 60 00 mail kongskilde industries com www kongskilde industries com www kongskilde grain com 121 000 388 You can always find the latest version of the manuals at 01 02 2021 www kongskilde industries com www kongskilde grain com ...

Reviews: