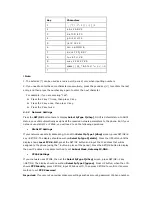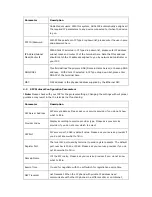
Key Characters
1
. , \' ? ! \" - 1 \/ | : [ ] ; 1
2
a b c 2 A B C 2
3
d e f 3 D E F 3
4
g h i 4 G H I 4
5
j k l 5 J K L 5
6
m n o 6 M N O 6
7
p q r s 7 P Q R S 7
8
t u v 8 T U V 8
9
w x y z 9 W X Y Z 9
0
space ( ) @ _ * & 0 % # ^= + < > 0
*
*
! Note:
1. The asterisk (*) can be used as a radix point (period) only when inputting numbers.
2. If you need to enter the same character consecutively, press the pound key (#) to confirm the last
entry, and then press the number key again to enter the next character
For example, if you are entering “Cab”:
Press the 2 key 7 times, then press # key.
Press the 2 key once, then press # key.
Press the 2 key twice.
3.1.2 Network
Settings
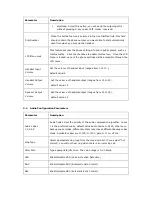
Press the SET/OK button twice to display Select IpType 1[dhcp], DHCP is default status. In DHCP
status, your LAN automatically assigns all the required network parameters to the phone. But if your
network use static IP or PPPoE, you will need to do the following operations.
•
Static IP Settings
If your network uses static addressing, then at the Select IpType 1[dhcp] screen, press SET/OK>0
key >SET/OK. The display should now show Select IpType 0[static]. Press the UP button until the
display shows Local IP X.X.X.X, press the SET/OK button and input the IP address that will be
assigned to the phone (using the * button in place of the period). Press the SET/OK button to display
the new IP address. Use same method to set Subnet Mask, Gateway IP,DNS.
•
PPPoE Settings
If your network uses PPPOE, then at the Select IpType 1[dhcp] screen, press SET/OK>2 key
>SET/OK. The display should now show Select IpType 2[pppoe]. Press UP button, when the LCD
shows PPP Identity, press SET/OK, input PPPoE user ID, then press SET/OK to confirm. Use same
method to set PPP Password.
Important: If your service provider makes presettings such as account, password, IP phone number,


