background image

PAMFW 12 C3

DE

AT

CH

 55


Inhaltsverzeichnis

Einleitung . . . . . . . . . . . . . . . . . . . . . . . . . . . . . . . . . . . . . . . . . . . . . . . . . . . . . . . 56

Bestimmungsgemäßer Gebrauch . . . . . . . . . . . . . . . . . . . . . . . . . . . . . . . . . . . . . . . . . . . . . . . 56
Ausstattung . . . . . . . . . . . . . . . . . . . . . . . . . . . . . . . . . . . . . . . . . . . . . . . . . . . . . . . . . . . . . . . . 56
Lieferumfang . . . . . . . . . . . . . . . . . . . . . . . . . . . . . . . . . . . . . . . . . . . . . . . . . . . . . . . . . . . . . . . 56
Technische Daten . . . . . . . . . . . . . . . . . . . . . . . . . . . . . . . . . . . . . . . . . . . . . . . . . . . . . . . . . . . 56

Allgemeine Sicherheitshinweise für Elektrowerkzeuge . . . . . . . . . . . . . . . . . . 57

1.  Arbeitsplatzsicherheit . . . . . . . . . . . . . . . . . . . . . . . . . . . . . . . . . . . . . . . . . . . . . . . . . . . . . . 57
2.  Elektrische Sicherheit . . . . . . . . . . . . . . . . . . . . . . . . . . . . . . . . . . . . . . . . . . . . . . . . . . . . . . 57
3.  Sicherheit von Personen . . . . . . . . . . . . . . . . . . . . . . . . . . . . . . . . . . . . . . . . . . . . . . . . . . . . 58
4.  Verwendung und Behandlung des Elektrowerkzeugs  . . . . . . . . . . . . . . . . . . . . . . . . . . . . . 58
5.  Verwendung und Behandlung des Akkuwerkzeugs . . . . . . . . . . . . . . . . . . . . . . . . . . . . . . . 59
6.  Service . . . . . . . . . . . . . . . . . . . . . . . . . . . . . . . . . . . . . . . . . . . . . . . . . . . . . . . . . . . . . . . . . 60

Gerätespezifische Sicherheitshinweise für Schleifer . . . . . . . . . . . . . . . . . . . . . 60

Sicherheitshinweise für Ladegeräte  . . . . . . . . . . . . . . . . . . . . . . . . . . . . . . . . . . . . . . . . . . . . . 60
Arbeitshinweise. . . . . . . . . . . . . . . . . . . . . . . . . . . . . . . . . . . . . . . . . . . . . . . . . . . . . . . . . . . . .  61

Vor der Inbetriebnahme  . . . . . . . . . . . . . . . . . . . . . . . . . . . . . . . . . . . . . . . . . . 61

Akku-Pack entnehmen/laden/einsetzen . . . . . . . . . . . . . . . . . . . . . . . . . . . . . . . . . . . . . . . . . . 61
Akkuzustand prüfen . . . . . . . . . . . . . . . . . . . . . . . . . . . . . . . . . . . . . . . . . . . . . . . . . . . . . . . . . 61
Staub-/ Späneabsaugung . . . . . . . . . . . . . . . . . . . . . . . . . . . . . . . . . . . . . . . . . . . . . . . . . . . . 61
Staubabsaugung anschließen . . . . . . . . . . . . . . . . . . . . . . . . . . . . . . . . . . . . . . . . . . . . . . . . . 62
Einsatzwerkzeug auswählen  . . . . . . . . . . . . . . . . . . . . . . . . . . . . . . . . . . . . . . . . . . . . . . . . . . 62
Schleifblatt auf die Schleifplatte aufsetzen . . . . . . . . . . . . . . . . . . . . . . . . . . . . . . . . . . . . . . . . 63
Einsatzwerkzeug wechseln . . . . . . . . . . . . . . . . . . . . . . . . . . . . . . . . . . . . . . . . . . . . . . . . . . . . 63

Inbetriebnahme  . . . . . . . . . . . . . . . . . . . . . . . . . . . . . . . . . . . . . . . . . . . . . . . . . 63

Ein- / Ausschalten  . . . . . . . . . . . . . . . . . . . . . . . . . . . . . . . . . . . . . . . . . . . . . . . . . . . . . . . . . . . 63
Schwingzahl vorwählen . . . . . . . . . . . . . . . . . . . . . . . . . . . . . . . . . . . . . . . . . . . . . . . . . . . . . . 63

Wartung und Reinigung . . . . . . . . . . . . . . . . . . . . . . . . . . . . . . . . . . . . . . . . . . . 63

Garantie der Kompernaß Handels GmbH  . . . . . . . . . . . . . . . . . . . . . . . . . . . . 64

Service . . . . . . . . . . . . . . . . . . . . . . . . . . . . . . . . . . . . . . . . . . . . . . . . . . . . . . . . . 65

Importeur   . . . . . . . . . . . . . . . . . . . . . . . . . . . . . . . . . . . . . . . . . . . . . . . . . . . . . . 65

Entsorgung  . . . . . . . . . . . . . . . . . . . . . . . . . . . . . . . . . . . . . . . . . . . . . . . . . . . . . 66

Original-Konformitätserklärung . . . . . . . . . . . . . . . . . . . . . . . . . . . . . . . . . . . . 67

Ersatz-Akku Bestellung  . . . . . . . . . . . . . . . . . . . . . . . . . . . . . . . . . . . . . . . . . . . 68

Summary of Contents for PARKSIDE PAMFW 12 C3

Page 1: ...GABLE Traducci n del manual de instrucciones original CORDLESS MULTI PURPOSE TOOL Translation of the original instructions FERRAMENTA MULTIUSOS COM BATERIA Tradu o do manual de instru es original ELET...

Page 2: ...uida familiar cese con todas las funciones del dispositivo Prima di leggere aprire le due pagine con le immagini e prendere con denza con le diverse funzioni dell apparecchio Antes de come ar a ler ab...

Page 3: ...Z52 A1 Z64 B2 HCS C...

Page 4: ...BATER A COMPATIBLE CON TODOS LOS APARATOS DE LA SERIE PARKSIDE X 12 V TEAM BATTERIA COMPATIBILE CON TUTTI GLI ATTREZZI DELLA SERIE PARKSIDE X 12 V TEAM 12V max 10 8V...

Page 5: ...ores 6 Indicaciones de trabajo 6 Antes de la puesta en marcha 7 Extracci n carga inserci n de la bater a 7 Comprobaci n del estado de la bater a 7 Aspiraci n del polvo serr n 7 Conexi n del aspirador...

Page 6: ...LED de capacidad de la bater a Botones de desbloqueo Bater a Aspiraci n de polvo 3 piezas Fijaci n de la carcasa Rueda de ajuste de la preselecci n del n mero de vibraciones Canal de aspiraci n Ranura...

Page 7: ...os que la herramienta el ctrica est desconec tada y los momentos en los que est conectada pero funciona sin carga Indicaciones generales de seguridad para las herramientas el ctricas ADVERTENCIA Lea t...

Page 8: ...casco o protecciones auditivas seg n el tipo de herramienta el ctrica en cuesti n reduce el riesgo de lesiones c Evite que el aparato pueda ponerse en mar cha accidentalmente Aseg rese de que la herr...

Page 9: ...ligrosas h Mantenga los mangos y las super cies de agarre secos limpios y sin restos de aceite o grasa Si los mangos o las super cies de agarre est n resbaladizos no podr manejarse ni controlarse la h...

Page 10: ...ectoras y mascarillas de protecci n contra el polvo Indicaciones de seguridad para los cargadores Este aparato puede ser utilizado por ni os a partir de 8 a os y por personas cuyas facultades f sicas...

Page 11: ...proceso de carga ha nalizado y que la bater a est lista para su uso 5 Coloque la bater a en el aparato Comprobaci n del estado de la bater a Pulse el interruptor de encendido apagado para comprobar el...

Page 12: ...ximo al borde y tambi n en zonas de dif cil acceso Ejemplo Serrado de aberturas en paredes de materiales ligeros Z64 B2 Hoja de sierra diamantada Materiales Adhesivos para azulejos juntas de azulejos...

Page 13: ...ercambiable pulsando la palanca de desbloqueo de herra mientas de nuevo hacia abajo Compruebe que la herramienta intercambiable est bien jada Si la herramienta intercambiable est mal montada o no est...

Page 14: ...detectan defectos en el producto puede ejercer sus derechos legales frente al vendedor Estos derechos legales no se ven limitados por la garant a descrita a continuaci n Condiciones de la garant a El...

Page 15: ...el n mero de art culo en la placa de caracter sticas grabado en el aparato en la portada de las instrucciones parte inferior izquierda o en un adhesivo en la parte trasera o inferior del aparato Si se...

Page 16: ...che la bater a con la basura dom stica Las bater as defectuosas o agotadas deben reci clarse seg n la directiva 2006 66 EC Deseche la bater a y el aparato a trav s de los puntos de recogida disponible...

Page 17: ...declaraci n de conformidad recaer sobre el fa bricante El objeto descrito de la declaraci n cumple con las disposiciones de la Directiva 2011 65 EU del Parlamento Europeo y del Consejo del 8 de junio...

Page 18: ...t cnica La promoci n se limita a una bater a por cliente aparato y a una vigencia de un mes tras el periodo de la oferta Tras esto podr solicitarse la bater a de repuesto como recambio bajo otras cond...

Page 19: ...per caricabatterie 20 Istruzioni operative 20 Prima della messa in funzione 20 Rimozione carica impiego della batteria 20 Controllo della carica della batteria 21 Aspirazione di polvere trucioli 21 A...

Page 20: ...ria Tasti di sblocco Pacco batteria Allacciamento dell aspirazione della polvere 3 parti Fissaggio dell involucro Rotella di regolazione preselezione frequenza delle oscillazioni Canale di aspirazione...

Page 21: ...routensile spento e i tempi in cui acceso ma funziona senza subire carichi Indicazioni generali di sicurezza per elettroutensili AVVERTENZA Osservare tutte le indicazioni relative alla sicurezza le is...

Page 22: ...re l elettro utensile Un utensile o una chiave lasciati in una parte rotante dell elettroutensile possono provocare lesioni e Evitare posture innaturali Provvedere a una posizione sicura e mantenere s...

Page 23: ...qua Se il liquido entra a contatto con gli occhi consultare un medico Il liquido che fuoriesce dalla batteria potrebbe provocare irritazioni cutanee o ustioni e Non utilizzare una batteria danneggiata...

Page 24: ...ionamento oscillante l utensile oscilla avanti e indietro tra 5000 e 19000 volte al minu to Ci consente un lavoro preciso anche in spazi piccolissimi Taglio tranciatura Utilizzare solo lame di taglio...

Page 25: ...molatura del metal lo o in presenza di resti di metallo nel legno la polvere di legno nel sacchetto ltro dell aspira polvere pu incendiarsi Ci pu succedere in particolare se la polvere di legno mescol...

Page 26: ...vo al centro del piano abrasivo Sostituzione dell utensile NOTA Se si desidera utilizzare il dispositivo di aspira zione della polvere lo si deve allacciare prima del montaggio della sostituzione dell...

Page 27: ...e e pulizia ATTENZIONE PERICOLO DI LESIONI Prima di qualsiasi lavoro sull apparec chio rimuovere la batteria Non utilizzare oggetti acuminati per la pulizia dell apparecchio Impedire la penetrazione d...

Page 28: ...anzia non si estende a componenti del prodotto che sono esposti al normale logorio e possono pertanto essere considerati come componenti soggetti a usura o a danni che si veri cano su componenti delic...

Page 29: ...tramite gli appositi centri di raccolta e riciclaggio Non smaltire gli elettrodomestici assieme ai normali ri uti domestici In base alla direttiva europea 2012 19 EU gli apparecchi elettrici usati de...

Page 30: ...chiarazione sopra descritto soddisfa le prescrizioni della Direttiva 2011 65 EU del Parlamento Europeo e del Consiglio Europeo dell 8 giugno 2011 sulla restrizione dell uso di determinate sostanze per...

Page 31: ...stenza L iniziativa promozionale limitata a una batteria per cliente apparecchio nonch a un periodo di due mesi dopo il termine dell iniziativa La batteria di ricambio pu essere ordinata anche dopo ta...

Page 32: ...PAMFW 12 C3 28 IT MT...

Page 33: ...es de seguran a para carregadores 34 Instru es de trabalho 35 Antes da coloca o em funcionamento 35 Retirar carregar colocar o bloco acumulador 35 Veri car o estado do acumulador 35 Aspira o de p apa...

Page 34: ...Bot o rotativo de pr sele o do n mero de oscila es Canal de aspira o Ranhuras de ventila o Luz LED de trabalho Parafuso de aperto Liga o anular Raspador de 52 mm L mina de serra diamantada de 64 mm L...

Page 35: ...e est ligada mas funciona sem press o Instru es gerais de seguran a para ferra mentas el tricas AVISO Leia todas as instru es de seguran a outras instru es guras e os dados t cni cos que est o inclu d...

Page 36: ...ou proteto res auriculares de acordo com o tipo e a aplica o da ferramenta el trica reduz o risco de ferimentos c Evite uma coloca o em funcionamento invo lunt ria Certi que se de que a ferramenta el...

Page 37: ...hos e as superf cies de pegar secos limpos e livres de leo e gordura Punhos e superf cies de pegar escorregadios n o permitem uma opera o e um controlo seguros da ferramenta el trica em situa es impre...

Page 38: ...erador da m quina e para as pessoas que se encon tram na proximidade Use culos de prote o e uma m scara anti poeiras Instru es de seguran a para carregadores Este aparelho pode ser utilizado por crian...

Page 39: ...1 Para retirar o bloco acumulador prima os bot es de desbloqueio e puxe o bloco acumulador para fora do aparelho 2 Insira o bloco acumulador no carregador r pido 3 Insira a cha na tomada O LED de con...

Page 40: ...s comuns L mina de serra de imers o HCS de 32 mm Materiais Madeira pl stico gesso e outros materiais macios Utiliza o Cortes de serra de imers o e de separa o Serragem junto a arestas tamb m em reas d...

Page 41: ...de aplica o no alojamento da ferramenta na posi o de encaixe escolha Volte a apertar a ferramenta de aplica o pre mindo novamente a alavanca de desbloqueio da ferramenta para baixo Veri que se a ferra...

Page 42: ...mitados pela nossa garantia que passamos a transcrever Condi es de garantia O prazo de garantia tem in cio na data da compra Por favor guarde bem o tal o de compra original Este documento necess rio c...

Page 43: ...o de Assist ncia T cnico indicado em seguida telefonicamente ou por e mail De seguida pode enviar gratuitamente o produto registado como defeituoso incluindo o comprovativo da compra tal o de compra e...

Page 44: ...com a Diretiva 2006 66 EC Devolva o acumulador e ou o aparelho nos pontos de recolha disponibilizados Relativamente s possibilidades de elimina o de ferramentas el tricas do acumulador informe se junt...

Page 45: ...o da declara o acima descrito cumpre os regulamentos da Diretiva 2011 65 EU do Parlamento Europeu e do Conselho de 8 de junho de 2011 relativamente limita o da utiliza o de determinadas subst ncias pe...

Page 46: ...ireta de Assist ncia T cnica A promo o limitada a um acumulador por cliente aparelho bem como a um per odo de dois me ses ap s o per odo da promo o Ap s este per odo o acumulador de substitui o pode s...

Page 47: ...elines for battery chargers 48 Working procedures 48 Before use 48 Removing charging inserting the battery pack 48 Checking the battery charge level 49 Dust chip extraction 49 Connecting a dust extrac...

Page 48: ...ON OFF switch Battery display LED Release buttons Battery pack Dust extraction unit 3 pcs Housing attachment Speed adjustment wheel Dust extraction duct Ventilation slits LED work light Tensioning scr...

Page 49: ...tool safety warnings WARNING Read all safety warnings instructions illust rations and speci cations provided with this power tool Failure to follow all instructions listed below may result in electric...

Page 50: ...tion and collection facilities ensure these are connected and properly used Use of dust collection can reduce dust related hazards h Do not let familiarity gained from frequent use of tools allow you...

Page 51: ...s may exhibit unpredictable behaviour resulting in re explosion or risk of injury f Do not expose a battery pack or tool to re or excessive temperature Exposure to re or temperature above 130 C 265 F...

Page 52: ...causes the application tool to move back and forth at a speed of 5000 19000 times per minute This allows for precision work even in con ned spaces Sawing cutting Use only undamaged saw blades that ar...

Page 53: ...al residues in wood wood dust in the bag of the vacuum cleaner can spontaneously ignite This is a particular risk if the wood dust is mixed with paint residues or other chemicals and the workpiece has...

Page 54: ...onto the sanding plate Place the sanding sheet centrally on the sanding plate Changing tools NOTE If you wish to use the dust collection it must be connected before tting the tool see section Connecti...

Page 55: ...arly The optimum charge level is between 50 and 80 The optimum storage climate is cool and dry NOTE Replacement parts not listed such as carbon brushes switches and replacement batteries can be ordere...

Page 56: ...he instructions bottom left or as a sticker on the rear or bot tom of the appliance If functional or other defects occur please contact the service department listed either by telephone or by e mail Y...

Page 57: ...or municipal authorities can provide information on how to Translation of the original Con formity Declaration We KOMPERNASS HANDELS GMBH documents o cer Mr Semi Uguzlu BURGSTR 21 DE 44867 BOCHUM GER...

Page 58: ...promotion is limited to one battery per customer appliance and also to a timeline of two months after the promotion period Thereafter the replacement battery can be ordered as a replacement part under...

Page 59: ...ce 60 Ger tespezi sche Sicherheitshinweise f r Schleifer 60 Sicherheitshinweise f r Ladeger te 60 Arbeitshinweise 61 Vor der Inbetriebnahme 61 Akku Pack entnehmen laden einsetzen 61 Akkuzustand pr fen...

Page 60: ...ht zum gewerblichen Gebrauch Ausstattung Hebel f r Werkzeugentriegelung EIN AUS Schalter Akku Display LED Entriegelungstasten Akku Pack Staubabsaugung 3 tlg Geh usebefestigung Stellrad Schwingzahlvorw...

Page 61: ...pielweise Zeiten in denen das Elektrowerkzeug abgeschaltet ist und solche in denen es zwar eingeschaltet ist aber ohne Belastung l uft Allgemeine Sicherheitshinweise f r Elektrowerkzeuge WARNUNG Lesen...

Page 62: ...sschuhe Schutzhelm oder Geh rschutz je nach Art und Einsatz des Elektrowerkzeugs verringert das Risiko von Verletzungen c Vermeiden Sie eine unbeabsichtigte Inbetriebnahme Vergewissern Sie sich dass d...

Page 63: ...tionen f hren h Halten Sie Gri e und Gri chen trocken sauber und frei von l und Fett Rutschige Gri e und Gri chen erlauben keine sichere Bedienung und Kontrolle des Elektrowerkzeugs in unvorhergesehen...

Page 64: ...edien person oder in der N he be ndliche Personen darstellen Tragen Sie Schutzbrille und Staubschutzmaske Sicherheitshinweise f r Ladeger te Dieses Ger t kann von Kindern ab 8 Jahren und dar ber sowie...

Page 65: ...en Akku Pack in das Schnell Ladeger t 3 Stecken Sie den Netzstecker in die Steckdose Die Kontroll LED leuchtet rot 4 Die gr ne Ladezustandsanzeige LED signali siert Ihnen dass der Ladevorgang abgeschl...

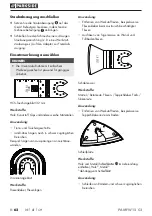
Page 66: ...ng Trenn und Tauchs geschnitte randnahes S gen auch in schwer zug nglichen Bereichen Beispiel S gen von Aussparungen an Leichtbau w nden Diamants geblatt Werksto e Fliesenkleber Fliesenfugen Anwendung...

Page 67: ...schalten Einschalten Schieben Sie den EIN AUS Schalter nach vorn um das Ger t einzuschalten Die LED Arbeitsleuchte leuchtet beim einschal ten und erm glicht so das Ausleuchten des Ar beitsbereiches be...

Page 68: ...ur ck Mit Reparatur oder Austausch des Produkts beginnt kein neuer Garantiezeitraum Garantiezeit und gesetzliche M ngelanspr che Die Garantiezeit wird durch die Gew hrleistung nicht verl ngert Dies gi...

Page 69: ...den Service WARNUNG Lassen Sie Ihre Ger te von der Servicestelle oder einer Elektrofachkraft und nur mit Original Ersatzteilen reparieren Damit wird sichergestellt dass die Sicherheit des Ger tes erha...

Page 70: ...werden Geben Sie Akku Pack und oder das Ger t ber die ange botenen Sammeleinrichtungen zur ck ber Entsorgungsm glichkeiten f r ausgediente Elektrowerkzeuge Akku Pack informieren Sie sich bitte bei Ihr...

Page 71: ...Der oben beschriebene Gegenstand der Erkl rung erf llt die Vorschriften der Richtlinie 2011 65 EU des Europ ischen Parlaments und des Rates vom 8 Juni 2011 zur Beschr nkung der Verwendung bestimmter...

Page 72: ...Kunde Ger t sowie auf eine Laufzeit von zwei Monaten nach dem Aktionszeitraum Danach kann der Ersatzakku als Ersatzteil zu anderen Konditionen weiter hin bestellt werden Telefonische Bestellung Servic...

Page 73: ...ELS GMBH BURGSTRASSE 21 DE 44867 BOCHUM GERMANY www kompernass com Estado de las informaciones Versione delle informazioni Estado das informa es Last Information Update Stand der Informationen 01 2019...

Reviews: