Assemblée
INSTRUCTIONS DE MONT
AGE
Ne pas serrer complètement les vis pendant l'assemblage. Ne serrez que lorsque toutes les pièces sont installées en place.
T
S
AA
AA x 8
11.
Page 1: ...reference QUESTIONS PROBLEMS OR MISSING PARTS Please Contact Customer Service Before Returning to Store Please carefully check the unit and make sure there is no damage when you open the carton servi...
Page 2: ...ONS Preparation Assembly FIREBOX OPERATIONS FCC IC Information Safety Information Operating Instructions Care And Maintenance Troubleshooting Table of Contents Package Contents Fireplace Mantel SP5740...
Page 3: ...NING DO NOT run cord under carpeting DO NOT cover cord with throw rugs runners or similar covering Do not route cord under furniture or appliances Arrange cord away from traffic areas and where it wil...
Page 4: ...ith the electric fireplace 7 Any installation labor construction transportation or other related costs expenses arising from defective part s repair replacement or otherwise of same will not be covere...
Page 5: ...one person Tools Required Philips Screwdriver Hand Drill Hex Key 5 ASSEMBLY INSTRUCTIONS Number of spare hardware is indicated in Hardware Identification Use the Touch up Pen to cover surface scratch...
Page 6: ...ration 6 ASSEMBLY INSTRUCTIONS x 1 x 1 x 1 x 1 x 1 x 2 x 2 x 2 x 1 x 1 x 2 x 1 x 1 x 1 x 1 x 1 x 1 x 1 x 2 x 1 x 1 x 1 A C B D H S E I T F J U G K V L M N O P Q R R N V J G U K M F A C B E D F T S H L...
Page 7: ...ssembly Only tighten when all parts are installed in place FF x 8 EE x 20 BB x 36 G G F H F H E D BB BB BB BB BB BB BB BB BB BB BB BB BB BB BB BB BB BB BB BB BB BB BB EE EE EE EE EE EE EE EE EE EE EE...
Page 8: ...Assembly Do not fully tighten screws during assembly Only tighten when all parts are installed in place 8 ASSEMBLY INSTRUCTIONS 2 BB x 8 H F F H H G H G EE BB BB BB BB BB BB...
Page 9: ...ews during assembly Only tighten when all parts are installed in place 3 4 BB x 2 FF x 6 EE x 12 BB x 24 M L K K I Q BB BB BB BB BB BB BB BB BB BB BB BB BB BB BB BB BB BB BB BB BB BB BB BB EE EE EE EE...
Page 10: ...lly tighten screws during assembly Only tighten when all parts are installed in place 10 ASSEMBLY INSTRUCTIONS 6 5 E D A C B BB BB JJ JJ JJ JJ BB BB JJ x 4 BB x 4 V N RR RR BB BB BB BB EE EE EE EE RR...
Page 11: ...Assembly 11 ASSEMBLY INSTRUCTIONS Do not fully tighten screws during assembly Only tighten when all parts are installed in place 7 H H G BB BB BB x 8...
Page 12: ...Assembly Do not fully tighten screws during assembly Only tighten when all parts are installed in place 12 ASSEMBLY INSTRUCTIONS CC x 2 BB x 10 J G H G H BB BB BB BB CC 8...
Page 13: ...Assembly 13 ASSEMBLY INSTRUCTIONS Do not fully tighten screws during assembly Only tighten when all parts are installed in place BB x 6 M L J K K BB 9...
Page 14: ...Assembly Do not fully tighten screws during assembly Only tighten when all parts are installed in place 14 ASSEMBLY INSTRUCTIONS N BB BB x 6 10...
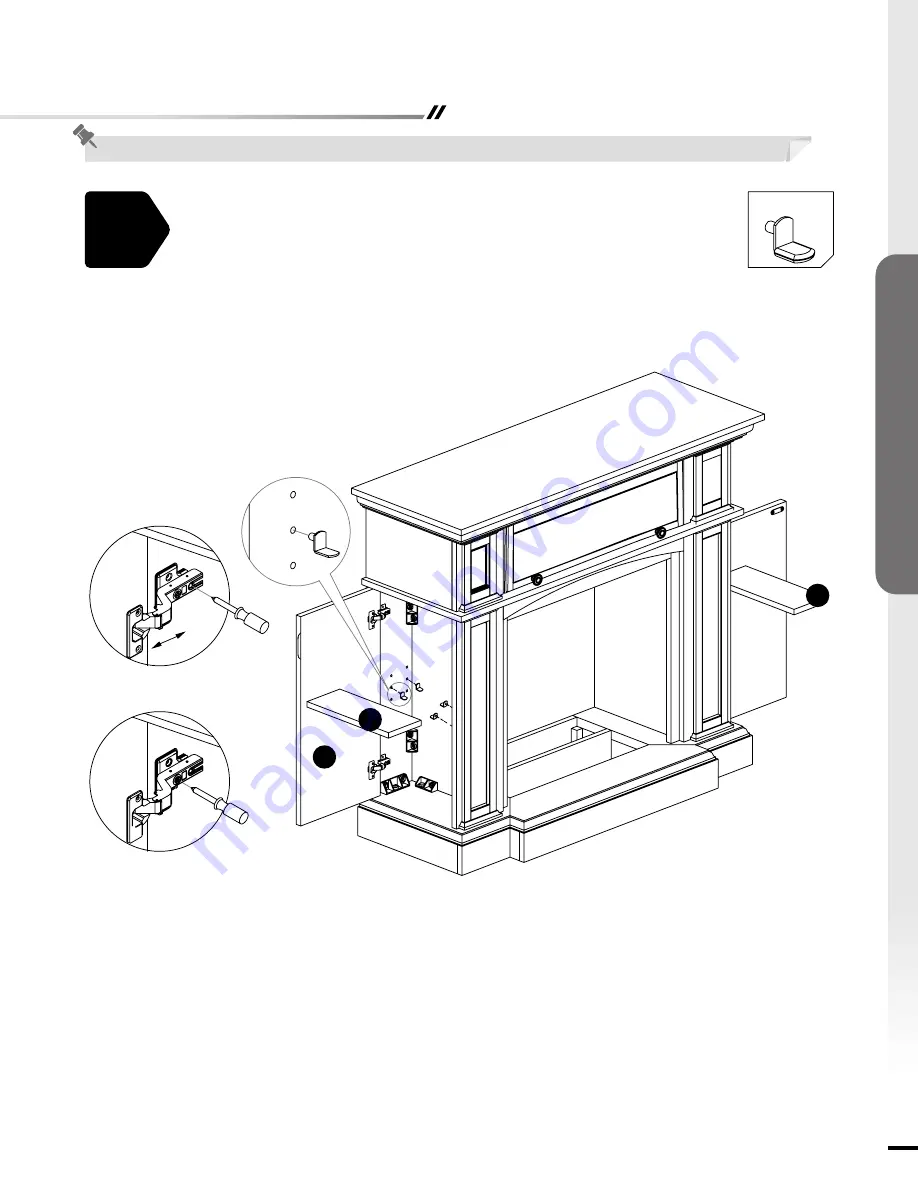
Page 15: ...Assembly 15 ASSEMBLY INSTRUCTIONS Do not fully tighten screws during assembly Only tighten when all parts are installed in place T S S AA AA x 8 11...
Page 16: ...Assembly Do not fully tighten screws during assembly Only tighten when all parts are installed in place 16 ASSEMBLY INSTRUCTIONS P CC CC CC CC CC CC CC CC CC CC CC CC CC CC CC x 14 12 13...
Page 17: ...Assembly 17 ASSEMBLY INSTRUCTIONS Do not fully tighten screws during assembly Only tighten when all parts are installed in place JJ x 2 O JJ JJ R Q BB BB BB BB BB BB x 6 14 15...
Page 18: ...w wall applications the safety mounting tape KK must be fastened to studs headers or other structural wall members The included plastic wall anchors OO are intended for use with solid wall application...
Page 19: ...structions may cause harmful interference to radio or television reception which can be determined by turning the equipment off and on The user is encouraged to try and correct the interference by one...
Page 20: ...an extension cord or relocatable power tap outlet power strip This heater includes an automatic protection system that will shut off the unit to prevent overheating If the unit is at risk of overheat...
Page 21: ...eater is working before power OFF the unit fan will have 20 seconds delay to ensure heat will not be trapped inside the unit Press the MODE button to cycle through the different functions Each time th...
Page 22: ...l a qualified service technician to inspect the fireplace and replace any part of the electrical system WARNING Disconnect the power before attempting any maintenance or cleaning to reduce the risk of...
Page 23: ...he blower runs for an additional 20 seconds to ensure heat will not be trapped inside the unit 6 This is normal for a heater appliance as it requires more current to operate Check the connections of t...
Page 24: ...ed by Soupro Limited Inc 72 Montgomery Court Markham Ontario L3R 0C1 QUESTIONS PROBLEMS OR MISSING PARTS Please Contact Customer Service Before Returning to Store servicespi sourceproinc com 1 844 455...
Page 25: ...re QUESTIONS PROBL MES OU PI CES MANQUANTES Contactez le service client le avant de le retourner au magasin V rifiez soigneusement l appareil et assurez vous qu il n y a pas de dommages lorsque vous o...
Page 26: ...aration Assembl e OP RATIONS DE FOYER Informations FCC IC Information de securite Instructions d operation Soins et entretien Guide de depannage Table des mati res Contenu de la bo te Manteau de chemi...
Page 27: ...eillance AVERTISSEMENT NE PAS utiliser une rallonge sous un tapis NE PAS couvrir le fils d alimentation avec une carpette ou tout autre objet du genre Placer le fils d alimentation en dehors d emplace...
Page 28: ...es frais et ou depenses decoulant de la piece defectueuse de la reparation du remplacement ne sera pas couvert par cette garantie et la Compagnie n en assume pas la responsabilite 8 Le propri taire ut...
Page 29: ...is INSTRUCTIONS DE MONTAGE Nombre de materiel en est separe pour la sauvegarde Identification de la quincaillerie Utilisez le stylet de retouche pour couvrir les rayures superficielles AVERTISSEMENT L...
Page 30: ...aration INSTRUCTIONS DE MONTAGE 26 x 1 x 1 x 1 x 1 x 1 x 2 x 2 x 2 x 1 x 1 x 2 x 1 x 1 x 1 x 1 x 1 x 1 x 1 x 2 x 1 x 1 x 1 A C B D H S E I T F J U G K V L M N O P Q R R N V J G U K M F A C B E D F T S...
Page 31: ...blage Ne serrez que lorsque toutes les pi ces sont install es en place 27 FF x 8 EE x 20 BB x 36 G G F H F H E D BB BB BB BB BB BB BB BB BB BB BB BB BB BB BB BB BB BB BB BB BB BB BB EE EE EE EE EE EE...
Page 32: ...sembl e INSTRUCTIONS DE MONTAGE Ne pas serrer compl tement les vis pendant l assemblage Ne serrez que lorsque toutes les pi ces sont install es en place 28 2 BB x 8 H F F H H G H G EE BB BB BB BB BB B...
Page 33: ...dant l assemblage Ne serrez que lorsque toutes les pi ces sont install es en place 29 3 4 BB x 2 FF x 6 EE x 12 BB x 24 M L K K I Q BB BB BB BB BB BB BB BB BB BB BB BB BB BB BB BB BB BB BB BB BB BB BB...
Page 34: ...E Ne pas serrer compl tement les vis pendant l assemblage Ne serrez que lorsque toutes les pi ces sont install es en place 30 6 5 E D A C B BB BB JJ JJ JJ JJ BB BB JJ x 4 BB x 4 V N RR RR BB BB BB BB...
Page 35: ...Assembl e INSTRUCTIONS DE MONTAGE Ne pas serrer compl tement les vis pendant l assemblage Ne serrez que lorsque toutes les pi ces sont install es en place 31 7 H H G BB BB BB x 8...
Page 36: ...Assembl e INSTRUCTIONS DE MONTAGE Ne pas serrer compl tement les vis pendant l assemblage Ne serrez que lorsque toutes les pi ces sont install es en place 32 CC x 2 BB x 10 J G H G H BB BB BB BB CC 8...
Page 37: ...Assembl e INSTRUCTIONS DE MONTAGE Ne pas serrer compl tement les vis pendant l assemblage Ne serrez que lorsque toutes les pi ces sont install es en place 33 BB x 6 M L J K K BB 9...
Page 38: ...Assembl e INSTRUCTIONS DE MONTAGE Ne pas serrer compl tement les vis pendant l assemblage Ne serrez que lorsque toutes les pi ces sont install es en place N BB BB x 6 10...
Page 39: ...Assembl e INSTRUCTIONS DE MONTAGE Ne pas serrer compl tement les vis pendant l assemblage Ne serrez que lorsque toutes les pi ces sont install es en place T S S AA AA x 8 11...
Page 40: ...l e INSTRUCTIONS DE MONTAGE Ne pas serrer compl tement les vis pendant l assemblage Ne serrez que lorsque toutes les pi ces sont install es en place P CC CC CC CC CC CC CC CC CC CC CC CC CC CC CC x 14...
Page 41: ...ssembl e INSTRUCTIONS DE MONTAGE Ne pas serrer compl tement les vis pendant l assemblage Ne serrez que lorsque toutes les pi ces sont install es en place JJ x 2 O JJ JJ R Q BB BB BB BB BB BB x 6 14 15...
Page 42: ...es chevilles en plastique inclus OO sont destines a etre utilises avec des murs solides seulement de tuiles ou en beton NE PAS UTILISER AVEC DES PANNEAUX DE GYPSE OU D AUTRES MURS CREUX INSTRUCTIONS D...
Page 43: ...des interf rences nuisibles lors de la r ception d missions de radio ou de t l vision il suffit pour le v rifier d allumer et d teindre successivement l article L utilisateur devra prendre les mesure...
Page 44: ...icle directement sur une prise murale N utilisez JAMAIS une rallonge ni une prise rechargeable barre d alimentation A l interieur de cet appareil se trouve un limiteur Lorsque l appareil surchauffe ou...
Page 45: ...a rouge Quand l unite est en mode ARRET il s arretera si le chauffage fonctionnait avant l arret de l appareil le ventilateur fonctionnera pour 20 secondes pour s assurer que la chaleur se dissipe App...
Page 46: ...Appelez immediatement un technicien de service qualifie pour inspecter le foyer et pour emplacer toute une partie du systeme electrique ATTENTION Coupez l alimentation avant tout entretien ou nettoya...
Page 47: ...che sur le panneau de controle 5 Le moteur du ventilateur continue de fonctionner apres la mise hors tension de l appareil 6 Le cordon d alimentation est chaud au toucher 2 Le capteur de surchauffe es...
Page 48: ...oupro Limited Inc 72 Montgomery Court Markham Ontario L3R 0C1 QUESTIONS PROBL MES OU PI CES MANQUANTES Contactez le service client le avant de le retourner au magasin servicespi sourceproinc com 1 844...