background image

IMPORTANT SAFETY INSTRUCTIONS 


1.


Read these instructions.  


2.


Keep these instructions.  


3.


Heed all warnings.  


4.


Follow all instructions.  


5.


Clean only with dry a cloth.  


6.


Do not block any ventilation openings.  Install in accordance with the manufacturer’s instructions. 


7.


Do  not  install  near  any  heat  sources,  such  as  radiators,  heat  registers,  stoves,  or  other 

apparatus (including amplifiers) that produce heat.  

8.


Protect the power cord from being walked on or pinched, particularly at plugs, 

convenience receptacles, and the point where they exit from the apparatus.  

9.


Only use attachments/accessories specified by the manufacturer 

10.


Unplug this apparatus during lightning storms or when not used for long periods of time.  

11.


Refer all servicing to qualified personnel.  Servicing is required when the apparatus has been 

damaged  in  any  way,  such  as  a  power-supply  cord  or  plug  is  damaged,  liquid  has  been 

spilled  or  objects  have  fallen  into  the  apparatus, the apparatus  has  been  exposed  to  rain  or 

moisture, does not operate normally or has been dropped. 

12.


CAUTION

: To disconnect the unit completely from the Mains, unplug the unit. Turning the 

power switch off does not completely disconnect the unit from the Mains. 


13.


Do not defeat the safety purpose of the polarized or grounding-type plug. A polarized plug has two 

blades, with one wider than the other. A grounding-type plug has two blades and a third grounding 

prong. The wide blade and the third prong are provided for your safety. If the provided plug does 

not fit into your outlet, consult an electrician for replacement of the obsolete outlet.  


14.


The  unit  shall  not  be  exposed to  dripping  or  splashing  of  liquids, and that  no  objects  filled  with 
liquids such as vases shall be placed on the unit. 


15.


WARNING

: This is a 

Class 1

 apparatus.  This unit should be connected to a MAINS socket outlet 

with a protective earthing connection. 


Copyright 1999-2017, Komet

Amplification. Group, L.L.C.  May not be reproduced in any form without express written consent from Komet

Amplification.   

Summary of Contents for Songwriter 30

Page 1: ...Songwriter 30 Owner s Manual Copyright 1999 2017 Komet Amplification Group L L C May not be reproduced in any form without express written consent from Komet Amplification ...

Page 2: ...d in nanoseconds they can cause considerable or permanent damage to electronic equipment Electrical surges can damage electrical equipment by burning or fusing internal wires or by the gradual degradation of a device s internal components The best way to prevent damage is to unplug your amplifier when not in use NOTE Devices such as refrigerators and air conditioners require large amounts of energ...

Page 3: ...cts have fallen into the apparatus the apparatus has been exposed to rain or moisture does not operate normally or has been dropped 12 CAUTION To disconnect the unit completely from the Mains unplug the unit Turning the power switch off does not completely disconnect the unit from the Mains 13 Do not defeat the safety purpose of the polarized or grounding type plug A polarized plug has two blades ...

Page 4: ...uct must not be disposed of with other waste Instead it is your responsibility to dispose of your waste equipment by handing it over to a designated collection point for the recycling of waste electrical and electronic equipment The separate collection and recycling of your waste equipment at the time of disposal will help conserve natural resources and ensure that it is recycled in a manner that ...

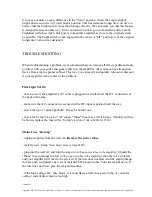
Page 5: ...ment gently turn the jewel lens cap counterclockwise and remove Now the bulb is exposed Using the tips of your fingers gently push and turn the bulb counterclockwise extract bulb and replace Note Your amplifier will continue to operate with no problem with a shorted bulb or with no bulb at all 4 Bass Control controls low end bass range frequencies 5 Volume Control adjusts clockwise the overall lev...

Page 6: ... Selector set this selector according to the appropriate speaker impedance you are using 4 8 and 16 Ohm settings are available 5 Output Jacks two standard inch speaker jacks wired parallel which will accommodate any quality standard speaker cable Note never use a shielded guitar cable as a speaker cable You can severely damage an amplifier 6 Tube Chart displays the placement of the power and pre a...

Page 7: ...t after extended periods of play that you allow for a sufficient amount of time to pass so as to let your amplifier cool down prior to moving or loading This action will help protect and extend the lifespan of the audio tubes and internal components from excessive vibration or damage Caution please pay close attention when extracting and installing the power and pre amp tubes The pins of the tube ...

Page 8: ... use their own numeric measurement system Some examples the Sovtek EL84 grade for the Songwriter is an IP number range from 12 through 15 The original Groove Tube rating scale for the Songwriter 30 would be a grade 1 through 3 Note the 12AX7 pre amp tubes in your amplifier are internally self biased and need no adjustment WARNING Never remove any of the four EL84 6BQ5 power tubes in order to attem...

Page 9: ...rned a bright frosted white color or occasionally completely burned off SPEAKERS FOR THE KOMET SONGWRITER 30 The Komet Songwriter 30 is a big sounding amp It is voiced for a sparkling clean sound at low volumes smooth dynamic and harmonic at higher volumes In our opinion these characteristics are best complimented with a closed back preferably vintage 4 X 12 speaker cabinet Our favorite reference ...

Page 10: ...r cabinets use the Switchcraft 11 but not all Some manufacturers have their speaker jacks panel mounted on the back of their cabinets which incorporate an internal circuit board on which the jacks are soldered This type of system is not designed for a type 11 jack and conversion to the 11 can be very tedious All electrical work should be performed by a professional and knowledgeable technician We ...

Page 11: ...le is plugged in at wall and at the IEC connection at the back of the amp make sure the AC connection is secure and the IEC input is pushed in all the way check the type 47 pilot light bulb It may be burned out check the 3 amp slow blow AC supply Mains fuse to see if it is blown Should your fuse be blown replace the fuse with a 3 amp slow blow a k a MDL 3A 250V Mains Fuse blowing unplug amplifier ...

Page 12: ...u will most likely have to replace one of more of your pre amp tubes with any of these problems This is another reason we stress purchasing n o s tubes they are less likely to go bad Fluorescent and neon lights rheostat wall dimmers and some appliances may alos cause your amp to contain a hum or buzz sound Also check your guitar cable if you discover that the problem is not a pre amp tube Over tim...

Page 13: ...center Avoid using T shirts or cloths that contain graphics or embroidery They may scratch some surfaces of your amp We prefer using a microfiber cleaning cloth for the logo control panels and metal surfaces A FINAL WORD Your Komet amplifier was designed to be played and enjoyed By virtue of its unmatched quality it will free you from thinking about your equipment and concentrate on the very thing...

Page 14: ...ted at 250V CONTACT Komet Amplification 1865 Dallas Drive Baton Rouge LA 70806 1454 225 926 1976 Email info kometamps com Website www kometamps com Facebook https www facebook com pages Komet Amplification 739410886107995 Tumbler http kometamplification tumblr com Twitter https twitter com kometamps Komet warranty information located at end of owner s manual Copyright 1999 2017 Komet Amplification...

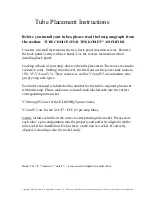
Page 15: ... tube enclosed is labeled with a number for the tube s required placement within the amp Please make sure to install each labeled tube into the correct corresponding tube socket V3 through V6 are for the EL84 6BQ5 power tubes V1 and V2 are for the 12AX7 ECC 83 pre amp tubes Gently install each tube in the correct corresponding tube socket Please note each tube s pin configuration must be properly ...

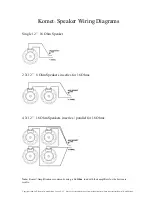
Page 16: ...4 X 12 16 Ohm Speakers in series parallel for 16 Ohms Note Komet Amplification recommends using a 16 Ohm load with their amplifiers for the best sonic results Copyright 1999 2017 Komet Amplification Group L L C May not be reproduced in any form without express written consent from Komet Amplification ...

Page 17: ...Komet Airbrake Manual Copyright 1999 2017 Komet Amplification Group L L C May not be reproduced in any form without express written consent from Komet Amplification ...

Page 18: ...e overall sound of an amplifier The Komet Airbrake sounds very natural and transparent at reasonable levels of attenuation It allows the user to bring the level of a 50 60 Watt Komet amplifier down to that of a cranked 20 to 25 watt amplifier all the while retaining its distinct voice and dynamics It is therefore best suited to match Komet amplifiers to a smaller room or in a quieter playing setti...

Page 19: ...6 Keep in mind that the combined load of both cabinets or both speaker loads will be 8 Set your amplifier s impedance selector accordingly to 8 Do not use two 8 speaker cabinets The combined load will be 4 which is below the Komet Airbrake 8 16 Ohm operating range For the same reason do not use two 4 cabinets Never combine two cabinets of different impedance ratings for example an 8 cab and a 16 c...

Page 20: ...ximum load capability for the Komet Airbrake is 200 Watts under full attenuation You should not have a problem using the Komet Airbrake with a 100W amplifier but it is always best to operate your 100W amplifier and attenuator within reason Final note The Komet Airbrake power attenuator reduces volume by converting the amp s excessive power into heat The device will get very warm even hot during us...

Page 21: ...Komet Airbrake Layout Copyright 1999 2017 Komet Amplification Group L L C May not be reproduced in any form without express written consent from Komet Amplification ...

Page 22: ...telephone number of the owner together with a brief description of any claimed defects Parts or product for which replacement is made shall become the property of Komet Amplification The customer may be responsible for all costs of transportation and insurance both to and from Komet Amplification depending on result of inspection and validation of warranty request Customer may be required to prepa...

Page 23: ...Please check any corresponding box on shipping label Please do not return ship your amplifier for Home Delivery service or Saturday delivery Please do not send for early morning before 9 00 A M delivery We prefer afternoon delivery Note Komet Amplification will not be held responsible for any Komet amplifier amplifier component or contents damaged or lost during shipping to Komet Amplification Kom...

Reviews: