Operation
3.3 Operation
WA70-7 – VENAM02003
3-55
Additional water separator
(Option)
1. Keep a container ready for collecting the fluid from the water
separator.
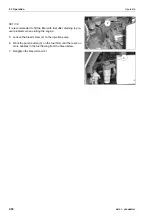
2. Close the stop valve (A) by turning the lever upward.
3. Release the collar nut (B) and remove the glass container
(C).
4. Empty the glass container.
5. Reinstall the glass container and hand-tighten the collar nut.
6. Open the stop valve (A) by turning the lever downward.
NOTICE
The two water separators are bled together at the end.
Water separator – draining water and dirt accumulations
1. Keep a container ready for collecting the fluid from the water
separator.
2. Unscrew the valve (1) at the bottom of the water separator
by 2 rotations.
3. Drain off water and dirt until pure fuel flows out.
4. Retighten the valve (1) again by turning clockwise.
ATTENTION
Do not over-tighten the valve, as this might damage the thread.
B
C
A
1
Summary of Contents for WA70-7
Page 2: ......
Page 3: ...Foreword WA70 7 VENAM02003 1 1 1 Foreword...
Page 23: ...Foreword 1 5 Table of contents WA70 7 VENAM02003 1 21 Blank for technical reason...
Page 28: ...1 7 Equipment Foreword 1 26 WA70 7 VENAM02003...
Page 75: ...Operation WA70 7 VENAM02003 3 1 3 Operation...
Page 114: ...3 2 Descriptions of the individual elements Operation 3 40 WA70 7 VENAM02003 Fuse allocation...
Page 185: ...Troubleshooting WA70 7 VENAM02003 4 1 4 Troubleshooting...
Page 203: ...Maintenance WA70 7 VENAM02003 5 1 5 Maintenance...
Page 277: ...Technical data WA70 7 VENAM02003 6 1 6 Technical data...
Page 283: ...Special equipment attachments WA70 7 VENAM02003 7 1 7 Special equipment attachments...
Page 291: ...Index WA70 7 VENAM02003 8 1 8 Index...
Page 296: ...8 1 Index Index 8 6 WA70 7 VENAM02003...
Page 297: ...Notes WA70 7 VENAM02003 9 1 9 Notes...
Page 298: ...Notes 9 2 WA70 7 VENAM02003...
Page 299: ...Notes WA70 7 VENAM02003 9 3...
Page 300: ...Notes 9 4 WA70 7 VENAM02003...
Page 301: ...Notes WA70 7 VENAM02003 9 5...
Page 302: ...Notes 9 6 WA70 7 VENAM02003...


