background image

MAINTENANCE

SERVICE PROCEDURE

REPLACE HYDRAULIC FILTER ELEMENT

 WARNING

The parts and oil are at high temperature after the engine is stopped, and may cause burns. Wait for the temperature to go down
before starting the work.
When removing the oil filler cap, turn it slowly to release the internal pressure, then remove it.

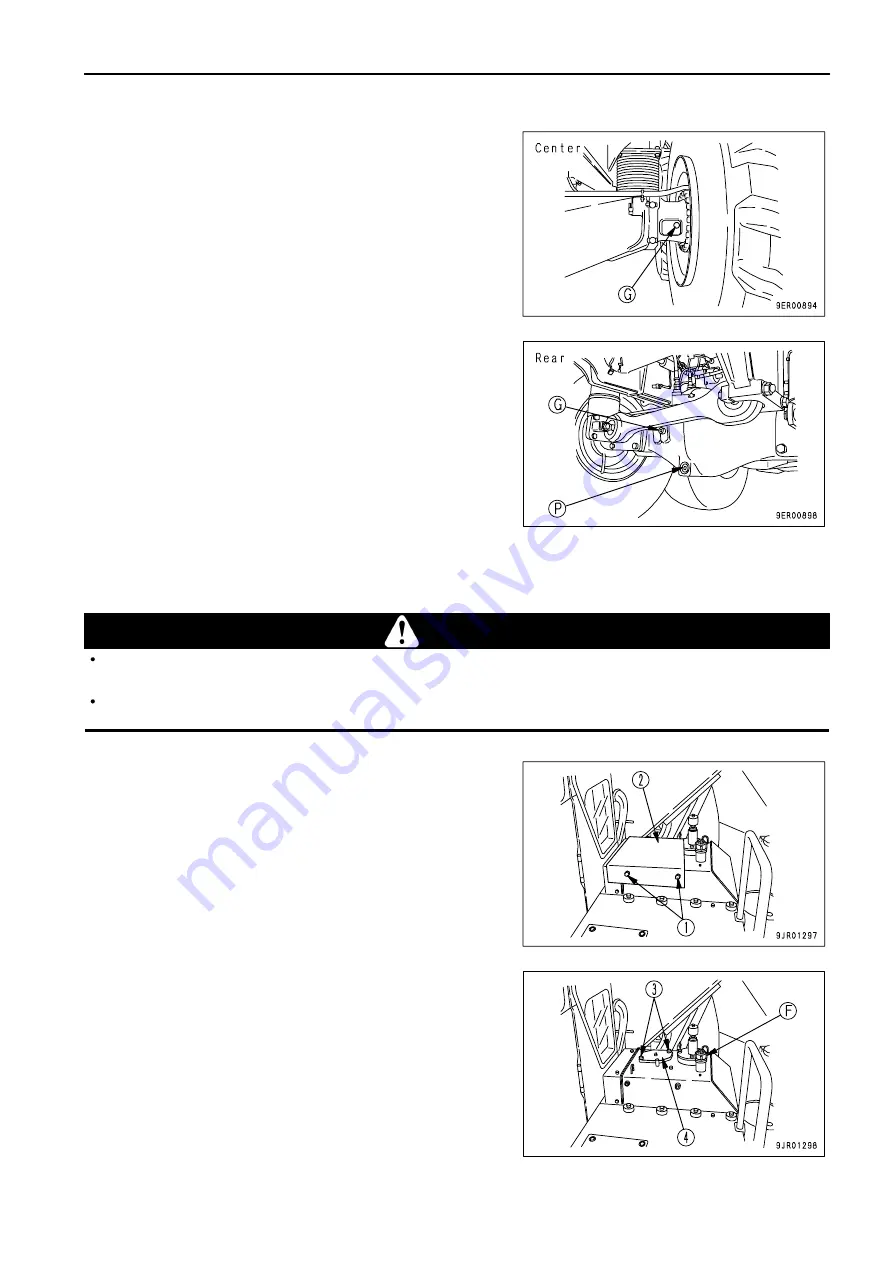
 1. Remove bolt (1), then remove cover (2).
 2. Turn the cap of oil filler (F) slowly to release the internal

pressure, then remove the cap.

 3. Remove bolts (3), then remove cover (4).
 4. Take out the element, then wash the inside of the case and the

removed parts.

 5. Install the new element, then install cover (4) with bolts (3).
 6. Install cover (2) with bolts (1).

4 - 65

Summary of Contents for HM400-1

Page 1: ... 1 1 ...

Page 2: ...t you understand them fully Keep this manual at the storage location for the Operation and Maintenance Manual given below and have all personnel read it periodically If this manual has been lost or has become dirty and cannot be read request a replacement manual immediately from Komatsu or your Komatsu distributor If you sell the machine be sure to give this manual to the new owners together with ...

Page 3: ... FOREWORD FOREWORD 1 3 ...

Page 4: ... FOREWORD FOREWORD 1 4 ...

Page 5: ...ation which if not avoided could result in death or serious injury Indicates a potentially hazardous situation which if not avoided may result in minor or moderate injury This word is used also to alert against unsafe practices that may cause property damage Example of safety message using signal word WARNING When standing up from the operator s seat always place the safety lock lever in the LOCK ...

Page 6: ...d inside a triangle and the method of avoiding the hazardous condition is shown inside a circle Komatsu cannot predict every circumstance that might involve a potential hazard in operation and maintenance Therefore the safety messages in this manual and on the machine may not include all possible safety precautions If any proceduresor actions not specifically recommendedor allowed in this manual a...

Page 7: ... USE INTENDED USE DIRECTIONS OF MACHINE In this manual the directions of the machine front rear left right are determined according to the view from the operator s seat in the direction of travel front of the machine 1 7 ...

Page 8: ...cement parts please inform your Komatsu distributor of the following items PRODUCT IDENTIFICATION NUMBER PIN MACHINE SERIAL NO PLATE This is at the rear left of the cab The design of the nameplate differs according to the territory ENGINE SERIAL NO PLATE POSITION It is at the top left side of the engine cylinder block and the engine cylinder head as seen from the fan 1 8 ...

Page 9: ...AND DISTRIBUTOR SERVICE METER POSITION It is at the center bottom of the machine monitor TABLE TO ENTER SERIAL NO AND DISTRIBUTOR Machine serial No Engine serial No Product identification number PIN Distributor name Address Service Personnel Phone Fax 1 9 ...

Page 10: ...TION 2 21 TRANSPORTATION 2 24 BATTERY 2 25 TOWING 2 27 PRECAUTIONS FOR MAINTENANCE 2 28 PRECAUTIONS WITH TIRES 2 35 OPERATION 3 1 GENERAL VIEW 3 2 GENERAL VIEW OF MACHINE 3 2 GENERAL VIEW OF CONTROLS AND GAUGES 3 3 EXPLANATION OF COMPONENTS 3 5 MACHINE MONITOR 3 5 OTHER FUNCTIONS OF MACHINE MONITOR 3 26 SWITCHES 3 29 CONTROL LEVERS AND PEDALS 3 40 MECHATRONICS EQUIPMENT CONTROLLER 3 45 SAFETY PIN ...

Page 11: ...FTER COLD WEATHER 3 117 LONG TERM STORAGE 3 118 BEFORE STORAGE 3 118 DURING STORAGE 3 118 AFTER STORAGE 3 118 PRECAUTIONS BEFORE TRAVELING AFTER LONG TERM STORAGE 3 118 TROUBLESHOOTING 3 119 AFTER RUNNING OUT OF FUEL 3 119 TOWING THE MACHINE 3 120 IF BATTERY IS DISCHARGED 3 122 OTHER TROUBLE 3 125 MAINTENANCE 4 1 GUIDES TO MAINTENANCE 4 2 OUTLINE OF SERVICE 4 4 HANDLING OIL FUEL COOLANT AND PERFOR...

Page 12: ...URS SERVICE 4 35 EVERY 250 HOURS SERVICE 4 36 EVERY 500 HOURS SERVICE 4 49 EVERY 1000 HOURS SERVICE 4 56 EVERY 2000 HOURS SERVICE 4 63 EVERY 4000 HOURS SERVICE 4 71 EVERY 6000 HOURS SERVICE 4 73 EVERY 8000 HOURS SERVICE 4 73 SPECIFICATIONS 5 1 SPECIFICATIONS 5 2 INDEX 6 1 1 12 ...

Page 13: ... 2 1 ...

Page 14: ...RAILS AND STEPS 2 13 MOUNTING AND DISMOUNTING 2 13 CRUSHING OR CUTTING PREVENTION 2 13 PREVENTION OF BURNS 2 14 FIRE PREVENTION 2 14 ACTION IF FIRE OCCURS 2 15 WINDOW WASHER LIQUID 2 15 PRECAUTIONS WHEN USING ROPS Roll Over Protective Structure 2 16 PRECAUTIONS FOR ATTACHMENTS 2 16 UNAUTHORIZED MODIFICATION 2 16 SAFETY AT WORKSITE 2 16 WORKING ON LOOSE GROUND 2 17 DO NOT GO CLOSE TO HIGH VOLTAGE C...

Page 15: ...NG 2 27 WHEN TOWING 2 27 PRECAUTIONS FOR MAINTENANCE 2 28 WARNING TAG 2 28 KEEP WORK PLACE CLEAN AND TIDY 2 28 APPOINT LEADER WHEN WORKING WITH OTHERS 2 28 STOP ENGINE BEFORE CARRYING OUT INSPECTION AND MAINTENANCE 2 29 TWO WORKERS FOR MAINTENANCE WHEN ENGINE IS RUNNING 2 30 PROPER TOOLS 2 31 HANDLING SUSPENSION CYLINDER ACCUMULATOR 2 31 PERSONNEL 2 31 WORK UNDER THE MACHINE 2 31 NOISE 2 31 PRECAU...

Page 16: ... always keep them clean When cleaning them do not use organic solvents or gasoline These may cause the labels to peel off There are also other labels in addition to the warning signes and safety labels Handle those labels in the same way If the labels are damaged lost or cannot be read properly replace them with new ones For details of the part numbers for the labels see this manual or the actual ...

Page 17: ... SAFETY SAFETY LABELS SAFETY LABELS 1 Roll over protective structure ROPS 09620 30202 2 Cautions for checking engine room 09667 A0880 3 Precaution when releasing radiator cap 09653 A0641 2 5 ...

Page 18: ...AFETY SAFETY LABELS SAFETY SAFETY LABELS 4 Precaution when releasing hydraulic tank cap 09653 A0641 5 Precaution when handling suspension 09659 A0641 6 Precautions for handling accumulator 09659 A057B 2 6 ...

Page 19: ...aintenance Warnings for inspection of emergency steering system brake system Warning for leaving operator s seat stopping engine Warning for retarder oil temperature 56B 93 12180 8 Cautions before starting Cautions when traveling in reverse Cautions for operating hoist control lever 569 93 61720 2 7 ...

Page 20: ... SAFETY SAFETY LABELS SAFETY SAFETY LABELS 9 Precaution when handling battery cable 09808 A1681 10 Exhaust pipe is hot 09817 A1103 11 Prohibited to enter 09162 C0881 2 8 ...

Page 21: ...FETY LABELS SAFETY SAFETY LABELS 12 Precaution for safety bar 09161 C0881 13 Precautions for high voltage 7872 10 1600 14 Precaution when handling battery This plate is fixed in position by the battery maker 2 9 ...

Page 22: ...Y SAFETY LABELS SAFETY SAFETY LABELS 15 Precaution for parking brake This plate is fixed in position by the chamber maker 16 Prohibited to jump start 09842 A0481 This plate is fixed to the starting motor 2 10 ...

Page 23: ...chine until the abnormality has been corrected CLOTHING AND PERSONAL PROTECTIVE ITEMS Do not wear loose clothing and accessories There is a hazard that they may catch on dump lever or other protruding parts If you have long hair and it hangs out from your hard hat there is a hazard that it may get caught up in the machine so tie your hair up and be careful not to let it get caught Always wear a ha...

Page 24: ...your shoes your foot may slip and this may cause a serious accident Do not leave parts or tools lying around the operator s compartment Do not stick suction pads to the window glass Suction pads act as a lens and may cause fire Do not use cellular telephones inside the operator s compartment when driving or operating the machine Never bring any dangerous objects such as flammable or explosive item...

Page 25: ... on or off the machine check the handrails and steps and if there is any oil grease or mud on them wipe it off immediately In addition repair any damage and tighten any loose bolts Do not get on or off the machine while holding tools in your hand MOUNTING AND DISMOUNTING Never jump on or off the machine Never get on or off a moving machine If the machine starts to move when there is no operator on...

Page 26: ...reeze and window washer liquid are particularly flammable and can be hazardous To prevent fire always observe the following Do not smoke or use any flame near fuel or oil Stop the engine before refueling Do not leave the machine while adding fuel or oil Tighten all fuel and oil caps securely Do not spill fuel on overheated surfaces or on parts of the electrical system Use well ventilated areas for...

Page 27: ...hey are loose they may vibrate during operation and rub against other parts This may lead to damage to the hoses and cause high pressure oil to spurt out leading to fire damage or serious injury Explosion caused by lighting equipment When checking fuel oil battery electrolyte window washer fluid or coolant always use lighting with anti explosion specifications If such lighting equipment is not use...

Page 28: ...your Komatsu distributor for advice Any injuries accidents or product failures resulting from the use of unauthorized attachments or parts will not be the responsibility of Komatsu Always read the instruction manual for the attachment UNAUTHORIZED MODIFICATION Any modification made without authorization from Komatsu can create hazards Before making a modification consult your Komatsu distributor K...

Page 29: ...0 000 V Over 11 m 36 ft Even going close to high voltage cables can cause electric shock which may cause serious burns or even death Always maintain a safe distance see the table on the right between the machine and the electric cable Check with the local power company about safe operating procedure before starting operations To prepare for any possible emergencies wear rubber shoes and gloves Lay...

Page 30: ...s and signs before starting work EMERGENCY ESCAPE FROM OPERATOR S CAB The cab installed on this machine has doors on the left and right sides If the door on one side does not open escape through the door on the other side ASBESTOS DUST HAZARD PREVENTION Asbestos dust in the air can cause lung cancer if it is inhaled There is danger of inhaling asbestos when working on jobsites handling demolition ...

Page 31: ...y to carry out operations and check that there is no damage or wear to the seat belt or mounting clamps Check that the gauges and instruments work properly check the angle of the mirror and check that the gearshift lever is at neutral and the dump lever is at HOLD Before starting the engine make sure that the safety lock knob is in the LOCK position Adjust the mirrors so that the rear of the machi...

Page 32: ... will be slow or may change suddenly and this may cause an accident If the battery electrolyte is frozen do not charge the battery or start the engine with a different power source There is a hazard that this will ignite the battery and cause the battery to explode Before charging or starting the engine with a different power source melt the battery electrolyte and check that there is no leakage o...

Page 33: ...ition PRECAUTIONS WHEN TRAVELING IN FORWARD OR REVERSE Before travelling check again that there is no one in the surrounding area and that there are no obstacles Before travelling sound the horn to warn people in the area Always operate the machine only when seated If another person is allowed on the machine that person may sit only in the assistant s seat Check that the backup alarm backup warnin...

Page 34: ...s a hazard that the machine may slip If the engine should stop on a slope apply the brakes fully and apply the parking brake also to stop the machine Do not shift gear while traveling downhill or travel downhill with the transmission in neutral It is dangerous if the engine has no braking effect Always set the transmission to a lower gear before starting to travel downhill PRECAUTIONS WHEN OPERATI...

Page 35: ...hift down to use the engine brake and carry out double braking depress the brake pedal several times to stop the machine When the loaded materials in the dump body are frozen do not dump There is a danger that the machine could tip over PARKING MACHINE Park the machine on firm level ground Select a place where there is no hazard of falling rocks or landslides or of flooding if the land is low When...

Page 36: ...at low speed drive the machine at low speed and operate slowly Never correct your steering on the ramps If necessary drive off the ramps correct the direction then enter the ramps again When loading or unloading to an embankment or platform make sure that it has suitable width strength and grade After loading the machine always lock the door There is danger that the door may open during transporta...

Page 37: ...rea with large amount of water If acid gets into your eyes flush them immediately with large amount of water and seek medical attention Before working with batteries turn the starting switch to the OFF position As there is a hazard that sparks will be generated always do as follows Do not let tools or other metal objects make any contact between the battery terminals Do not leave tools or other me...

Page 38: ...ine There is a hazard that the machine will move when the power is connected Be sure to connect the positive cable first when installing the booster cables Disconnect the negative cable ground side first when removing them When removing the booster cables be careful not to let the booster cable clips touch each other or to let the clips touch the machine Always wear safety goggles and rubber glove...

Page 39: ...on of the wire rope For towing see TOWING THE MACHINE PAGE 3 120 Always wear leather gloves when handling wire rope During the towing operation never stand between the towing machine and the machine being towed Never tow a machine on a slope Never use a wire rope which has cut strands A reduced diameter B or kinks C There is danger that the rope may break during the towing operation 2 27 ...

Page 40: ...viceman is carrying out service or maintenance of the machine it may lead to serious injury KEEP WORK PLACE CLEAN AND TIDY Do not leave hammers or other tools lying around in the work place Wipe up all grease oil or other substances that will cause you to slip Always keep the work place clean and tidy to enable you to carry out operations safely If the work place is not kept claen and tidy there i...

Page 41: ...Select a place where there is no hazard of falling rocks or landslides or of flooding if the land is low Lower the dump body set dump lever 1 to the HOLD position lock with safety lock knob 2 then stop the engine Set parking brake switch to the PARKING position and put blocks 3 under the tires to prevent the machine from moving 2 29 ...

Page 42: ... ready to stop the engine at any time All workers must maintain contact with the other workers Set dump lever 1 to the HOLD position lock with safety lock knob 3 then set parking brake switch 2 to the PARKING position When carrying out operations near the fan fan belt or other rotating parts there is a hazard of being caught in the parts so be careful not to come close Do not touch the gearshift l...

Page 43: ...sealing gas into the cylinder or releasing gas from it PERSONNEL Only authorized personnel can service and repair the machine Do not allow unauthorized personnel into the area If necessary employ an observer WORK UNDER THE MACHINE If it is necessary to go under the machine when it is raised in order to carry out service or maintenance support the machine securely with blocks and stands strong enou...

Page 44: ...rent PRECAUTIONS WITH HIGH PRESSURE OIL The hydraulic system is always under internal pressure When inspecting or replacing piping or hoses always check that the pressure in the hydraulic circuit has been released If the circuit is still under pressure it will lead to serious injury so always do as follows For details of the method of releasing the pressure see the section on INSPECTION AND ADJUST...

Page 45: ...ion Never touch the injector terminal or the inside of the engine controller If it is necessary to touch the injector terminal or the inside of the engine controller please contact your Komatsu distributor WASTE MATERIALS To prevent pollution pay careful attention to the method of disposing of waste materials Always put oil drained from your machine in containers Never drain oil directly onto the ...

Page 46: ...ment of safety critical parts See PERIODIC REPLACEMENT OF SAFETY CRITICAL PARTS PAGE 4 14 The material of these components naturally changes over time and repeated use causes deterioration wear and fatigue As a result there is a hazard that these components may fail and cause serious injury or death It is difficult to judge the remaining life of these components from external inspection or the fee...

Page 47: ...do not fit the tire there is a problem with the tire or rim parts Always contact your Komatsu distributor for repairs If the rim parts are not fitted properly when the tire is being pumped up there is danger that the rim parts may fly off so set up a protective fence around the tire and do not stand directly in front of the rim Stand beside the tread when pumping up the tire Do not adjust the tire...

Page 48: ... ...

Page 49: ... 3 1 ...

Page 50: ... OPERATION GENERAL VIEW GENERAL VIEW GENERAL VIEW OF MACHINE 1 2 3 4 5 Hydraulic tank Dump body Rear wheel Hoist cylinder Front wheel 6 7 8 9 Turn signal lamp Head lamp Air cleaner Fuel tank 3 2 ...

Page 51: ... 5 6 Dump lever Lamp switch Turn signal lever Dimmer switch Steering wheel Machine monitor Retarder control lever Cigarette lighter 7 8 9 10 11 12 Shift lever Parking brake switch Accelerator pedal Brake pedal Left and right differential lock pedal Safety lock knob 3 3 ...

Page 52: ...g lamp switch if equipped Side lamp switch if equipped Working lamp rear switch if equipped Working lamp front switch Machine monitor bulb check switch 9 10 11 12 13 14 15 16 Night lighting dimmer switch Hazard lamp switch Emergency steering switch Power mode selector switch AISS LOW switch Inter axle differential lock switch Exhaust brake switch Left and right differential lock switch 3 4 ...

Page 53: ...eeded for operating the machine To perform suitable operations correctly and safely it is important to completely understand the methods of operating equipment and meanings of the displays MACHINE MONITOR A B C Character display Caution items Emergency stop item D E Meter display portion Central warning lamp 3 5 ...

Page 54: ...urned ON if the shift lever is not at the neutral position after completion of the system check the shift lever position pilot lamp and the central warning lamp will light up and the alarm buzzer will continue to sound intermittently When this happens if the shift lever is set at neutral N is displayed the central warning lamp goes out and the buzzer stops Check central warning lamp alarm buzzer m...

Page 55: ...nce an action code is displayed to recommend suitable action When the time for replacing the filter or changing the oil is reached after completion of the system check with the starting switch at the ON position the maintenance monitor caution lamps flash or light up and at the same time the filter or oil to be replaced is displayed NOTICE Information regarding the failure of the machine or mainte...

Page 56: ... probably a failure in the machine so please contact your Komatsu distributor for inspection ODOMETER This meter 2 indicates the total distance traveled in kilometers Even when the starting switch is at the OFF position while the top of machine monitor mode selector switch 1 is being pressed it indicates the total distance traveled NOTICE When the starting switch is at the OFF position if the tota...

Page 57: ...displayed stop the machine immediately check the failure code and contact your Komatsu distributor for repairs REMARK The top line of the character display displays E03 and the bottom line displays CHECK RIGHT NOW and CALL in turn for 3 seconds each The telephone number is displayed on the right of the CALL display If the telephone number has not been set there is a blank For details of the method...

Page 58: ...e filter or changing the oil reset the replacement interval For details see RESET METHOD FOR FILTER OIL REPLACEMENT TIME PAGE 3 26 REMARK The top line of the character display shows the name and ID number of the item needing replacement The line at the bottom shows the remaining time until replacement and the total number of times the item has been replaced After giving the display for 30 seconds ...

Page 59: ...IDGE PAGE 4 50 Engine oil filter CHANGE OIL IN ENGINE OIL PAN REPLACE ENGINE OIL FILTER CARTRIDGE PAGE 4 49 Engine oil CHANGE OIL IN ENGINE OIL PAN REPLACE ENGINE OIL FILTER CARTRIDGE PAGE 4 49 Corrosion resistor REPLACE CORROSION RESISTOR CARTRIDGE PAGE 4 56 Transmission oil CHANGE OIL IN TRANSMISSION CASE PAGE 4 58 Transmission oil filter REPLACE TRANSMISSION OIL FILTER ELEMENT VALVE SIDE PAGE 4...

Page 60: ...ly and take the necessary action 1 2 3 Seat belt caution lamp Parking brake pilot lamp Dump body pilot lamp 4 5 6 Emergency steering pilot lamp Fuel level caution lamp Maintenance caution lamp SEAT BELT CAUTION LAMP This monitor 1 lights up if the seat belt is not fastened There is danger when traveling so always fasten your seat belt 3 12 ...

Page 61: ...d this monitor lights up so turn the lamp off see Section CANCELING DUMP BODY HOLD CONDITION PAGE 3 84 for details EMERGENCY STEERING PILOT LAMP This monitor 4 lights up when the emergency steering is actuated If any abnormality should occur in the steering oil pressure circuit when the machine is traveling the auto emergency steering is actuated and the related lamp lights up FUEL LEVEL CAUTION L...

Page 62: ...raulic oil level if equipped Clogged air cleaner Clogged hydraulic filter if equipped Clogged transmission oil filter Drop in engine cooling water level Clogged brake cooling oil filter if equipped Worn brake disc front left if equipped Worn brake disc front right if equipped Worn brake disc center left if equipped Worn brake disc center right if equipped Worn brake disc rear left if equipped Worn...

Page 63: ...er oil temperature caution lamp Battery charge circuit caution lamp Steering oil temperature caution lamp Engine oil pressure caution lamp 7 8 9 10 11 12 Retarder oil pressure caution lamp Tilt caution lamp Machine monitor option system caution lamp Engine system caution lamp Transmission system caution lamp Retarder system caution lamp ENGINE WATER TEMPERATURE CAUTION LAMP This monitor 1 warns th...

Page 64: ...fe place set the shift lever to the N position and run the engine under no load at a mid range speed until the lamp goes out BATTERY CHARGE CIRCUIT CAUTION LAMP This monitor 4 lights up when the engine is running to warn the operator of an abnormality in the charging system When it lights up E03 CHECK RIGHT NOW is displayed on the character display at the same time so stop the machine immediately ...

Page 65: ...r are not actuated when the engine is stopped If the brake oil pressure is lower than the specified value 30 seconds after the engine has been started E03 CHECK RIGHT NOW is displayed on the character display so stop the machine immediately at a safe place then stop the engine and carry out inspection TILT CAUTION LAMP This monitor 8 lights up if the dump body has left its seat when the rear frame...

Page 66: ... up when an abnormality has been detected in the system controlled by the transmission controller When it lights up E03 CHECK RIGHT NOW is displayed on the character display at the same time so stop the machine immediately at a safe place then stop the engine and carry out inspection RETARDER SYSTEM CAUTION LAMP This monitor 12 lights up when an abnormality has been detected in the system controll...

Page 67: ...lot lamp Shift hold pilot lamp 7 8 9 10 11 12 Head lamp high beam pilot lamp Turn signal pilot lamp Shift indicator Shift lever position pilot lamp Power mode pilot lamp Left and right differential lock pilot lamp PREHEATING PILOT LAMP This monitor 1 lights up when the electrical heater for preheating the engine is being actuated When the starting switch is turned to the ON position in cold weathe...

Page 68: ...MP This monitor 3 lights up when the retarder control lever is pulled and the retarder is actuated INTER AXLE DIFFERENTIAL LOCK PILOT LAMP This monitor 4 lights up when the inter axle differential lock is actuated LOCKUP PILOT LAMP This monitor 5 lights up when the torque converter lockup is engaged and the transmission is shifted to direct drive 3 20 ...

Page 69: ... hold switch is actuated HEAD LAMP HIGH BEAM PILOT LAMP This monitor 7 lights up when the head lamps are set to high beam TURN SIGNAL PILOT LAMP This monitor 8 flashes at the same time as the turn signal lamp flashes SHIFT INDICATOR This monitor 9 shows the transmission shift range speed range 3 21 ...

Page 70: ... the speed range selected by the shift lever lights up POWER MODE PILOT LAMP This monitor 11 displays the power mode When the mode is selected with the power mode selector switch either High Power P or Economy E lights up LEFT AND RIGHT DIFFERENTIAL LOCK PILOT LAMP This monitor 12 lights up when the left and right differential locks are actuated 3 22 ...

Page 71: ...TS METERS 1 2 3 Speedometer Engine tachometer Fuel gauge 4 5 6 Engine water temperature gauge Torque converter oil temperature gauge Retarder oil temperature gauge SPEEDOMETER This meter 1 indicates the travel speed of the machine 3 23 ...

Page 72: ...in the white range during operation If it is in the red range during operation the alarm buzzer will sound and the central warning lamp will light up at the same time E02 ENGINE OVERHEAT is displayed on the character display so run at the engine under no load at a mid range speed and wait until the meter enters the white range If it is in the red range the engine output is automatically limited TO...

Page 73: ...on run the engine under no load at a mid range speed and wait until the lamp goes out CENTRAL WARNING LAMP If the machine is in the following condition this lamp will flash and at the same time the alarm buzzer will sound intermittently When an abnormality has occurred in any of EMERGENCY STOP ITEM PAGE 3 15 When action code E02 or E03 is displayed on the character display If the parking brake is ...

Page 74: ...onitor mode selector switch 1 or turn the starting switch OFF RESET METHOD FOR FILTER OIL REPLACEMENT TIME The filter and oil replacement time is displayed on the character display so if the filter and oil have been replaced reset the filter and oil change time 1 Press the of machine monitor mode selector switch 1 and display the reverse travel in odometer 2 Press or of machine monitor mode select...

Page 75: ...or mode selector switch 1 and display the reverse travel odometer 2 Press or of machine monitor mode selector switch 2 and display TEL 3 Press of machine monitor mode selector switch 1 It will change to the display in the diagram on the right Once the telephone number is input the input number will be displayed next time 4 Up to 12 digits can be displayed for the telephone number Input from the fi...

Page 76: ...ress the of machine monitor mode selector switch 1 The presently selected language is displayed 4 Press or of machine monitor mode selector switch 2 and select the language The available languages are English Japanese German French Italian Spanish and Swedish 5 When the of machine monitor mode selector switch 1 is pressed the language is set and the screen returns to the previous screen 6 When com...

Page 77: ... Shift hold switch Parking brake switch AISS LOW switch Inter axle differential lock switch 13 14 15 16 17 18 19 20 21 22 23 24 25 Left and right differential lock switch Fog lamp switch if equipped Side lamp switch if equipped Working lamp front switch Working lamp rear switch if equipped Yellow rotating lamp switch if equipped Power window switch right Power window switch left Machine monitor mo...

Page 78: ...FF position then operate it as usual to the ON position In cold weather if the starting switch is turned to the ON position preheating is automatically started and the preheating pilot lamp lights up After the preheating is completed the preheating pilot lamp goes out START position This is the position to start the engine Hold the key at this position while cranking Release the key immediately af...

Page 79: ...on If it does not return return it by hand DIMMER SWITCH This switch 2 is used to switch the head lamps between high beam and low beam Each time switch 2 is moved up in direction a the head lamps switch between high beam and low beam When the switch is released it automatically returns to its original position b When the lamp switch is OFF if the switch is operated in direction a the head lamps li...

Page 80: ...tuated and the exhaust brake pilot lamp lights up c Exhaust brake is not operated When working at night the symbol inside the switch lights up regardless of the selected position of the switch HAZARD LAMP SWITCH This switch 5 is used to make the left and right turn signal indicators flash a OFF b Turn signal lamp and turn signal pilot lamp flash When working at night the symbol inside the switch l...

Page 81: ... steering pump can be used for a maximum of 90 seconds When the emergency steering is being used keep the travel speed to a maximum of 5 km h 3 1 MPH The emergency steering is actuated automatically in the following cases When the steering hydraulic pump fails When the engine has stopped during operation When the emergency steering is actuated stop the machine promptly and perform inspection If th...

Page 82: ...lights up regardless of the selected position of the switch REMARK If the engine is stopped with the parking brake switch at TRAVEL the parking brake will be applied even though the switch is at TRAVEL In this case start the engine again operate the switch to PARKING and then move it back to TRAVEL to cancel the parking brake AISS LOW SWITCH Using this switch 11 it is possible to switch the AISS f...

Page 83: ...e symbol inside the switch lights up regardless of the selected position of the switch For details when using the differential lock see OPERATION USING DIFFERENTIAL LOCK PAGE 3 100 LEFT AND RIGHT DIFFERENTIAL LOCK SWITCH This switch 13 can be used to switch the conditions of the left and right differential locks When the switch is pressed and the left and right differential lock pedal is depressed...

Page 84: ...at night the symbol inside the switch lights up regardless of the selected position of the switch WORKING LAMP FRONT SWITCH This switch 16 is used to switch the working lamp front on and off a Working lamp goes out b Working lamp lights up When working at night the symbol inside the switch lights up regardless of the selected position of the switch WORKING LAMP REAR SWITCH If equipped This switch ...

Page 85: ...lass be careful not to get anyone s hands or head caught There is danger of serious injury if anyone is caught in the window glass CAUTION After fully opening or fully closing the window glass release the switch immediately If the switch is kept operated it may cause failure of the power window Switches 19 and 20 are used to open and close the window glass The switches can only be used when the st...

Page 86: ... for the front glass and rear glass Using the wiper when the glass is dry will scratch the glass Spray with window washer fluid before actuating the wiper Front wiper Position a OFF Stopped Position b INT Wiper moves once every 4 to 7 seconds Position c LOW Wiper moves at low speed Position d Hi Wiper moves at high speed When the button at the tip of the switch is pressed washer fluid is sprayed o...

Page 87: ...FF Position a OFF Position b Lights up when the door opens Position c Lights up REMARK The room lamp lights up even when the main switch is OFF so when leaving the operator s seat set the switch to position a or b When carrying out operations with the door fully opened set the switch to position a OFF 3 39 ...

Page 88: ...S CONTROL LEVERS AND PEDALS 1 2 3 4 Brake pedal Accelerator pedal Shift lever Dump lever 5 6 7 Retarder control lever Left and right differential lock pedal Safety lock knob BRAKE PEDAL This pedal 1 is used to apply the wheel brakes 3 40 ...

Page 89: ...he transmission is fixed in R1 and the travel is carried out in torque converter drive or direct drive according to the travel speed The maximum travel speed in this position is 7 4 km h 4 6 MPH Position R2 This is used when traveling in reverse When this position is used the transmission is fixed in R2 and the travel is carried out in torque converter drive or direct drive according to the travel...

Page 90: ... lever is not at the N neutral position the engine will not start When the starting switch is at the ON position if the shift lever is not at the N neutral position the shift lever position pilot lamp will flash the central warning lamp will light up and the alarm buzzer will sound If the parking brake is applied or the shift lever is not at the N neutral position the central warning lamp will lig...

Page 91: ...ower the dump body before traveling This lever 4 is used to operate the dump body a RAISE b HOLD The dump body stops and is held in position c FLOAT The dump body moves freely under external force d LOWER Always set to the FLOAT position when traveling It is impossible to travel in reverse if the dump body is raised If the engine stops during the dump operation the dump body is held in position re...

Page 92: ...ed SAFETY LOCK KNOB WARNING When carrying out inspection of the machine with the dump body raised always set the dump lever to the HOLD position lock with the safety lock knob then use the safety pin This device 7 is used to lock the dump lever To set to the FREE position pull the lock knob up until it stops then turn it to lock it in position To set to the LOCK position pull the lock knob up then...

Page 93: ...ation of the abnormality When the condition is normal 0 0 0 L 0 or 0 C is displayed ENGINE CONTROLLER A 2 digit failure code is displayed in the inspection window of this controller 2 to show the location of the abnormality When the condition is normal 0 0 is displayed RETARDER CONTROLLER A 2 digit failure code is displayed in the inspection window of this controller 3 to show the location of the ...

Page 94: ...afety pins 1 then insert lock pins 2 to stow in position ARTICULATE LOCK WARNING If the machine is transported or raised without applying the articulation lock the machine may suddenly articulate This may cause serious injury to persons in the surrounding area When transporting or raising the machine always apply the articulation lock Apply the articulation lock if necessary when carrying out main...

Page 95: ...ctrical equipment and wiring from burning out If the fuse becomes corroded or white powder can be seen or the fuse is loose in the fuse holder replace the fuse NOTICE When replacing any fuse always turn the power off turn the starting switch to OFF When replacing the fuse always use a fuse of the same capacity and type FUSE CAPACITY AND CIRCUIT NAME Fuse box I No Capacity Name of circuit 1 30A Mai...

Page 96: ...19 20A Rear wiper motor 20 20A Radio Terminal B Air conditioner controller if equipped 21 10A Transmission controller Engine controller machin monitor panel 22 20A Hazard lamp 23 10A Emergency steering 24 5A Room lamp 25 20A Direct from battery spare Fuse box III No Capacity Name of circuit 26 20A Fog lamp if equipped 27 20A Air conditioner controller if equipped 28 10A Heater 29 20A Heater 30 10A...

Page 97: ...if equipped 41 10A Horn 42 10A Electric mirror if equipped tachograph if equipped 43 10A Cigarette lighter 44 10A Air suspension seat 45 Fuse box V No Capacity Name of circuit 46 30A Power source for fuse box Precautions when adding electrical equipment CAUTION If the electrical equipment system is changed abnormalities may occur in the machine control Do not make any changes to the electrical sys...

Page 98: ...r switch Volume Tone control knob Display Clock button Displaying frequency AST 6 7 8 9 Preset switch Seek Band selector switch Tuning switch POWER SWITCH VOLUME When this switch 1 is turned to the right it clicks and the power is turned on If it is turned further the speaker volume is adjusted 3 50 ...

Page 99: ... frequency and the operating mode CLOCK BUTTON DISPLAYING FREQUENCY When this button 4 is pressed the display changes to the time If it is pressed again it displays the frequency AST When this button 5 is pressed the preset stations are called up in turn When the desired broadcasting station is reached press the button again to stop it If the button is kept pressed continuously for 2 seconds it is...

Page 100: ...matically searches for stations that can be received and when it receives a station it stops BAND SELECTOR SWITCH When this switch 8 BAND is pressed the band is switched between FM and MW AM The reception band and frequency are displayed on the display TUNING SWITCH When the TUNE button U of switch 9 is pressed the frequency goes up when the V button is pressed the frequency goes down If it is kep...

Page 101: ...d tone as desired 5 To turn the radio OFF turn VOL knob 1 to the left until a click is heard METHOD OF AUTOMATIC TUNING When the SEEK switch is pressed it moves up to higher frequencies and when it finds a station that can be received it stops automatically METHOD OF MANUAL TUNING When the TUNE button U is pressed the frequency goes up when the V button is pressed the frequency goes down If it is ...

Page 102: ...tched off all the preset settings are deleted Carry out the presetting operation again It is possible to preset 6 AM MW stations and 6 FM stations METHOD OF AUTOMATIC MEMORY If the AST button is pressed for 2 seconds the broadcasting stations that can be received in the area are called up in turn and the broadcasting stations are automatically saved in the preset memory AUTOMATIC SWITCHING RECEPTI...

Page 103: ...ONS FOR USE Stow the antenna when traveling in places with low overhead clearance To ensure safety always keep the sound to a level where it is possible to hear outside sounds during operation If water gets into the speaker case or radio it may lead to an unexpected failure so be careful not to get water on the equipment Do not wipe the scales or buttons with benzene thinner or any other solvent W...

Page 104: ...Loudness button Time radio display selector button Tape eject button 8 9 10 11 12 13 14 Cassette door Fast forward rewind buttons Preset buttons Metal tape button Manual tuning buttons Seek tuning buttons Band selector button A B C D Band display Metal tape display FM stereo reception display Loudness display E F G Tape direction display Preset channel display Time frequency display 3 56 ...

Page 105: ...y is memorized in the auto store REMARK The auto store function cannot be used when the channel display is flashing When the display is flashing the preset scan function is being used Preset scan If this button is pressed for less than 0 5 second while in radio reception programs from the six preset stations in the same band will be broadcast one after another for 5 seconds each starting from No 1...

Page 106: ...easily by emphasizing the low tone when the low tones are weak Push button Actuated ON Push button again Canceled OFF TIME RADIO DISPLAY SELECTOR BUTTON This button 6 is used to switch between the Radio tape display and the Time display Correcting the time Press the button to set the time display A Correcting hour Keep the DISP button pressed and press the bottom H of the TUNING button to correct ...

Page 107: ... press the button pointing in the same direction as the lighted arrow indicating the direction of play the tape will be fast forwarded if you press the button pointing in the opposite direction the tape will rewind To stop the tape lightly press the button that is not locked The fast forward or rewind operation will be canceled If the fast forward and rewind buttons are pressed at the same time th...

Page 108: ... for FM when TUN button is pressed the frequency goes down 9 kHz for AM or 0 1 MHz for FM If the button is pressed down and held the frequency will change continuously SEEK TUNING BUTTONS These buttons 13 are used to seek tuning When the SEEK UP button is pressed the search automatically goes up when the SEEK DOWN button is pressed the search automatically goes down When the next station that can ...

Page 109: ...3 Press manual memory button 2 or seek tuning button 3 4 Press preset button 4 of the number to be preset for 2 seconds while the frequency display is being shown on the display The preset channel and frequency are displayed and the presetting is completed 5 Repeat Steps 2 to 4 to preset other stations REMARK Use Steps 2 to 4 also when changing the setting of a preset switch to another station Whe...

Page 110: ...tte when listening to the radio the tape will start to play LISTENING TO CASSETTE TAPE 1 Turn the starting switch ON then turn power switch 1 ON 2 Set the cassette with the exposed portion of the tape on the right side and push it past the cassette door The tape will automatically start playing If the arrow indicating the direction of play is pointing to the right the top side is being played if t...

Page 111: ... with benzene thinner or any other solvent Wipe with a soft dry cloth Use a cloth soaked in alcohol if the equipment is extremely dirty NOTICE Handling cassette tape Clean the tape head approx once a month with a commercially available head cleaning tape Do not leave the tape any place where it is exposed to direct sunlight any place that is excessively dusty or any place where there is a magnetic...

Page 112: ...t even on dusty jobsites GENERAL LOCATIONS ON CONTROL PANEL 1 2 3 Fan switch Air conditioner switch Mode selector switch 4 5 External Internal air changeover switch Temperature control switch FAN SWITCH This switch 1 can be used to adjust the air flow to 4 stages This switch also acts as the main switch for the air conditioner When the switch is pressed the indicator lamp above the switch lights u...

Page 113: ...re available FACE FACE FOOT FOOT FOOT DEF DEF When the switch is pressed the indicator lamp above the switch lights up to display the vent mode EXTERNAL INTERNAL AIR CHANGEOVER SWITCH This switch 4 changes between internal air circulation and external air intake When pressing the switch the indicator lamp on the top of switch lights up Internal air circulation This switch 4 is used when wishing to...

Page 114: ...switch to set the temperature The settings for each mode are retained in memory even when the starting switch is turned OFF However in the following cases the settings must be made again When the machine has been out of use for more than 7 days When the battery voltage is extremely low When there has been abnormal interference from outside When the fan switch is turned OFF the setting is not kept ...

Page 115: ...WHEN NOT USING THE AIR CONDITIONER REGURARLY To lubricate each part of the compressor operate cooling dehumidifying and heating for 3 to 5 minutes once a month at low idle Also check the amount of cooling gas twice a year REMARK If the temperature inside the cab is low the air conditioner may not work In such cases use the recirculated air to heat up the inside of the cab then turn the air conditi...

Page 116: ...e at low speed and set the temperature control lever to the central position Clean the air filter and check the refrigerant For details see CLEAN AIR CONDITIONER AIR FILTER PAGE 4 26 and CHECK REFRIGERANT GAS LEVEL PAGE 4 26 To enable the air conditioner to perform to the full and to maintain a pleasant working environment always contact your Komatsu distributor to have the air conditioner refille...

Page 117: ...epairs if any abnormality is found 2 Remove dirt from around engine battery radiator and aftercooler Check that there is no dirt or dust accumulated around the engine radiator or aftercooler Check also that there is no flammable material dry leaves twigs etc accumulated around the battery or engine muffler turbocharger or other high temperature parts of the engine Remove any dirt or flammable mate...

Page 118: ...ent to the machine Tighten any loose bolts When the belt has been used for a long time if any external damage or fraying of the belt can be seen or if the clamps are broken or deformed replace the seat belt 11 Inspect tires WARNING If worn or damaged tires are used they may burst and cause serious injury or death To ensure safety do not use the following tires Wear Tires with a tread groove of les...

Page 119: ...l in this condition there is a hazard of burns Wait for the temperature to go down then turn the cap slowly to release the pressure before removing it 1 Open the engine hood and check that the coolant in subtank 1 is between the FULL and LOW marks 2 If the level is LOW remove cap 2 and add the engine coolant up to the FULL mark 3 If there is no coolant in the subtank add water to the radiator thro...

Page 120: ...ts and oil are at high temperature immediately after the engine is stopped and will cause serious burns Wait for the temperature to cool down before starting the operation 1 Open the engine hood cover and check the oil level with the dipstick G 2 Take out the dipstick G and wipe off the oil with cloth 3 Completely insert dipstick G into the oil filler pipe then remove it and check the oil level 4 ...

Page 121: ...iller cap CHECK OIL LEVEL IN TRANSMISSION CASE ADD OIL 1 After starting the engine run the engine at low idling and check the oil level with dipstick G1 or the LOW TEMP scale on sight gauge G2 2 If the oil level is low add engine oil through oil filler F NOTICE The oil level changes according to the oil temperature so check the oil level after completing the warming up operation When idling during...

Page 122: ...ames near fuel because it is highly flammable and dangerous 1 Check with fuel gauge 1 on the machine monitor 2 After completing operations add fuel through fuel filler F to fill the tank Fuel tank capacity 500 liters 132 1 US gal 3 After adding fuel tighten the cap securely REMARK If the breather hole in the cap becomes clogged the pressure inside the tank will go down and the fuel may not flow th...

Page 123: ... the ON position press machine monitor check switch 1 and check that there is no failure in any monitor lamp If any instrument does not work there is probably a failure so please contact your Komatsu distributor for inspection CHECK BRAKING EFFECT Check that the parking brake foot brake and retarder brake work properly If there is any abnormality please contact your Komatsu distributor for repair ...

Page 124: ... accumulation of flammable material around the battery and remove such flammable material Please contact your Komatsu distributor for investigation and correction of any abnormalities found CHECK INFLATION PRESSURE OF TIRES Measure the inflation pressure with a tire pressure gauge while the tires are cool before starting work Check for damage or wear to the tires and the rims Check for loose wheel...

Page 125: ...at to tilt it backward Move lever 2 down and push down on the front of the seat to tilt it forward Adjustment range 13 degrees Front tilt rear tilt 4 stages each C Setting seat for operator s weight Sit on the seat and adjust the strength of the suspension with valve 3 Adjustment range Target 50 kg 110 lb to 120 kg 265 lb Push Suspension is strengthened Pull Suspension is weakened D Adjusting back...

Page 126: ...or belt If there is any wear or damage replace Even if there appears to be no abnormality in the seat belt replace the seat belt once every 3 years The date of manufacture is woven on the reverse side of the belt Adjust and fasten the seatbelt before starting to travel Always use the seatbelt when traveling Do not use the seat belt with either half of the belt twisted Fastening and removing belt F...

Page 127: ... of the steering wheel can be adjusted to the front and rear and up and down Pull lever up and set the steering wheel to the desired position then push lever down to lock the steering wheel securely in position Amount of adjustment Front rear 80 mm 80 mm 3 2 in 3 2 in from center of steering wheel Up 33 mm 1 3 in Down 17 mm 0 7 in 3 79 ...

Page 128: ...e switch to the PARKING position 1 Check that parking brake switch 1 is in the PARKING position 2 Check that shift lever 2 is at the N position REMARK If the starting switch is turned to the ON position when the shift lever is not at the N position the shift lever position pilot lamp and central warning lamp will flash and the alarm buzzer will sound 3 Check that dump lever 3 is at the HOLD positi...

Page 129: ...ngine suddenly before completing the warming up operation Do not keep the starting motor rotating continuously for more than 20 seconds If the engine does not start wait for at least 2 minutes before trying to start the engine again 1 Turn the key of starting switch 1 to the START position to start the engine 2 When the engine starts release the key in starting switch 1 The key will return automat...

Page 130: ...it for at least 2 minutes before trying to start the engine again If the accelerator pedal is kept depressed after starting the engine the engine speed will suddenly rise after the turbo protect time this may damage the turbocharger 1 Turn the key of starting switch 1 to the ON position 2 The preheating will start automatically according to the engine water temperature and the preheating pilot lam...

Page 131: ...rise above 1000 rpm Engine water temperature Turbo protect time above 10 C 50 F 0 sec 10 C to 10 C 14 F to 50 F 0 to 5 sec below 10 C 14 F 5 sec The turbocharger rotates at extremely high speed Immediately after the engine is started the pressure of the lubricating oil has not risen sufficiently so if the engine speed is suddenly raised it may lead to damage or seizure of the turbocharger bearing ...

Page 132: ...he engine do not operate the accelerator pedal or dump body for the time given below Even after this time has passed avoid sudden acceleration of the engine for 5 minutes Normal temperature 10 seconds Cold temperature 15 seconds or more When first starting engine after changing engine oil or replacing engine oil filter 20 seconds 2 After the warming up operation check that the machine monitor is n...

Page 133: ...ine 1 Set the shift lever to the N position then set the parking brake switch to the PARKING position 2 Lower the dump body and set the dump lever to the HOLD position 3 Run the engine at low idling for about 5 minutes to cool down gradually 4 Turn the key of starting switch 1 to the OFF position to stop the engine 5 Remove the key from starting switch 1 CHECKS AFTER STOPPING ENGINE 1 Walk around ...

Page 134: ...achine monitor 2 Fasten the seatbelt 3 Check that dump lever 1 is at the FLOAT position and that the dump body pilot lamp is out If the dump body pilot lamp is lighted up operate the dump lever to the HOLD position then operate it to the FLOAT position to cancel the dump body HOLD condition 4 Depressed the brake pedal fully Then set parking brake switch 2 to the TRAVEL position to release the park...

Page 135: ...re shifting from N to R or F 6 Depress accelerator pedal 5 to move the machine off NOTICE If the shift lever is shifted to a position other than N when the parking brake has not been released the central warning lamp will flash and the alarm buzzer will sound If the shift lever is shifted to a position other than N when the dump lever is at a position other than FLOAT or the body is raised the cen...

Page 136: ...l 2 to move the machine off NOTICE The machine cannot travel in reverse if the dump body is raised Lower the dump body set the dump lever to the FLOAT position then operate the shift lever to the R1 or R2 position When shifting between FORWARD and REVERSE stop the machine completely and run the engine at low idling when shifting the lever After moving the shift lever do not accelerate until you de...

Page 137: ...r when parking the machine after stopping it NORMAL STOPPING Release accelerator pedal 1 and depress brake pedal 2 to stop the machine STOPPING IN EMERGENCY If there should be a failure in the foot brake stop the machine as follows WARNING When the machine stops put blocks under the tires immediately Immediately after making an emergency stop the parking brake disc will be at high temperature so w...

Page 138: ...e switch 2 to PARKING to apply the parking brake 3 If an emergency stop has been made put blocks under the tires immediately then try to find the cause and repair it on site If the parking brake has been used to make an emergency stop it is necessary to re adjust the parking brake Contact your Komatsu distributor for adjustment 3 90 ...

Page 139: ...tect that the transmission clutch has engaged Do not operate the shift lever with the accelerator pedal depressed This will cause a big shock and will also reduce the service life of the machine SHIFTING UP 1 When accelerator pedal 2 is depressed to accelerate the machine the lockup clutch is engaged to shift the transmission to direct drive 2 If the machine is accelerated further the transmission...

Page 140: ...oil temperature caution lamp on the machine monitor lights up when the retarder is being used shift down to travel downhill When this happens the central warning lamp lights up and the alarm buzzer sounds If the caution lamp does not go out even when the transmission is shifted down stop the machine immediately set the shift lever to the N position run the engine at 1800 rpm and wait for the cauti...

Page 141: ...rder brake performance 3 When traveling downhill operate retarder control lever 2 run the engine at a speed of at least 1800 rpm and travel so that the retarder brake oil temperature gauge is in the white range For machines equipped with an exhaust brake using the exhaust brake can provide more secure braking force for increased safety and will also improve the durability of the brake For details ...

Page 142: ... a perpendicular line down 3 Take the point where it crosses the line for travel resistance 11 as B and draw a horizontal line 4 Take the point where it crosses the performance curve as C and draw a perpendicular line down Take the point where this line crosses the travel speed scale as D 5 The following information can be obtained from this procedure From point D Maximum permissible speed 25 km h...

Page 143: ... OPERATION OPERATION Brake performance Downhill distance 450 m 1476 ft Brake performance Downhill distance 450 m 1476 ft with exhaust brake 3 95 ...

Page 144: ... OPERATION OPERATION Brake performance Downhill distance 600 m 1968 ft Brake performance Downhill distance 600 m 1968 ft with exhaust brake 3 96 ...

Page 145: ... OPERATION OPERATION Brake performance Downhill distance 900 m 2952 ft Brake performance Downhill distance 900 m 2952 ft with exhaust brake 3 97 ...

Page 146: ... OPERATION OPERATION Brake performance Downhill distance 1500 m 4921 ft Brake performance Downhill distance 1500 m 4921 ft with exhaust brake 3 98 ...

Page 147: ... OPERATION OPERATION Brake performance Downhill distance Continuous Brake performance Downhill distance Continuous with exhaust brake 3 99 ...

Page 148: ...left and right differential lock when traveling Operate the inter axle differential lock switch and left and right differential lock pedal to actuate the differential lock 5 to 10 m 16 ft 5 in to 32 ft 10 in before entering a road surface where the tires are likely to slip It is important to actuate the differential lock before the tires slip in order to obtain the full ability of the differential...

Page 149: ...ifferential lock Use this setting when traveling in A and the machine gets stuck or the tires start to slip on soft ground Depress the differential lock pedal at the same time as actuating the left and right differential lock switch The differential lock will be actuated only while the pedal is being depressed When the pedal is released it is canceled REMARK If the tires slip or there is a differe...

Page 150: ...dal set to the gearshift lever to position 5 and raise the engine speed 4 Release the accelerator pedal and brake pedal 5 Depress the left and right differential lock pedal set to the gearshift lever to position R1 and raise the engine speed 6 Repeat Steps 1 5 to move the machine backwards and forwards until it can escape LOADING OPERATIONS When using a large wheel loader to load large rocks if th...

Page 151: ... switch 2 to the PARKING position 2 Move dump lever 3 to the RAISE position then depress the accelerator pedal to raise the dump body If the dump lever is released when it is at the RAISE position it is held at the RAISE position and the dump body will continue to rise The dumping speed increases in proportion to the engine speed 3 When the dump body rises to the previously set position dump lever...

Page 152: ...it will return to the FLOAT position The dump body will then move down under its own weight When raising the dump body let the accelerator pedal back near the maximum angle to avoid any impact load on the hydraulic circuit or hoist cylinders When the dump body is raised if the shift lever is at the D position the transmission is fixed in 2nd and if it is at positions 1 5 the transmission is fixed ...

Page 153: ...event interference between the cab and the dump body machine when operating the cab tilt set the machine straight The lock bar is on the right side inside the engine hood After using it always put it back in the original place WHEN USING CRANE 1 Remove pin 1 in the mount at the rear of the cab and insert it in hole 3 2 Fit the hanging tool to hooks 4 both left and right installed to the cab mount ...

Page 154: ...d be extremely careful not to let the tires slip or the machine spin and sink into the ground If the engine should stop when the machine is traveling stop the machine immediately then move the shift lever to the N position and start the engine again If the central warning lamp and pilot lamp for any EMERGENCY item on the machine monitor should flash and the buzzer sounds during operation stop the ...

Page 155: ...this may lead to a serious injury or death Before standing up from the operator s seat always set the parking brake switch securely to the PARKING position The retarder must not be used as a parking brake Do not use the retarder for long term parking regardless of the engine speed CAUTION To prevent damage to the parking brake apply the parking brake only when parking the machine 1 Release acceler...

Page 156: ...ed CHECKS AFTER COMPLETION OF WORK Use the machine monitor to check the engine water temperature engine oil pressure and fuel level If the engine has overheated do not stop the engine suddenly Run it at a mid range speed to cool it gradually before stopping LOCKING Always lock the following places 1 Fuel filler cap of fuel tank 2 Cab door left right 3 Engine hood 4 Tool box 5 Battery box REMARK Th...

Page 157: ...ase in the generation of heat in the tire This may cause premature damage to the tire so be careful of the following points Travel only when empty Check the tire inflation pressure before starting for the day when the tires are cold and adjust to the following inflation pressure Do not reduce the tire inflation pressure when traveling Tire size Inflation pressure MPa kgf cm2 PSI 29 5 R25 VLT stand...

Page 158: ...rake failure Make the road as straight as possible and particularly in intermediate areas with curves where the machine is traveling at high speed make the radius of the curve as large as possible Small S curves are particularly dangerous so avoid such curves The radius of the curve must be a minimum of 12 to 15 m 39 ft 4 in to 49 ft 3 in Make the radius of curves as large as possible Make the roa...

Page 159: ...ights and dimensions given in Section SPECIFICATIONS PAGE 5 2 Note that the specifications for the weights and dimensions for transportation differ according to the type of tires and type of dump body PRECAUTIONS WHEN LOADING Load the machine onto a trailer as follows 1 Set the parking brake switch to the PARKING position to apply the parking brake 2 Turn the starting switch to the OFF position to...

Page 160: ...lways stop the engine apply the parking brake and set the articulation lock to the LOCK position to ensure that the front frame cannot articulate When using a crane for the lifting operation the crane must be operated by a qualified person Never raise the machine with any worker on the machine When carrying out lifting operations always use a wire rope or lifting equipment that is of ample strengt...

Page 161: ...TING POSITION MARK WEIGHT TABLE Machine weight Front wheel load Center wheel load Rear wheel load Center of gravity from front axle HM400 1 30 350 kg 66 922 lb 16 810 kg 37 066 lb 6 770 kg 14 928 lb 6 770 kg 14 928 lb 2 380 mm 7 ft 10 in 3 113 ...

Page 162: ...ator s compartment is safe then lock with the articulation lock so that the front frame and rear frame cannot bend 3 To prevent damage to front grill 1 during lifting operations remove front grill 1 before starting 4 Fit the lifting equipmentto the lifting hooks with the lifting mark at the front of the front frame and the rear of the rear frame To prevent damage to the lifting equipment put prote...

Page 163: ... when handling antifreeze NOTICE Never use methanol ethanol or propanol based antifreeze Avoid using any leak preventing agent regardless if it is sold separately or in antifreeze Do not mix one brand of antifreeze with a different brand For details on the amount of antifreeze mixture and on when to change the coolant see CLEAN INSIDE OF COOLING SYSTEM PAGE 4 23 Use a Permanent Antifreeze ethylene...

Page 164: ...electrolyte from freezing INSTALLATION OF RADIATOR CURTAIN If equipped If the display for the engine water temperature gauge does not enter the white range install a radiator curtain It is possible to adjust the degree of openingof the radiator curtain fully closed one side open and both sides open Adjust to a suitable condition to match the ambient temperature so that the engine water temperature...

Page 165: ... oil for all parts with oil of the viscosity specified For details see USE OF FUEL COOLANT AND LUBRICANTS ACCORDING TO AMBIENT TEMPERATURE PAGE 4 8 If for any reason AF PT antifreeze winter one season type is used drain the cooling system completely then clean out the inside of the cooling system thoroughly and fill with fresh water 3 117 ...

Page 166: ...he rust preventive operation while the machine is indoors open the doors and windows to improve ventilation and prevent gas poisoning Operate the engine and move the machine for a short distance once a month so that a new film of oil will be coated over movable parts and component surfaces At the same time also charge the battery Before operating the work equipment wipe off all the grease from hyd...

Page 167: ...n then install it again Add fuel from small hole A dirty side at eight places Do not add fuel from hole B clean side at the center If clean fuel is not available go on to Step 2 2 Loosen air bleed plug 2 at the fuel filter head 3 Loosen the knob of priming pump 3 then pump the knob and check that fuel comes out from air bleed plug 2 4 Tighten air bleed plug 2 Tightening torque 7 8 to 9 8 N m 0 8 t...

Page 168: ...r of the machine being towed Use the specified hook for both the towing machine and the machine being towed To protect the operator if the towing wire or towing bar breaks install protective plates on both the towing machine and the machine being towed There are towing hooks under the front frame and at the rear of the rear frame Use only these hooks when towing Do not use any other place for towi...

Page 169: ...ful Connect the towing machine securely to the towed machine Use two towing machines of the same class or larger than the machine being towed connect one machine each to the front and rear of the machine being towed If it is necessary to change the direction of the machine being towed it is possible to use the emergency steering but it can be used for a maximum of only 90 seconds If the emergency ...

Page 170: ...r When handling batteries always wear protective goggles and rubber gloves When removing the battery first disconnect the cable from the ground normally the negative terminal When installing install the positive terminal first If a tool touches the positive terminal and the chassis there is danger that it will cause a spark so be extremely careful If the terminals are loose there is danger that th...

Page 171: ...t the engine with a different power source There is a hazard that this will ignite the battery electrolyte and cause the battery to explode Do not use or charge the battery if the battery electrolyte level is below the LOWER LEVEL line This may cause an explosion Always check the battery electrolyte level periodically and add distilled water to bring the electrolyte level to the UPPER LEVEL line S...

Page 172: ...ble B to the engine block of the problem machine STARTING THE ENGINE CAUTION Make sure that the parking brake switch is at PARKING position and the shift lever is at N neutral position for both normal machine and the problem machine 1 Make sure the clips are firmly connected to the battery terminals 2 Start the engine of the normal machine and keep it running at high idle 3 Turn the starting switc...

Page 173: ...ion See EVERY 250 HOURS SERVICE Lamp flickers while engine is running Battery charge system caution pilot lamp lights up while engine is running Defective alternator Defective wiring Replace Check repair Abnormal noise is generated from alternator Defective alternator Replace Starting motor does not turn when starting switch is turned to ON Defective wiring Defective starting switch Insufficient b...

Page 174: ... of front brake Make tire inflation pressure uniform See CHECK BEFORE STARTING Check wear of brake disc For details see EVERY 1000 HOURS SERVICE Braking effect is poor when brake pedal is depressed Disc has reached wear limit Rear disc has reached wear limit Insufficient oil pressure Insufficient brake oil Air in brake circuit Replace disc Replace disc Charge to specified pressure Add brake oil Se...

Page 175: ...ssed while the engine runs at low idling when the pedal is released The engine speed varies depending on the load After using the accelerator pedal to move the machine to a safe place check the service code and contact your Komatsu distributor There are two methods when operating the accelerator pedal either release the pedal check switch is OFF low idling or depress the pedal fully 1500 rpm If th...

Page 176: ...00 HOURS SERVICE Change coolant clean inside of cooling system See WHEN REQUIRED Clean or repair See EVERY 500 HOURS SERVICE Replace water temperature gauge Replace thermostat Replace thermostat seal Tighten or replace cap Repair connect wiring Radiator cooling water level monitor lights up Engine water temperature gauge is in red range Engine water temperature monitor flashes Engine water tempera...

Page 177: ...t Worn piston ring cylinder liner Defective compression Defective turbocharger Defective exchaust brake Defective injecter Clean or replace See WHEN REQUIRED Check repair See adjustment of clearance above Check replace Check replace repair Check adjust repair Engine hunts Air entering suction side of fuel line Repair place where air is leaking in Combustion noise ocaasionally makes breathing sound...

Page 178: ...ed on character display 1 2 Press the top portion of machine monitor mode selector switch 2 again The service meter and odometer will be displayed for several seconds and the screen will then return to the action code screen If more than one failure has occurred the next failure code is displayed 3 Check the failure code then contact your Komatsu distributor for repairs REMARK The 6 digit code dis...

Page 179: ... 4 1 ...

Page 180: ... to the person in charge and carry out suitable action In addition when replacing the engine oil filter fill the new filter with the specified clean oil then install it OIL CHANGE If your machine is equipped with a fuel strainer do not remove it while fueling WELDING INSTRUCTIONS Turn off the engine ignition switch Do not apply more than 200 V continuously Connect grounding the cable within 1 m 3 ...

Page 181: ...air in the circuit See WHEN REQUIRED PAGE 4 20 PRECAUTIONS WHEN INSTALLING HYDRAULIC HOSES When removing parts at locations where there are O rings or gasket seals clean the mounting surface and replace with new parts When doing this be careful not to forget to assemble the O rings and gaskets When installing the hoses do not twist or bend them into loops with a small radius This will cause damage...

Page 182: ...erly Be extremely careful not to let impurities get in when storing or adding fuel Always use the fuel specified in the Operation and Maintenance Manual Fuel may congeal depending on the temperature when it is used particularly in low temperature below 15 C 5 F so it is necessary to change to a fuel that matches the temperature To prevent the moisture in the air from condensing and forming water i...

Page 183: ...d or dirt sticking in the grease would cause wear of the rotating parts CARRYING OUT KOWA Komatsu Oil Wear Analysis KOWA is a maintenance service that makes it possible to prevent machine failures and downtime With KOWA the oil is periodically sampled and analyzed This enables early detection of wear of the machine drive parts and other abnormalities Periodic use of KOWA makes the following possib...

Page 184: ...d use them again Always replace with new filters When replacing oil filters check if any metal particles are affixed to the old filter If any metal particles are found contact your Komatsu distributor When replacing the engine oil filter fill the new filter with the specified clean oil then install it Do not open packs of spare filters until just before they are to be used Always use Komatsu genui...

Page 185: ...parentheses are to be replaced at the same time Item Part No Part Name Q ty Replacement frequency Engine oil filter 600 211 1340 Cartridge 1 EVERY 500 HOURS Fuel filter 600 319 3310 Cartridge 1 Corrosion resistor 600 411 1161 Cartridge 1 EVERY 1000 HOURS Transmission oil filter Valve side 714 07 28711 Cartridge 2 Transmission oil filter Brake cooling side 07063 51210 07000 F5180 Element O ring 2 2...

Page 186: ...HELL DONAX TD MOBIL MOBILFLUID 424 NOTICE Use only diesel fuel The engine mounted on this machine employs electronic control and a high pressure fuel injection device to obtain good fuel consumption and good exhaust gas characteristics For this reason it requires high precision for the parts and good lubrication If kerosene or other fuel with low lubricating ability is used there will be a big dro...

Page 187: ... Change oil according to the following table if fuel sulphur content is above 0 5 When starting the engine with an atmospheric temperature of lower than 0 C 32 F be sure to use engine oil of SAE10W SAE10W 30 and SAE15W 40 even though the atmospheric temperature goes up to 10 C 50 F more or less during the day Use API classification CD as engine oil and if API classification CC reduce the engine oi...

Page 188: ... BP Vanellus C3 Gear oil EP Hypogear EP Energrease LS EP2 Antifreeze 6 CALTEX RPM delo 400 RPM delo 450 Universal thuban Universal thuban EP Marfak all purpose 2 Ultra duty grease 2 AF engine coolant 7 CASTROL Turbomax RX super CRD EP EPX Hypoy Hypoy B Hypoy C MS3 Spheerol EPL2 Anti freeze 8 CHEVRON Delo 400 Universal gear Ultra duty grease 2 9 CONOCO Fleet motor oil Universal gear lubricant Super...

Page 189: ...e white grease 705 707L White bearing grease Anti freeze and summer coolant 15 PETROFIN E FINA kappa TD FINA potonic N FINA potonic NE FINA marson EPL2 FINA tamidor 16 SHELL Rimura X Spirax EP Spirax heavy duty Albania EP grease 17 SUN Sunoco GL5 gear oil Sunoco ultra prestige 2EP Sun prestige 742 Sunoco antifreeze and summer coolant 18 TEXACO Ursa super plus Ursa premium Multigear Multifak EP2 St...

Page 190: ...0 0 62 0 67 5 84 5 84 0 105 0 180 8 227 8 253 2 314 6 361 7 448 4 488 2 611 2 607 6 759 5 27 30 33 36 39 41 46 50 55 60 1320 1720 2210 2750 3280 135 0 175 0 225 0 280 0 335 0 976 5 1265 8 1627 4 2025 2 2423 1 1180 1470 1520 1910 1960 2450 2450 3040 2890 3630 120 0 150 0 155 0 195 0 200 0 250 0 250 0 310 0 295 0 370 0 868 0 1085 0 1121 1 1410 4 1446 6 1808 3 1808 3 2242 2 2133 7 2676 2 NOTICE When ...

Page 191: ...e Target value Permissible range N m kgf m lbft N m kgf m lbft 9 16 18UNF 19 44 4 5 32 5 35 63 3 5 6 5 25 3 47 0 11 16 16UN 22 74 7 5 54 2 54 93 5 5 9 5 39 8 68 7 13 16 16UN 27 103 10 5 75 9 84 132 8 5 13 5 61 5 97 6 1 14UNS 32 157 16 0 115 7 128 186 13 0 19 0 94 0 137 4 13 16 12UN 36 216 22 0 159 1 177 245 18 0 25 0 130 2 180 8 4 13 ...

Page 192: ...how deterioration like deformation or cracking replace the clamps at the same time as the hoses Also perform the following checks with hydraulic hoses which need to be replaced periodically Tighten all loose clamps and replace defective hoses as required When replacing hoses always replace O rings gaskets and other such parts at the same time SAFETY CRITICAL PARTS No Safety critical parts for peri...

Page 193: ...26 Check refrigerant gas level 4 26 Check dump body 4 27 Check electric intake air heater 4 27 Check length of suspension cylinder 4 27 Bleed air from front brake 4 28 Bleed air from center brake 4 29 Bleed air from rear brake 4 30 Check play of output coupling of output shaft 4 31 Selection and inspection of tires 4 32 CHECK BEFORE STARTING EVERY 50 HOURS SERVICE Lubrication 4 35 EVERY 250 HOURS ...

Page 194: ...ner 4 66 Clean transmission case strainer 4 67 Clean strainer in differential lock hydraulic circuit 4 67 Clean breather 4 69 Clean engine breather element 4 69 Check alternator starting motor 4 70 Check adjust engine valve clearance 4 70 Check injector EPA exhaust gas regulation areas only 4 70 Clean check turbocharger 4 70 Check play of turbocharger rotor 4 70 EVERY 4000 HOURS SERVICE Change oil...

Page 195: ...INTENANCE SCHEDULE CHART EVERY 8000 HOURS SERVICE Replace injector nozzle tip all areas except EPA exhaust gas regulation areas 4 73 Replace high pressure piping clamp 4 73 Replace fuel spray prevention cap 4 73 4 17 ...

Page 196: ...a or a B regulation area A REGULATION AREA EPA regulation areas and areas with the regulations equivalent to EPA regulations EVERY 2000 HOURS SERVICE Check injector Check the exhaust gas color visually If there is any abnormality in the exhaust gas color please ask your Komatsu distributor to carry out inspection or replacement For details of the procedure if any abnormality is found see Section E...

Page 197: ...filter cartridge Replace transmission filter element valve side brake cooling side Change oil in transmission case Change oil in brake oil tank replace brake oil filter element Change oil in final drive case Change oil in differential case Replace hydraulic filter element Change oil in hydraulic tank For details of the method of replacing or maintaining see EVERY 500 HOURS EVERY 1000 HOURS EVERY 2...

Page 198: ...place the air cleaner element immediately 3 After checking cleaning or replacing press the top of dust indicator 1 to return the red line to its original position NOTICE Do not clean the element until the dust indicator shows 0 0075 MPa 30 INCHES H2O 0 076 kgf cm2 1 1 PSI If the element is cleaned frequently before the dust indicator shows 0 0075 MPa 30 INCHES H2O 0 076 kgf cm2 1 1 PSI the air cle...

Page 199: ... Next blow with air along the folds from the outside then blow with air again from the inside 5 Remove evacuator valve 4 and clean it with compressed air After cleaning install it again NOTICE After cleaning put a light bulb inside the element and if small holes or thinner parts are found replace the element When cleaning the element do not hit it or beat it against anything Do not use any element...

Page 200: ...tape 3 Clean the air cleaner body interior then remove the cover installed in Step 2 4 Install a new inner element to the body Do not clean and re use an inner element 5 Install the outer element and the cover 6 Remove evacuator valve 4 and clean it with compressed air After cleaning install it again 7 After replacing the element return the red line of the dust indicator to its original position 4...

Page 201: ... Replacing corrosion resistor Permanent type antifreeze All season type Every year autumn or every 2000 hours whichever comes first Every 1000 hours and when cleaning the inside of the cooling system and when changing coolant Non permanent type antifreeze containing ethylene glycol winter one season type Every 6 months spring autume Drain antifreeze in spring add antifreeze in autumn When no using...

Page 202: ...front of the machine then open drain valve 3 at the bottom of the radiator and drain the water 4 After draining the water close drain valve 3 and fill with city water 5 When the radiator is full start the engine and run it at low idling Keep the engine running at low idling for 10 minutes until the water temperature reaches more than 90 C 194 F 6 Stop the engine open drain valve 3 and drain the wa...

Page 203: ...radiator cap 14 Drain the cooling water from inside subtank 4 flush the inside of the subtank then fill with water to a point between the FULL and LOW marks CHECK LEVEL OF WINDOW WASHER FLUID ADD FLUID Carry out this check if there is air in the window washer fluid Check the level of the fluid in window washer tank 1 and if it is low fill with automobile window washer fluid Be careful not to let d...

Page 204: ...nd blow off the dust with a weak flow of compressed air or with a soft brush CHECK REFRIGERANT GAS LEVEL WARNING If the refrigerant used in the cooler gets into your eyes or on your hands it may cause loss of sight or frostbite Do not touch the refrigerant Never loosen any part of the refrigerant circuit Do not bring any flame close to any point where the refrigerant gas is leaking If the cooling ...

Page 205: ...F SUSPENSION CYLINDER When traveling if the unevenness of the road surface is transmitted directly to the chassis the machine bounces or the cylinders retract and hit the stopper carry out the following checks CHECK LENGTH OF CYLINDER When checking front suspension 1 and rear suspension 2 carry out the inspection with the machine unloaded 1 Remove cover 3 2 Measure distance A from the shoulder at ...

Page 206: ...ose approx 50 mm 2 0 in below the surface of the oil Use any commercially available vinyl hose 3 Depress the brake pedal and loosen bleeder screw 1 approx 3 4 turns Keep the pedal depressed until no more bubbles come out from the vinyl hose 4 Pull the retarder control lever and loosen bleeder screw 1 approx 3 4 turns Keep the retarder control lever depressed until no more bubbles come out from the...

Page 207: ...ose approx 50 mm 2 0 in below the surface of the oil Use any commercially available vinyl hose 3 Depress the brake pedal and loosen bleeder screw 1 approx 3 4 turns Keep the pedal depressed until no more bubbles come out from the vinyl hose 4 Pull the retarder control lever and loosen bleeder screw 1 approx 3 4 turns Keep the retarder control lever depressed until no more bubbles come out from the...

Page 208: ...ter then insert a vinyl hose Prepare a container with oil in it and insert the other end of the hose approx 50 mm 2 0 in below the surface of the oil Use any commercially available vinyl hose 3 Depress the brake pedal and loosen bleeder screw 1 approx 3 4 turns Keep the pedal depressed until no more bubbles come out from the vinyl hose 4 After bleeding the air tighten bleeder screw 1 securely and ...

Page 209: ...on Using a bar move the coupling in the direction of the circumference and check the play in the circumferential direction at the outside diameter of the coupling Standard Max 15 mm 0 6 in REMARK If the play range is exceeded the engine fan will start to rotate so when inspecting the play check first that the engine fan is not rotating If the result of the measurement shows that it is greater than...

Page 210: ...es with the tire size consult your Komatsu distributor when using optional tires Maximum load kg lb Tire size Remarks Front wheel 14000 30870 29 5 R25 Type 1 for construction equipment Rear wheel 14000 30870 29 5 R25 CHECK OF INFLATION PRESSURE OF TIRES AND INFLATION OF THEM WARNING When inflating a tire check that any person will not enter the working area and use an air chuck which has a clip an...

Page 211: ... XADT standard 0 39 4 0 56 8 29 5 R25 RL2 standard 0 40 4 1 58 2 875 65 R29 if equipped 0 44 4 5 63 9 NOTICE If the tires are used when the inflation pressure is less than the value given in the table above the rim may be damaged Always keep the tire inflation pressure within 0 to 0 03 MPa 0 3 kgf cm2 4 3 PSI of the value in the table above PRECAUTIONS WHEN REPLACING TIRE After tightening hub bolt...

Page 212: ...ne oil pan add oil Check oil level in transmission case add oil Check oil level in hydraulic tank add oil Drain water sediment from fuel tank Check fuel level add fuel Check wheel hub bolts tighten Check central warning lamp alarm buzzer monitor lamps and meters Check braking effect Check emergency steering Check backup alarm Check electrical wiring Check inflation pressure of tires 4 34 ...

Page 213: ...isually that the greasing has been carried out properly 4 After greasing wipe off any old grease that was pushed out Carry out the greasing operation every day when operating in places where the grease flows out easily such as when traveling through mud or water 1 Front suspension left 2 places 2 Front suspension right 2 places 3 Rear suspension left and right 2 places each 4 35 ...

Page 214: ...e fittings shown by arrows 3 Check visually that the greasing has been carried out properly 4 After greasing wipe off any old grease that was pushed out Carry out the greasing operation every day when operating in places where the grease flows out easily such as when traveling through mud or water 1 Steering cylinder left 2 places 2 Steering cylinder right 2 places 3 Hoist cylinder left and right ...

Page 215: ... machine is shipped from the factory so it is unnecessary to carry out greasing for the first 6000 hours or 2 years REMARK If special drive shaft grease is used continuously carry out greasing every 6000 hours or every 2 years Special drive shaft grease 56B 20 19910 1 Using a grease pump pump in grease through the grease fittings marked by the arrows 2 Grease the spider portion until grease comes ...

Page 216: ... PROCEDURE CHECK DRIVE SHAFT If there is any abnormality such as looseness of the drive shaft connection play in the spline or bearing portion or runout of the shaft please contact your Komatsu distributor for repair 4 38 ...

Page 217: ...ove the mud and dirt from around the breather then remove the breather and use clean diesel oil or flushing oil to rinse off the dirt stuck to the filter inside the breather Differential case breather front Brake drain breather front left This is on the inside of the hydraulic tank Brake drain breather front right This is at the rear on the inside of the front right wheel Differential case breathe...

Page 218: ... MAINTENANCE SERVICE PROCEDURE MAINTENANCE SERVICE PROCEDURE Differential case breather rear Brake drain breather rear 4 40 ...

Page 219: ... protective glasses and mask A brake drain tube is installed to each wheel Clean the tubes of all the wheels 1 Remove cover 1 then remove brake drain tube 2 2 After removing the tube use compressed air to blow out the soil and dirt from the tube 3 Install brake drain tube 2 and cover 1 Front left and right 2 places Center left and right 2 places Rear left and right 2 places 4 41 ...

Page 220: ... weather add it before starting operations in the morning to prevent the electrolyte from freezing Inspect the battery electrolyte level at least once a month and follow the basic safety procedures given below WHEN CHECKING ELECTROLYTE LEVEL FROM SIDE OF BATTERY If it is possible to check the electrolyte level from the side of the battery check as follows 1 Use a wet cloth to clean the area around...

Page 221: ...s the bottom of the sleeve UPPER LEVEL line without fail Use the diagram below for reference and check if the electrolyte reaches the bottom of the sleeve 2 After adding distilled water tighten cap 1 securely REMARK If distilled water is added to above the bottom of the sleeve use a syringe to lower the level to the bottom of the sleeve Neutralize the removed fluid with baking soda sodium bicarbon...

Page 222: ...cover removed in step 1 Confirm that no part of the cover touches any turning part of the alternator REMARK Check each pulley for breakage and wear of the V groove In particular check that the V belt does not touch the bottom of the V groove If any abnormality is found ask your Komatsu distributor for replacement of the pulley If the V belt is so lengthened that it cannot be adjusted any more or i...

Page 223: ...humb at a point midway between the air compressor pulley and drive pulley with a force of approx 58 8 N 6 kgf 3 Tighten bolt 1 and nut 2 to secure the compressor in position 4 Check each pulley for damage wear of the V groove and wear of the V belt In particular be sure to check that the V belt is not touching the bottom of the V groove 5 If the V belt is so lengthened that it cannot be adjusted a...

Page 224: ... position lock with the safety lock knob then use the safety pin 1 Wash the frame and A frame to make it easier to check 2 Check all parts of the frame and A frame for damage In particular check the hatched portions in the diagram and if any cracks or damage are found repair the damage Please contact your Komatsu distributorfor details of the repair procedure 4 46 ...

Page 225: ...here is danger of damage inside the transmission so always do this with the shift lever at the D position Do not use any other position CHECK BRAKING CAPACITY OF RETARDER BRAKE WARNING If the machine moves it will lead to serious injury or death If machine begins to move during the inspection of braking capacity lower the engine speed immediately set shift lever at N position and then depress the ...

Page 226: ...NG 2 Set shift lever 2 to the D position gradually raise the engine speed If the machine does not move even when the engine speed reaches 1400 rpm it is normal 3 Lower the engine speed set shift lever at N position If any abnormality is found ask your Komatsu distributor for repair NOTICE There is danger of damage inside the transmission so always do this with the shift lever at the D position Do ...

Page 227: ...in plug 1 drain plug 2 68 6 9 8 N m 7 1 kgf m 50 6 7 2 lbft 5 Using the filter wrench turn filter cartridge 3 to the left to remove it When doing this to prevent getting oil on yourself do not carry out this operation from immediately under the cartridge In particular if this operation is carried out immediately after stopping the engine a large amount of oil will come out so wait for 10 minutes b...

Page 228: ... get in and cause problems with the injection system Always avoid using substitute parts When carrying out inspection or maintenance of the fuel system pay more attention than normal to the entry of dirt If dirt is stuck to any part use fuel to wash it off completely Prepare a filter wrench 1 Set the container to catch the fuel under the filter cartridge 2 Using a filter wrench turn filter cartrid...

Page 229: ...riming pump 3 becomes stiff 14 Push the knob of priming pump 3 in and tighten it 15 After replacing the filter cartridge start the engine and check for leakage of oil from the filter seal surface If any oil leakage is found check the tightening of the filter cartridge If oil still leaks repeat Steps 1 and 2 to remove the filter cartridge then check the packing surface for damage or embedded foreig...

Page 230: ...ASE ADD OIL WARNING The parts and oil are at high temperature immediately after the engine is stopped and may cause serious burns Wait for the temperature to go down before starting the operation If there is still pressure remaining inside the case the oil or plug may fly out Loosen the plug slowly to release the pressure 1 Stop the machine so that the TOP casting mark is at the top and drain plug...

Page 231: ...ing plug oil may spout out So turn the plug gradually to release the internal pressure then carefully remove it 1 Remove plug G and check that the oil level is near the bottom of the plug hole 2 If the oil level in the front differential case is low add axle oil through oil filler port F until oil overflows from the plug hole 3 If the oil level in the center or rear differential case is low add ax...

Page 232: ... so always clean or carry out inspection and take the necessary actions Cleaning can be carried out by using jets of air steam or water but be careful not to let the nozzle contact the fin Air pressure Max 0 98 MPa 10 kgf cm2 142 PSI Steam pressure Max 0 39 MPa 4 kgf cm2 56 8 PSI When using compressed air or steam keep the nozzle at a right angle to the radiator and after cooler Examine the rubber...

Page 233: ... is approx 17 to 19 mm 0 67 to 0 75 in when a point midway between the fan pulley and tension pulley is pressed with the thumb with a force of 98 N 10 kgf When the belt is replaced with a new belt the standard deflection is 13 to 15 mm 0 51 to 0 59 in 3 Check for damage to the pulleys and wear of the groove and belt Be particularly careful to check that the belt is not in contact with the bottom o...

Page 234: ...ge 3 Using a filter wrench remove cartridge 2 4 Clean the filter holder coat the seal surface of the new cartridge thinly with engine oil then install the cartridge 5 When installing tighten until the gasket contacts the seal surface of the filter holder then tighten a further 2 3 turns If the filter cartridge is tightened too far the gasket will be damaged and this will lead to leakage of water I...

Page 235: ...ON CASE ADD OIL PAGE 3 73 BRAKE COOLING SIDE 1 Remove bolt 1 then remove cover 2 2 Set the container to catch the oil directly under the drain plug P Remove drain plug P drain the oil then tighten the plug again 3 Take out the element then clean the inside of the case and removed parts 4 Install the new element then install cover 2 with bolt 1 5 Add engine oil For details see CHECK OIL LEVEL IN TR...

Page 236: ...owly to release the internal pressure then remove it Refill capacity 115 liters 30 38 US gal including brake oil tank To drain all the oil carry out the procedure for Item CHANGE OIL IN BRAKE OIL TANK REPLACE BRAKE OIL FILTER ELEMENT PAGE 4 60 at the same time 1 Set the container to catch the oil directly under the drain plug P Remove 2 drain plugs P drain the oil then tighten the plug again 2 Ref...

Page 237: ...50 mm 2 0 in below the surface of the oil Use any commercially available vinyl hose 4 Start the engine loosen bleeder screw 1 approx 3 4 turns and keep the engine running at idling until fewer bubbles come out from the vinyl hose 5 Tighten bleeder screw 1 properly then install the cap 6 After adding oil check that the oil is at the specified level See CHECK OIL LEVEL IN TRANSMISSION CASE ADD OIL P...

Page 238: ...r Item CHANGE OIL IN TRANSMISSION CASE PAGE 4 58 at the same time 1 Depress the brake pedal at least 20 times to reduce the pressure inside the brake control accumulator to 0 2 Set the container to catch the oil directly under drain plug P Remove drain plug P drain the oil then tighten the plug again 3 Remove filter case 1 4 Take out the element and wash the inside of the filter case Replace O rin...

Page 239: ...SMISSION CASE ADD OIL PAGE 3 73 LUBRICATION 1 Using a grease pump pump in grease through grease fittings marked by arrows 2 After greasing wipe off any old grease that was pushed out Carry out the greasing operation every day when operating in places where the grease flows out easily such as when traveling through mud or water 1 Transmission rear mount 1 place 2 Center hinge pin 2 places 3 Praking...

Page 240: ...ntacts the piston 5 If mark 3 at position A of rod 2 enters beyond guide end face 4 it means that the disc has reached the wear limit If the disc has reached the wear limit please contact your Komatsu distributor for inspection and maintenance 6 Tighten cap nut 1 removed in Step 3 Tightening torque 14 7 to 19 6 N m 1 5 to 2 0 kgf m 10 8 to 14 5 lbft REMARK With new machines the position of the gui...

Page 241: ...osen the plug slowly to release the pressure Refill capacity Front left right 6 0 liters 1 59 US gal each Center left right 4 5 liters 1 19 US gal each Rear left right 4 5 liters 1 19 US gal each 1 Stop the machine so that the TOP casting mark is at the top and drain plug P is at the bottom 2 Remove drain plug P drain the oil then tighten the plug again 3 Add axle oil to the specified level throug...

Page 242: ...sen the plug slowly to release the pressure Refill capacity Front 22 5 liters 5 94 US gal Center 39 0 liters 10 30 US gal Rear 35 0 liters 9 25 US gal 1 Remove drain plug P drain the oil then tighten the plug again 2 Add axle oil to the specified level through the hole for plug G or oil filler port F 3 After adding oil check that the oil is at the specified level See CHECK OIL LEVEL IN DIFFERENTIA...

Page 243: ... removing the oil filler cap turn it slowly to release the internal pressure then remove it 1 Remove bolt 1 then remove cover 2 2 Turn the cap of oil filler F slowly to release the internal pressure then remove the cap 3 Remove bolts 3 then remove cover 4 4 Take out the element then wash the inside of the case and the removed parts 5 Install the new element then install cover 4 with bolts 3 6 Inst...

Page 244: ...emperature to go down before starting the operation If there is still pressure remaining inside the case the oil or plug may fly out Loosen the plug slowly to release the pressure 1 Remove plug 1 of the strainer 2 places inside the front left wheel 2 Take the strainer out from strainer case 2 then wash it in clean diesel fuel 3 Assemble the strainer to strainer case 2 then install plug 1 4 66 ...

Page 245: ...clean diesel fuel or flushing oil If the strainer is damaged replace it 3 Install the strainers to their original position CLEAN STRAINER IN DIFFERENTIAL LOCK HYDRAULIC CIRCUIT WARNING The parts and oil are at high temperature immediately after the engine is stopped and may cause serious burns Wait for the temperature to go down before starting the operation If there is still pressure remaining in...

Page 246: ...ter rear differential lock This is on the left side at the front of the rear frame Suction strainer for center differential lock This is at the rear of the center differential case Suction strainer for rear differential lock This is on the left side of the rear differential case 4 68 ...

Page 247: ...il or flushing oil to rinse off the dirt stuck to the filter inside the breather Transmission breather Hydraulic tank breather CLEAN ENGINE BREATHER ELEMENT WARNING Engine parts and oil are at high temperature immediately after the engine is stopped and will cause serious burns Wait for the temperature to cool down before starting the operation 1 Wipe off the dirt from around the breather 2 Loosen...

Page 248: ...TING MOTOR The brush may be worn or have no grease on the bearing so contact your Komatsu distributor for inspection or repair If the engine is started frequently carry out inspection every 1000 hours CHECK ADJUST ENGINE VALVE CLEARANCE Special tools are needed for the inspection and maintenance so please contact your Komatsu distributor to have this work carried out CHECK INJECTOR See Section A R...

Page 249: ...gh oil filler F to the specified level 5 After adding oil check that the oil is at the specified level For details of the oil to use see CHECK OIL LEVEL IN HYDRAULIC TANK ADD OIL PAGE 3 73 CHECK WATER PUMP Check for play in the pulley leakage of grease or water or clogging of the drain hole If any abnormality is found contact your Komatsu distributor for disassembly and repair or replacement CHECK...

Page 250: ... hardened rubber please contact your Komatsu distributor for replacement CHECKING FOR MISSING FUEL SPRAY PREVENTION CAP HARDENING OF RUBBER Check for any missing fuel spray prevention caps 1 to 11 or fuel spray prevention cover 12 and check also for any hardened rubber portions If there are any missing caps or cover or the rubber is hardened please contact your Komatsu distributor for repairs 4 72...

Page 251: ...ease 56B 20 19910 1 Using a grease pump pump in grease through the grease fittings marked by the arrows 2 Grease the spider portion until grease comes out from the cap seal 3 After greasing wipe off any old grease that was pushed out EVERY 8000 HOURS SERVICE Maintenance for every 50 250 500 1000 2000 4000 and 6000 hours service should be carried out at the same time REPLACE INJECTOR NOZZLE TIP See...

Page 252: ... ...

Page 253: ... 5 1 ...

Page 254: ...ine Flywheel horsepower kW HP rpm 331 440 2000 Max torque N m kgf m lbft rpm 2045 208 5 1508 1 1400 A Overall length mm ft in 11025 36 2 B Overall height mm ft in 3700 12 2 C Overall height when dumping mm ft in 7130 23 5 D Overall width mm ft in 3450 11 4 E Min ground clearance bottom of rear axle mm ft in 620 2 Min turning radius mm ft in 8710 28 7 Travel speed FORWARD 1 st km h MPH 7 2 4 5 2 nd...

Page 255: ...INTENANCE 4 2 H HANDLING OIL FUEL COOLANT AND PERFORMING OIL CLINIC 4 4 HANDLING TIRES 3 109 I INTENDED USE 1 7 DIRECTIONS OF MACHINE 1 7 L LOADING OPERATIONS 3 102 LOCATION OF PLATES TABLE TO ENTER SERIAL NO AND DISTRIBUTOR 1 8 ENGINE SERIAL NO PLATE POSITION 1 8 PRODUCT IDENTIFICATION NUMBER PIN MACHINE SERIAL NO PLATE 1 8 SERVICE METER POSITION 1 9 TABLE TO ENTER SERIAL NO AND DISTRIBUTOR 1 9 L...

Page 256: ...VICE 4 71 EVERY 50 HOURS SERVICE 4 35 EVERY 500 HOURS SERVICE 4 49 EVERY 6000 HOURS SERVICE 4 73 EVERY 8000 HOURS SERVICE 4 73 INITIAL 250 HOURS SERVICE ONLY AFTER THE FIRST 250 HOURS 4 19 WHEN REQUIRED 4 20 SHIFTING GEAR 3 91 SPECIFICATIONS 5 2 STANDARD TIGHTENING TORQUES FOR BOLTS AND NUTS 4 12 STARTING ENGINE 3 81 STEERING THE MACHINE 3 100 STOPPING ENGINE 3 85 SWITCHES 3 29 T TORQUE LIST 4 12 ...

Page 257: ... ...

Page 258: ... HM400 1 GALEO ARTICULATED DUMP TRUCK Form No SEAM040302P 2004 KOMATSU All Rights Reserved Printed in Japan 02 04 ...

Reviews: