Komando Rotating 2 Manual Download Page 3


Camera key features:        


Included Accessories:
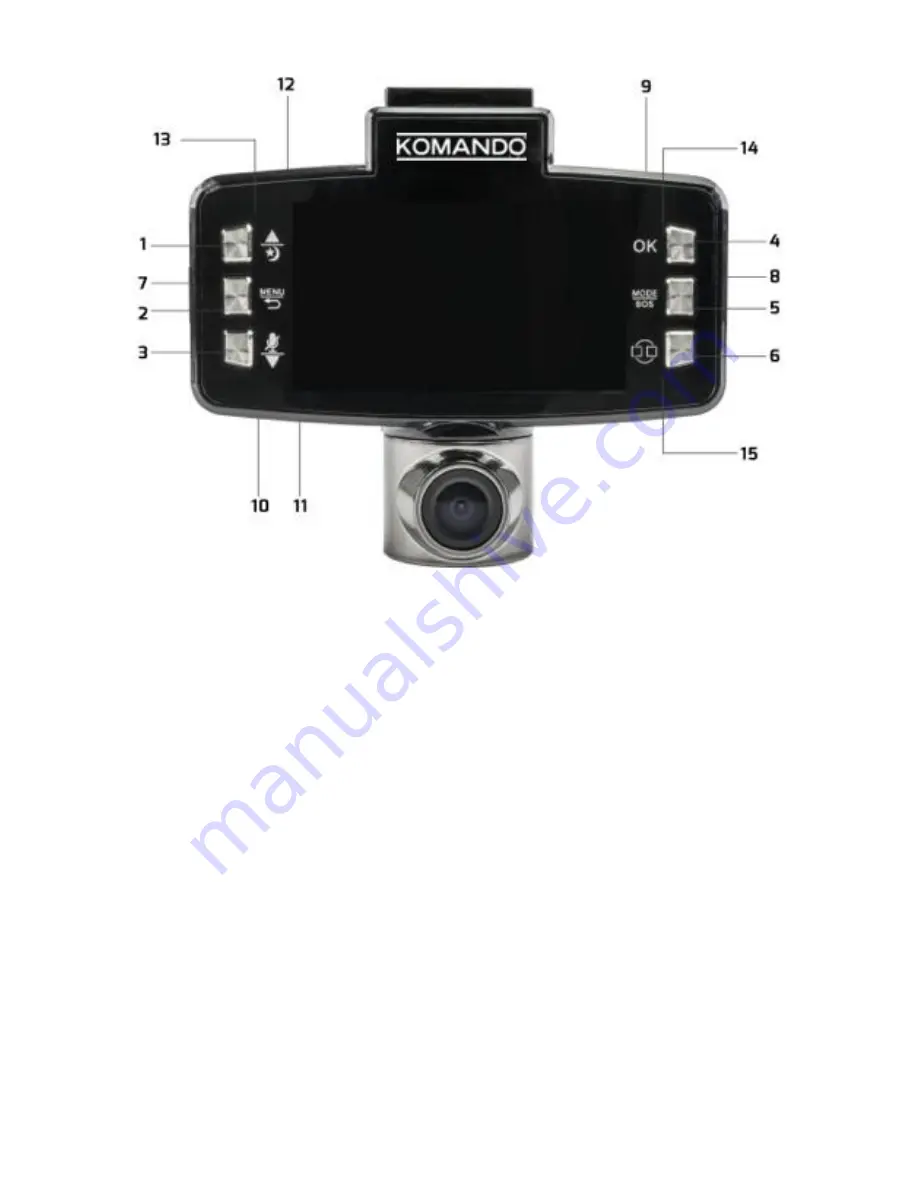
 

1. Up arrow / Night 

LED’s  


Micro USB Cable 

2. Menu / Back arrow   


Micro USB Car Charger 

3. Down arrow / MIC switch    


Windshield Mount 

4. OK key  


32GB MicroSD Card 

5. Mode key / SOS 
6. Screen toggle 
7. Memory card socket 
8. Power button 
9. AV-OUT Socket 
10. MIC 
11. Reset 
12. Micro USB power connector 
13. The power led 
14. Video recording / standby indicator 
15. WIFI connection indicator 


Summary of Contents for Rotating 2

Page 1: ...Thank you for purchasing the Komando Rotating Dual Dash Cam2 Please review this guide fully before use For any questions not answered in this guide please contact Support Komando com ...

Page 2: ...s best used when installed near the rear view mirror at the center and top of windshield must follow all local laws related to mounted devices in vehicle The operating temperature should be kept between 14 and 122 F 10 and 50 C Technical Features Specifications Video resolution 1920 x 1080 1280 x 720 640 x 480 Compression format H 264 Cycle recording motion detection parking monitor Power supply r...

Page 3: ...Micro USB Car Charger 3 Down arrow MIC switch Windshield Mount 4 OK key 32GB MicroSD Card 5 Mode key SOS 6 Screen toggle 7 Memory card socket 8 Power button 9 AV OUT Socket 10 MIC 11 Reset 12 Micro USB power connector 13 The power led 14 Video recording standby indicator 15 WIFI connection indicator ...

Page 4: ...ause of the internal software and applications this device features the battery power is limited when not plugged in Some vehicles do not have constant power to their DC outlet when not in use If your Dash Cam is left in the vehicle without constant power use of the Dash Cam will be limited Menu Settings Power on your unit stop the recording and hit the Menu button This will bring you to the menu ...

Page 5: ...D MM YYYY Stamp Date Logo Default Date Logo off When off is selected video will not show time Language select English Default Español Português Русский Chinese Simplified and traditional Chinese Deutsch Italiano Latviski Polski Română Slovenč Flicker Frequency rate 50 Hertz Default 60 Hertz LCD Power Save Off 1 Min Default 3 Min LED light On Off The default Protect Level G Sensor Off 0 1 2 default...

Page 6: ...he unit is not recording and is in standby mode Pressing OK will manually stop and start recording in Video Mode To change the camera display Picture in Picture To toggle the view between the two cameras and enable PIP mode picture in picture use the bottom on the bottom right corner of the screen 6 in the diagram Screen Time Out LCD POWER SAVE By default the camera is set to turn the LCD screen o...

Page 7: ...curity purposes To activate it set it to something other than OFF under the General Settings menu Viewing Recordings Power on the unit stop the recording and hit the MODE SOS 5 button twice Use the UP and DOWN buttons to navigate the through the files and press OK to select a recording Press the Menu button to access the Playback menu Here you can use the UP and DOWN buttons to Delete Protect or v...

Page 8: ...easonable protection against harmful interference in a residential installation This equipment generates uses and can radiate radio frequency energy and if not installed and used in accordance with the instructions may cause harmful interference to radio communications However there is no guarantee that interference will not occur in a particular installation If this equipment does cause harmful i...

Reviews: