7 頁
8 頁
6.
Preparation
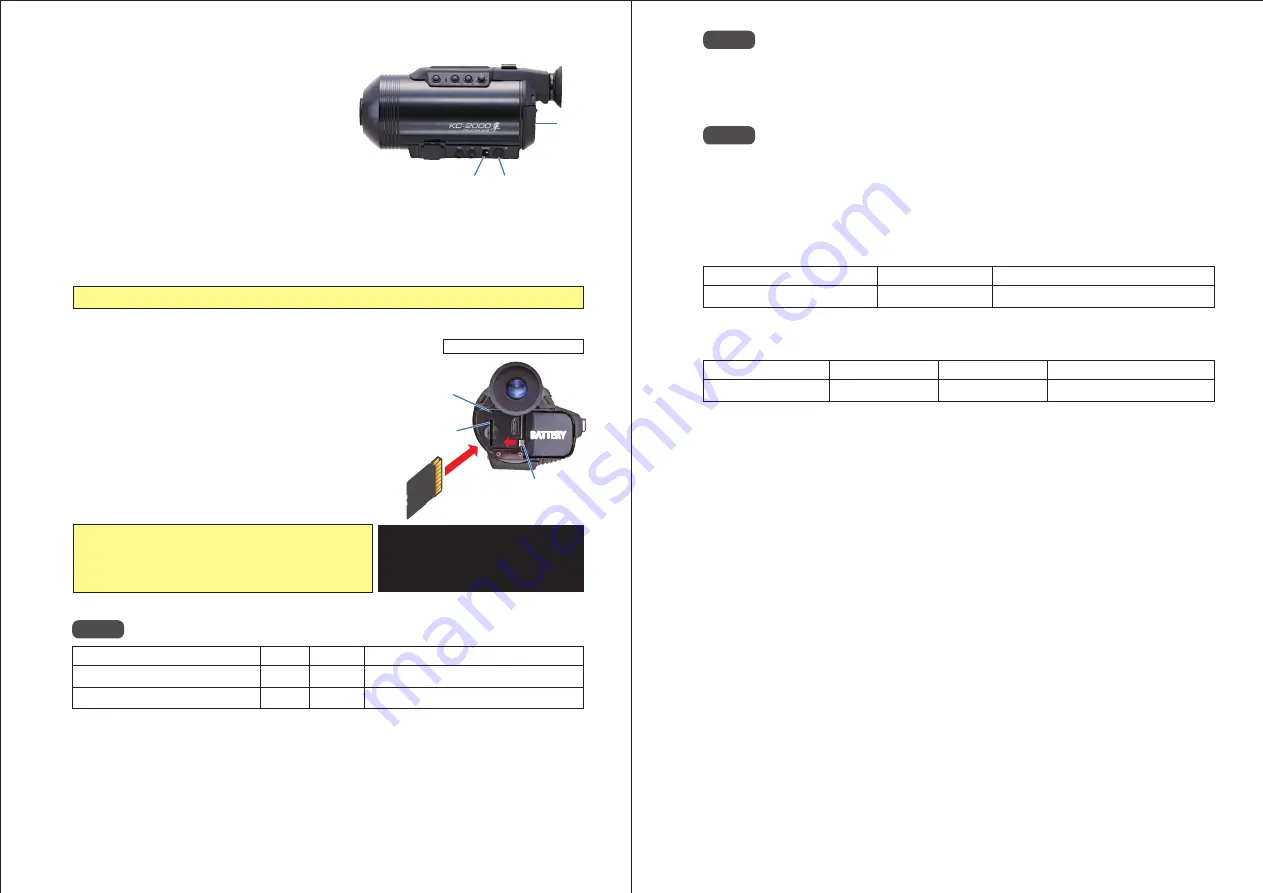
6-1. Mounting the Battery
6-2. Inserting the SD Memory Card
Note. 1
6-3. Powering the Unit On
Battery cannot be charged in this camera. Fully charge the battery first in its own charger.
SD(SDHC)
Write Once SD(Tamper-Proof)
4 and up
-
32GB
1GB
Toshiba: SD-K01G
(Not fo Video Record/Playback)
Install a fully-charged battery as follows:
① Remove the rear cover.
② Slide the locking pin away from the battery hold in the direction of the red arrow, as shown below.*
③ Insert the battery into the battery hold.
④ Slide the locking pin back toward the battery hold to secure the battery.
⑤ Replace the rear cover in its original position.
*
To remove the battery, slide the locking pin away from the battery. The battery will pop out.
Insert the SD memory card as follows:
① Remove the rear cover.
② Insert the SD card, with its metal contacts facing
forward and to the right, into the SD card slot.
③ Push the card into the slot until you hear a ʻclickʼ.
④ Replace the rear cover in its original position.
*
To remove the SD card, push the card in. The card will unlatch and pop out.
The following SD Memory Cards have been tested on KC2000:
We do not guarantee functionality for all commercially-available SD Memory Cards.
The following SD Memory Card manufacturers are recommended:
Please do NOT delete the files recorded on this camera using your PC. Doing so in some cases will
deteriorate the cardʼs ability to record and playback video. If this happens, copy the files onto your PC
first, then re-format the SD Memory Card in this camera.
・Panasonic
・Toshiba
・SanDisk
This product may be powered either by the battery or by the AC adapter through the DC POWR PORT.
If both the battery and the AC adapter are present, the camera takes its power from the DC POWER PORT.
Turn the camera ON or OFF by pressing and holding the POWER SWITCH for more than 2 seconds.
The SD memory card must be formatted.
→Please see the description about Setup Page 4/4
on P20 of this manual.
battery nor the AC adaptor while the SD
Card Access Indicator is flashing.
Model
Class
Capacity
Notes
6
7
SD CARD SLOT
SD CARD
ACCESS
INDICATOR
LOCKING PIN
BATTERY
DC POWER PORT
REAR COVER
POWER SWITCH
● Before using a SD card for the first time:
● Caution: Do not remove the SD card,
● Never remove the SD card while
recording nor during playback.
Metal contact side
⬅
SD CARD
Shown with REAR COVER off
KC2K
0001
.JPG
Model Name
Photo Files
File Number
Extension
Note 2
Total recording time on a SD memory card will vary depending on the amount of scene details.
Recording time available on a single battery charge will depend on the temperature, the number of
charge cycles on the battery, and the charge method. We recommend that you plan ahead and have
enough SD memory cards and batteries for twice the expected recording time.
Note 3
Folders are automatically created on the SD memory card to store data.
Sill image files are stored inside the “DCIM/100KC200” folder.
Video files are stored inside the “MOVIE” folder.*
(*”MOVIE” folder is not created on Write-Once(Tamper-Proof)SD cards.)
Photo and video file names consist of the model name, file number and file extension.
The file number is incremented automatically from 0001 to 9999 in the order of creation.
KC2K
01
.mov
Model Name
Video Files
Main File Number
00
File Branch Number
Extension
The main file number is incremented automatically from 01 to 99 every time a video recording is stopped.
File branch number is incremented automatically from 00 to 99 when a file is segmented.
* A maximum of 100 file segments may be created for one recording session.
* A maximum of 99 files may be created on a SD memory card by repeating short, non-segmenting recording sessions.
* The main file number and the file branch number increment according to the segmenting rule in the VIDEO CHUNK
setting (file size of 2GB or a preset recording time interval). See VIDEO CHUNK setting description on P18 for details.


