RGM User Manual | 21 Brake Initialization
21 Brake Initialization
When the RGM joint is enabled it is possible that, depending on the robot position, gravitational forces from
the robot’s weight can prevent the brake from disengaging. The recommended initialization sequence is to:
1. Enable the drive.
2. Then move the axis back and forth to insure the brake solenoid is fully retracted
The RGM uses a pin in spoke brake, a 4 spoke wheel is on mounted on the motor, this means there is a brake
position every 90 degrees of the motor position or .89 degrees of the gear output. The pin which contacts the
spokes during braking is activated with a solenoid. Power must be applied to the solenoid to release the
brake. Once the solenoid is energized to release the brake, the controller needs to move (shake) the joint back
and forth to ensure the brake pin is not hung on the brake wheel. The recommended move distance is +/- 0.5
degrees of gear motion.
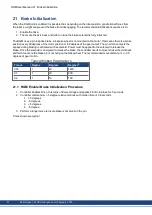
T move
Degree
Deg/sec
Deg/sec
2
0.05
1
40
1600
0.1
1
20
400
0.2
1
10
100
Typical Motion Parameters
21.1 RGM Enable/ Brake Initialization Procedure
1. Controller Enables Drive, this turns on Power bridge and applies 48 Vdc to brake for .5 seconds
2. Controller co/-.5-degree relative motions with motion time of .06 seconds
1. +.5 degrees
2. -.5 degrees
3. +.5 degrees
4. -.5 degree
3. Perform a longer move to insure brake is not stuck on the pin.
Times shown are typical
31
Kollmorgen | kdn.Kollmorgen.com | February 2019

