-6-
1079129-T01-U
9.
·
·
·
·
·
9. Final Connections
·
·
·
·
·
Connect the supply shut-off valve to the supply hose.
Open the supply shut-off valve slowly to check for leaks. If
the connections have been properly assembled, a slight
tightening of the nuts should stop leakage.
Install the toilet seat according to the packed instructions.
Flush the toilet several times using first one push button
and then the other, and check all connections for leaks.
Verify proper operation.
Periodically check for leaks for several days following the
installation.
10.
·
·
·
10. FILL FLOAT WITH
BALLAST
·
·
·
Test flush the toilet.
Periodically check all connections for
leaks for several days following
installation.
Set the tank cover in place on the
tank.
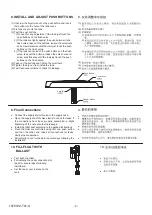
8. INSTALL AND ADJUST PUSH BUTTONS
(1)
(2)
(3) Test the push buttons.
1) No need for any adjustment if the rods just touch the
push buttons on the flush valve.
2) If the rods are tightly against the push buttons on the
flush valve, take out the buttons, loosen the small nuts
and screw clockwise until the rods just touch the push
buttons on the flush valve.
3) If the rods cannot touch the push buttons on the flush
valve, take out the buttons, loosen the small nuts and
screw anticlockwise until the rods just touch the push
buttons on the flush valve.
(4) Take out the buttons and tighten the small nuts.
(5) Tighten the big nut from inside the tank.
(6) Test flush several times to check for leakage.
Unscrew the big white nut on the push button and insert
the button into the hole of the tank cover.
Fix tank cover onto the tank.
8.
(1)
(2)
(3)
1)
2)
3)
(4)
(5)
(6)
Push Button
Tank Cover
Rubber Sleeve
Small Nut


