


2. Drop-in Installation - Construct the Floor Sink Opening
CAUTION: Risk of personal injury or product damage.
Cast iron sinks are very heavy. Get assistance
lifting the floor sink into place.
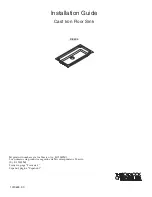
Carefully measure dimensions B and C.
Subtract 1/4
″
(6 mm) from the B dimension and 1/2
″
(1.3 cm) from the C dimension to determine
the size of the recessed hole.
Measure dimension A to determine the depth of the recessed hole. The floor sink basin must rest on
the subfloor and the floor sink must be level.
Cut out the floor sink opening.
Install the drain according to the manufacturer’s instructions.
Clean the floor sink to reduce the risk of surface damage and use a drop cloth or similar material to
protect the enameled surface during installation.
Set the floor sink in place. Verify the bottom of the floor sink is firmly supported against the floor.
Verify the floor sink is level.
NOTE:
Framing adjustment may be necessary. Shim if needed.
3. Drop-in Installation - Complete the Floor Sink Installation
Connect the drain to the trap.
Seal the edges of the floor sink with silicone sealant.
Install and finish the trim around the floor sink.
Clean with a non-abrasive cleaner.
48"
(122 cm)
25"
(63.5 cm)
6-5/8"
(16.8 cm)
B
C
A
Tile
Sealant
Mortar or
Adhesive
Underlayment
1013609-2-C
4
Kohler Co.


