3. Activation Sensor and Chain Assembly
NOTE:
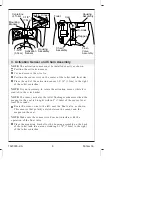
The activation sensor must be installed exactly as shown.
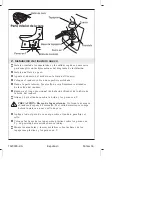
Position the activation sensor.
Cut and remove the wire tie.
Position the sensor wire on the center of the toilet tank front rim.
Place the end of the activation sensor 1-5/16” (3.3cm) to the right
of the toilet centerline.
NOTE:
It is not necessary to rotate the activation sensor while it is
cradled in the wire basket.
NOTE:
The sensor activates the toilet flushing mechanism when the
magnet in the seat is brought within 3” (7.6cm) of the sensor for at
least 20 seconds.
Route the sensor wire to the left, near the float valve, as shown.
This ensures that polarity exists between the sensor and the
magnet in the seat.
NOTE:
Make sure the sensor wire does not interfere with the
operation of the float valve.
Place the mounting bracket for the housing assembly on the back
of the toilet tank in an area extending 3-1/8
″
(7.9cm) to the right
of the toilet centerline.
Latch Hinges
Housing
Assembly
3-1/8"
(7.9cm)
1-5/16"
(3.3cm)
Mounting
Bracket
Activation
Sensor
Centerline
of Toilet
Toilet
Housing
Assembly
Chain
Assembly
S-Hook
Flapper
Cam
Flush
Valve
Assembly
1023905-2-A
6
Kohler Co.
Summary of Contents for K-3434-X
Page 23: ...1023905 2 A...


