


Kohler Co.
5
1103349-X2-C
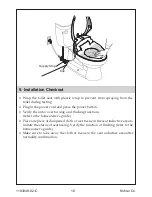
4. Install the Mounting plate
¨
Position the mounting plate over the toilet mounting holes.
¨
Slide a washer onto each of the bolts.
NOTE:
Some toilets come with threaded inserts pre-installed in the mounting
holes. For toilets with threaded inserts, the nut is not required.
For Toilets with Threaded Inserts (Fig 1):
¨
Insert a bolt through the mounting plate and position the washers so they rest
in the grooves of the mounting plates. Please pay attention to washer direction.
¨
Loosely thread the bolts into inserts. Do not overtighten for future adjustment.
For All Other Installation (Fig 2):
¨
Position the mounting plate over the toilet mounting holes.
¨
Slide a washer onto each of the bolts. Please pay attention to washer direction.
¨
Insert a bolt through the mounting plate and the toilet mounting holes.
¨
Position the washers so they rest in the grooves of mounting plate.
¨
Thread a nut onto each of the bolts. Handtighten the nut.
Face the folding part of
washer downwards
Mounting Plate
Face the other folding part of
washer upwards to
prevent screws form
rotating
Nut
Fig 1
Fig 2
Summary of Contents for C3-225
Page 11: ...Kohler Co 11 1103349 X2 C GFCI ELCB 220 240 50 60 16...
Page 12: ...1103349 X2 C 12 Kohler Co 0 7 7 4 0 07 0 74...
Page 14: ...1103349 X2 C 14 Kohler Co 4 1 2 2 1...
Page 15: ...Kohler Co 15 1103349 X2 C 5 2...
Page 16: ...1103349 X2 C 16 Kohler Co 6 1 4 G1 2...
Page 17: ...Kohler Co 17 1103349 X2 C 7 6mm 45 2 6 45...
Page 18: ...1103349 X2 C 18 Kohler Co 1 2 3 4 8 1 2 3...
Page 19: ...Kohler Co 19 1103349 X2 C 9...