background image


B

a

s

ic


Inf

or
m

a

tion


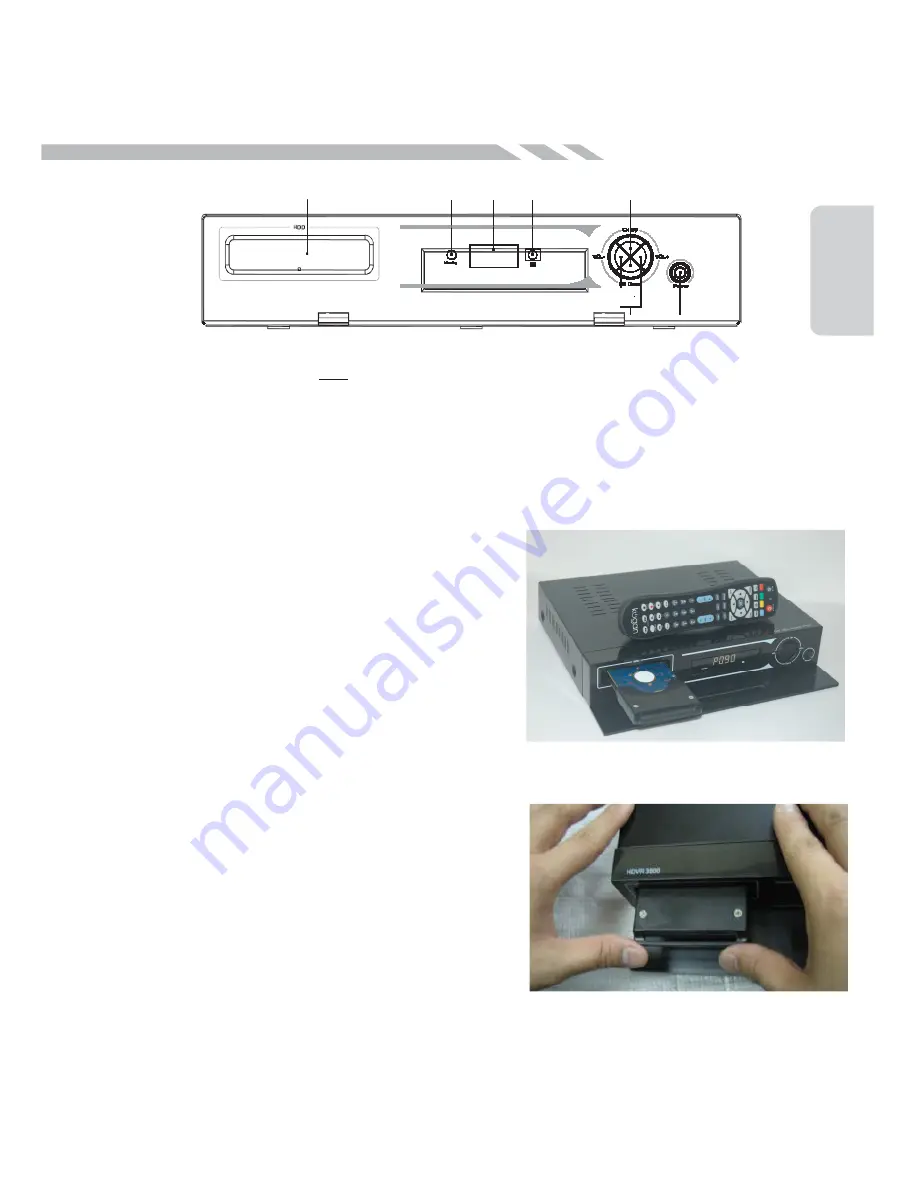
4.Front Panel


G  

 F  

 E  

  D  

 B


A


A. Power Button


B. Channel Up / Channel Down Button 

C. Volume Up / Volume Down Button 

D. Remote Control IR  sensor


E. LED Display


F.  Standby LED


G. Hard Disk Drive Swappable  Slot


PROPER INSERT of HARD DISK DRIVE


into Opening Slot (SATA Connector)


Carefully  unpack &  insert the Hard Disk Drive 

into the Open Slot (Fig 4.1.1)


Using both your thumbs  with equal pressure on 
both  edges,  ( Fig 4.1.2),  push all the way in  to 
connect Hard Disk Drive securely into the SATA


connector inside the Open Slot. 

Fig 4.1.1


IMPORTANT: Make sure that the  Hard Disk Drive 
is properly connected into the SATA connector 
inside – this can be achieved  by applying further 
push after the Clicking  Sound  from the Locking 
Mechanism inside.


TV screen will show “SATA Device  Initializing” upon 

switching-ON  the machine  (refer to page 8).


After initializing, your can start using the recording 
function.


Fig 4.1.2


4


Summary of Contents for KGNPVR500VAA

Page 1: ......

Page 2: ...QUICK GUIDE TV PVR CONNECTION...

Page 3: ...sing Pause button simultaneously And a third program from either of the two TV Stations carriers can be watched while recording 2 programs at the same time 3 EPG Electronic Program Guide Recording ref...

Page 4: ...hange TV Radio Channel 14 Change Volume Level 14 Change TV Radio Operation Mode 14 Mute 14 Audio Selection 15 Electronic Program Guide EPG 15 TV Radio Channel Information 16 Teletext DVB Subtitle Subt...

Page 5: ...rations Menu Operations Others PVR Function 33 Record Browser Video Program Browser 33 Storage Device Info 35 Playlist Manager 36 Digital Photo 37 Safe Remove 38 Password Setup 38 Software Upgrade 39...

Page 6: ...t other electronic equipment on top of the receiver DO NOT use any attachments that are not recommended by the manufacturer as this could cause damage to or impair the operation of the equipment DO NO...

Page 7: ...Basic Information 2 Accessories Supplied Link to User Manual Remote Control Unit Batteries 2xAAA A V Cable RF Loop Cable 12V 2A AC DC Adaptor 2...

Page 8: ...Small Screen Picture on EPG and TV Channel list Support TELETEXT decoding or Re insert into VBI Support Subtitle Support PAL Advanced Automation Tuning 9 Favorite Channel Preset 30 Events timer Channe...

Page 9: ...1 Using both your thumbs with equal pressure on both edges Fig 4 1 2 push all the way in to connect Hard Disk Drive securely into the SATA connector inside the Open Slot Fig 4 1 1 IMPORTANT Make sure...

Page 10: ...to the an adaptor 12V 2A AUDIO OUT L R Left Right audio output S PDIF Out OPT OUT Sony Philips Digital interface output for digital audio optical option out VOUT VIDEO Composite video output S VIDEO...

Page 11: ...4 VOL VOL 5 CH CH 6 Numeric Keys 0 9 7 FAV 8 MENU 9 EPG 10 Capture Still Image 11 HDMI S 12 INFO 13 TIMER 14 EXIT 15 CH UP DOWN 16 VOL VOL 17 OK 18 Function key RED GREEN YELLOW BLUE 19 PAUSE 20 AUDI...

Page 12: ...to RF IN of TV 4 Use AV cable provided with Yellow White Red cable also called Composite to connect For HDTV Quality Viewing 1 Connect HDMI OUT to TV HDMI IN using HDMI cable not provided Optional Con...

Page 13: ...untry Aspect ratio width height ratio Region name or use defualt Figure as Fig 8 1 2 Press OK button to confirm and enter the Auto Detect window Carriers will be detected C a r r i e r s s c a n c o m...

Page 14: ...resolution status will appear on the front panel and TV screen Step 3a Choose TV Aspect Ratio Press CH button to move cursor to Aspect Ratio as shown in Figure 8 2 3 Press VOL button to select Auto Ho...

Page 15: ...ect 4 3 or 16 9 Press OK button to save setting Step 4 Set the Digital Video Output Press CH button to move cursor to Digital Video as shown in Figure 8 2 6 Press VOL button to select between Auto or...

Page 16: ...to move cursor to Setup Press OK button Step 2 Select Time OSD Press CH button to move cursor to Time OSD as shown in Figure 8 3 2 Press OK button 3 Location Time Offset Set Up There are 30 event time...

Page 17: ...LJ LJ HWWLQJ 6WDUW 6WHS KRRVH XWR 7LPHU 0RGH 6HOHFW 5HJLRQ 3UHVV EXWWRQ WR PRYH FXUVRU WR 7LPHU 0RGH DV VKRZQ LQ LJXUH 3UHVV 92 EXWWRQ WR VHOHFW XWR DV VKRZQ LQ LJXUH 3UHVV 2 EXWWRQ WR VDYH VHWWLQJ...

Page 18: ...U WR 6HWXS 3UHVV 2 EXWWRQ 3UHVV EXWWRQV WR PRYH FXUVRU DQG KLJKOLJKW 7XQLQJ DV VKRZQ LQ LJXUH 3UHVV 2 EXWWRQ 3UHVV EXWWRQ WR KLJKOLJKW 6HDUFK 0RGH VKRZQ LQ LJXUH 3UHVV 92 EXWWRQV WR VHOHFW DFWRU HIDXO...

Page 19: ...H RQ WKH UHPRWH FRQWURO GLUHFWO WR LQSXW WKH FKDQQHO QXPEHU RU SUHVV 83 2 1 EXWWRQV RQ WKH IURQW SDQHO WR FKDQJH FKDQQHO XS GRZQ KDQJH 79 5DGLR 2SHUDWLRQ 0RGH 3UHVV 79 5 EXWWRQ RQ WKH UHPRWH FRQWURO R...

Page 20: ...ted channel program Press EXIT to exit from Main Menu Fig 9 6 1 Fig 9 6 2 6A Recording from EPG Time Setting Press EPG on remote control for TV Program Guide refer to Fig 9 6 1 Press VOL button to sel...

Page 21: ...ct Yes to confirm or No to cancel and exit from main menu 2 To Edit Press GREEN button on the remote control refer to Fig 9 6 5 Press CH to select Timer Mode Start Time or End Time Press VOL and 0 9 t...

Page 22: ...VXSSRUWV VXEWLWOHV LI DYDLODEOH 3UHVV 68 7 EXWWRQ WR DFWLYDWH WKH 6XEWLWOH DV VKRZQ LQ LJXUH 3UHVV 92 EXWWRQ WR FKRRVH 6XEWLWOH 21 RU 6XEWLWOH 2 3UHVV 7 WR H LW RU ZDLW IRU WLPH RXW 3UHVV 1 WR VHOHFW...

Page 23: ...PRYH FXUVRU DQG VHOHFW WKH RSWLRQV 7LPHU 1R 7LPHU 7LPHU 0RGH FOH 2 21 0217 6HUYLFH 6HOHFW SURJUDP FKDQQHO DNH XS 0RGH 6HOHFW 5HFRUGLQJ 6HUYLFH DNHXS DWH 00 3UHVV QXPHULF NH V WR LQSXW WKH ZDNHXS GDWH...

Page 24: ...s play button to continue the program from pause In receive mode or record mode press FF button to catch up the live program Press FF button once the speed of playback become faster Fast Forward 5 is...

Page 25: ...20...

Page 26: ...s to highlight the desire TV channel as shown in Figure 10 1 2 Press OK button to select Press EPG button to toggle the channel list between ALL and By Alphabet Press BLUE button to display Favourite...

Page 27: ...3 button to assign as Show channel Press 4 button to assign as Sports channel Press 5 button to assign as Kids channel Press 6 button to assign as Education channel Press 7 button to assign as Music c...

Page 28: ...ggle the channel list between All and By Alphabet Press 1 button to display Pop channels Press 2 button to display News channel Press 3 button to display Show channel Press 4 button to display Sports...

Page 29: ...Preference Press 1 button to assign as Movie channel Press 2 button to assign as News channel Press 3 button to assign as Show channel Press 4 button to assign as Sports channel Press 5 button to assi...

Page 30: ...U SUHVV 7 WR H LW IURP PHQX 3UHVV EXWWRQ WR UHQDPH WKH FKDQQHO NH SDG PHQX ZLOO EH SRSSHG XS 3UHVV 92 EXWWRQ WR FOHDU HQWLUH VWULQJ 3UHVV 92 EXWWRQ WR GHOHWH RQH FKDUDFWHU 3UHVV 92 WR PRYH FXUVRU 3UHV...

Page 31: ...8VHU PD LQSXW WKH FKDQQHO IUHTXHQF IRU FKDQQHO GHWHFWLRQ XWR HWHFW XWR VFDQ DQG GLVSOD GHWDLOV RI WKH SURJUDPV FKDQQHOV XWR GLW 7R VFDQ WKH FDUULHU FKDQQHOV DUULHU GLW 7R HGLW WKH IUHTXHQF RI WKH FDUU...

Page 32: ...WLUH VWULQJ 3UHVV 92 EXWWRQ WR GHOHWH RQH FKDUDFWHU 3UHVV 2 WR HQWHU RQH FKDUDFWHU 3UHVV 7 DQG FKRRVH HV WR FRQ UP DQG VDYH WKH VWULQJ LQSXW 3UHVV 7 DQG FKRRVH 12 WR H LW 3UHVV 7 DJDLQ WR H LW WKH PHQ...

Page 33: ...HQ 5DWLR 3UHVV EXWWRQ WR PRYH FXUVRU WR VSHFW 5DWLR DV VKRZQ LQ L UH 3UHVV 92 EXWWRQ WR VHOHFW XWR RU 6WUHWFK HQWHUHG DOI RRP XOO RRP LGWK HLJKW 5DWLR ZLWK XWR XOO 6FUHHQ HWWHU ER LGWK HLJKW 5DWLR ZLW...

Page 34: ...WR QWHQQD 3RZHU DV VKRZQ LQ LJXUH 3UHVV 92 EXWWRQV WR VHOHFW 21 RU 2 GHSHQGV LI RX QHHG WR SRZHU XS 9 DQWHQQD RXWSXW 3UHVV 2 EXWWRQ WR VDYH VHWWLQJ G 7LPH 26 0HQX 3UHVV EXWWRQ WR PRYH FXUVRU WR 7LPH...

Page 35: ...UHVV EXWWRQ WR PRYH FXUVRU WR 7LPHU 0RGH DV VKRZQ LQ LJXUH 3UHVV 92 EXWWRQ WR VHOHFW 0DQXDO 3UHVV EXWWRQ WR PRYH FXUVRU WR DWH DQG 7LPH DV VKRZQ LQ LJXUH 3UHVV 92 DQG WR VHW WKH FRUUHFW DWH DQG 7LPH 3...

Page 36: ...0HQX 2SHUDWLRQV LJ LJ H 6HOHFW DQJXDJH 3UHVV WR 26 DQJXDJH 3UHVV 92 WR ODQJXDJH I 6HOHFW 79 RXWSXW 7 SH 3UHVV WR 79 RXWSXW W SH 3UHVV 92 WR VHOHFW 57 57 LV XVHG IRU 79...

Page 37: ...92 EXWWRQV WR PRYH FXUVRU DQG VHOHFW WKH RSWLRQV DV VKRZQ LQ LJXUH 7LPHU 1R a 7LPHU 7LPHU 0RGH FOH 2 21 0217 6HUYLFH 6HOHFW SURJUDP FKDQQHO DNHXS 0RGH VHOHFW 5HFRUGLQJ 6HUYLFH DNHXS DWH 00 3UHVV QXPH...

Page 38: ...er Press CH button to highlight desire TV channel as shown in Figure 10 4 2 Press OK button to select Press Red button to delete video channel Press Green button to rename video channel Keypad menu wi...

Page 39: ...to choose YES to Press EXIT button to choose NO to cancel saving and exit Press EXIT button again to leave Main Menu Press YELLOW button to enter video recording Photo Option is used to capture the MP...

Page 40: ...Digital Photo The receiver supports JPEG photo when insert a USB memory stick Digital photo is active and Playlist Manager appear Special Note Playback only of MPEG 4 video programs captured still pic...

Page 41: ...ne character Press CH VOL to move cursor Press OK to enter one character Press EXIT button and choose YES to a Press red button to create a photo list b Press VOL CH move cursor to the photo which you...

Page 42: ...2 F 7UDQVLWLRQ 3UHVV EXWWRQ WR PRYH FXUVRU WR 7UDQVLWLRQ DV VKRZQ LQ LJXUH 3UHVV 92 EXWWRQ WR VHOHFW VHFRQG RU VHFRQG RU VHFRQG RU VHFRQG RU VHFRQG RU VHFRQG RU VHFRQG G 6OLGH 6KRZ 3UHVV WR PRYH FXUV...

Page 43: ...n press Yellow button to enter Password Setup function In Storage Device Info press YELLOW button to pop up the Password Setup window and enter the new password User may change the password any time P...

Page 44: ...eted a Insert the USB memory device in PC the format must be FAT FAT32 b Create a folder named PAC7101 DVBT in a FAT32 USB memory device c Copy the new software to the folder d Insert the USB memory d...

Page 45: ...WKH 79 ER VHUYLFH DJHQW LQ RUGHU WR UHVHW WKH 79 ER HIDXOW SDVVZRUG QVXUH WKH 79 6HW 7RS R LV VZLWFKHG RQ KHFN WKH 9 DQG RU 5 FRQQHFWLRQV EHWZHHQ WKH 79 ER DQG WKH 79 KHFN WKH DQWHQQD FDEOH WR WKH 79...

Page 46: ...0RGH 1R LHUDUFKLFDO LHUDUFKLFDO XDUG QWHUYDOV 6 PERO 5DWH 06 V 0 WR 0 E 1R 3HUIRUPDQFH FHHGV 9 UHF 9LGHR HFRGH HFRGLQJ 03 9 03 03 03 03 0 62 DWH 5DWH 0D 0ELW V 79 6WDQGDUG 3 VSHFW 5DWLR 9LGHR RUPDW L...

Page 47: ...DIF RCA coaxial and optical SPDIF for Doblly Digital MPEG Bit Stream Front Panel Display 5 Buttons Power Channel Up Channel Down Volume Up Volume Down Power LED RED Light up when in Standby mode Power...

Page 48: ......

Page 49: ...H 6 PERO 5DWH 6SHHG RI WKH GLJLWDO SDFNDJH WUDQVPLVVLRQ 63 6RQ 3KLOLSV GLJLWDO LQWHUIDFH IRUPDW LJLWDO DXGLR RXWSXW 8OWUD LJK UHTXHQF 8 GHILQHG IUHTXHQF UDQJH RI 5DGLR IUHTXHQF IRU 79 EURDGFDVWLQJ 9HU...

Reviews: