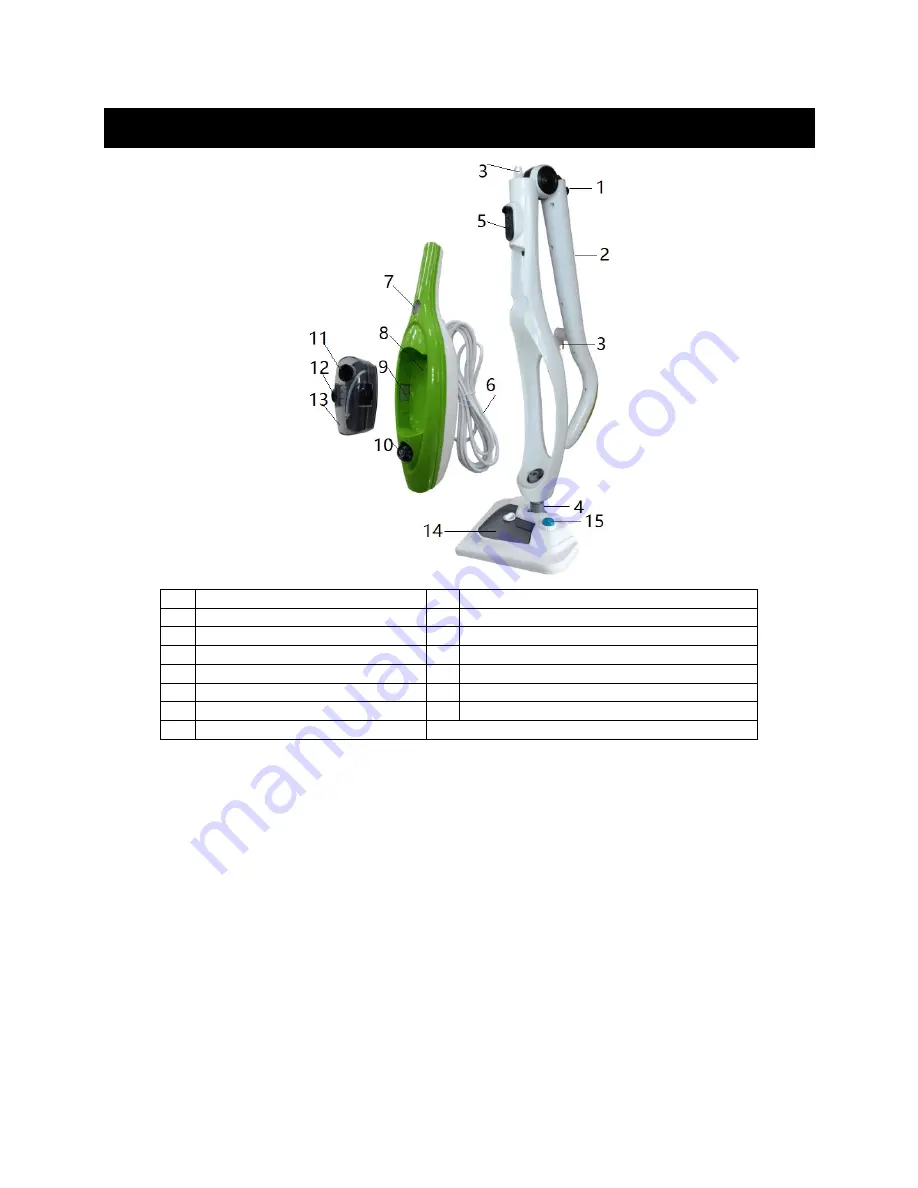
Kogan KAMOPSTM11A Quick Start Manual Download Page 4


Overview 


Folding button 

9  Indicator light 

Handle 

10  Steam control knob 

Cord holder 

11  Water tank cap 

Steam head swivel 

12  Water tank button 

Lock catch 

13  Water tank 

Power cord 

14  Detergent tank 

Power switch 

15  On/off switch (for detergent choice) 

Water inlet 


Summary of Contents for KAMOPSTM11A

Page 1: ...1 11 in 1 Steam Mop KAMOPSTM11A Quick Start Guide Table of Contents Safety Warnings 2 Overview 4 Assembly Instructions 7 Operation 8 Cleaning Care 10 Specifications 12 Troubleshooting 12...

Page 2: ...o not use appliance in an enclosed space filled with vapour given off by oil based paint thinner some moth proofing substances flammable dust or other explosive or toxic vapours Do not use on leather...

Page 3: ...tion which will result in death or serious injury if not avoided WARNING Indicates a potentially hazardous situation which could result in death or serious injury if not avoided CAUTION Indicates a po...

Page 4: ...or light 2 Handle 10 Steam control knob 3 Cord holder 11 Water tank cap 4 Steam head swivel 12 Water tank button 5 Lock catch 13 Water tank 6 Power cord 14 Detergent tank 7 Power switch 15 On off swit...

Page 5: ...ndow squeegee D Small scrub brush E Medium scrub brush F Accessory adaptor G Angle nozzle H Grout cleaning tool I Scraping tool J Measuring cup K Microfiber pad L Garment steamer cloth M Steam and det...

Page 6: ...s D E Oven microwaves stove tops showers bathtubs faucet fixtures tile grout toys refrigerators etc Angle nozzle Part G Stove tops around faucet edges grout microwaves sinks hard to reach areas etc Gr...

Page 7: ...s the Folding Button 1 and turn the handle to fold back Attaching the Steam Head Slide the bottom end of the main body into the steam head M until the Mop Head Swivel 4 clicks into place The steam hea...

Page 8: ...Fill the water tank Method one Open the water tank cap 11 by turning anticlockwise fill 300ml of water using the measuring cup and then turn clockwise to close the water tank cap 11 Method two Remove...

Page 9: ...during preheating or after preheating then power on again and the appliance will repeat the above preheating action 6 When the cleaning surface is stained with grease or oil etc you need to press the...

Page 10: ...er every use Please use detergent to clean and then wash with clean water and air dry the accessories when they are dirty How to Decalcify the Water Tank To clean calcium deposits that builds up insid...

Page 11: ...It is recommended to use a spray lubricant Spray a small burst or two of lubricant inside the tip of the nozzle 2 After spraying lubricant inside the component tilt the steamer with water according t...

Page 12: ...steam nozzle There is no power supply to the unit Make sure unit is plugged in Steam control knob is set to minimum Turn steam control knob clockwise Blown fuse or breaker Replace fuse or reset break...

Reviews: