background image


1.


Connect the monitor to the input device via HDMI or VGA.  

2.


Connect one end of the power cable to the monitor, then connect the other end 

directly to a power socket. Turn on the power socket.  

3.


Press the power button to turn the monitor on.  

4.


When finished use, press the power button again to turn it off.  

 
FreeSync 


To use this feature, ensure your hardware has FreeSync capabilities and the graphics 

drivers are fully up to date. 


After connecting, you may receive a prompt to enable the feature on your computer. If 
you do not receive the prompt, you may need to enable the function in your graphics 

card menu. 


See your graphics card manufacturer’s documentation for instructions on how to turn 

on and/or enable FreeSync. 


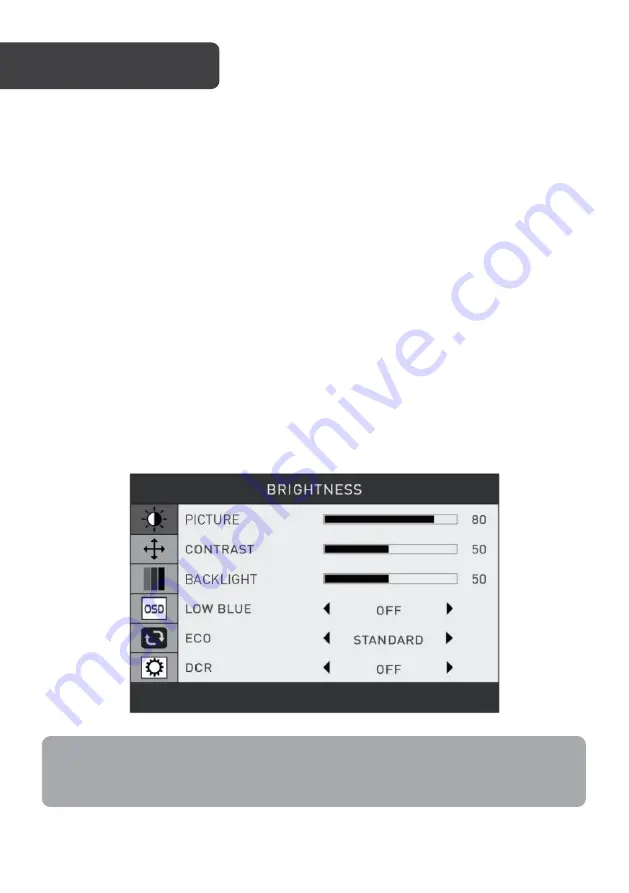
On-screen display (OSD) menu 

The OSD menu may be used to adjust the monitor’s settings.  


Note: 

When using the monitor for the first time, the monitor will configure to optimal settings 
automatically.   

            OPERATION 

Summary of Contents for KAMN32F7SA

Page 1: ...32 FULL HD IPS 75HZ FREESYNC MONITOR 1920 x 1080 KAMN32F7SA ...

Page 2: ......

Page 3: ...in rooms lacking adequate ventilation Do not position the monitor on unstable surfaces or unsafe locations If the monitor falls it may be damaged and injure people around its vicinity Unplug the monitor if it will not be used for an extended period Do not place heavy objects on the monitor its power cord or any connected cable Do not open the back panel of the monitor as it contains a high voltage...

Page 4: ...A Monitor x1 B Stand connector x1 C Stand base x1 D 10mm M4 stand base screw x5 E 10mm M4 VESA screw x4 F Cover x1 G HDMI cable x1 H Power cable x1 I User guide x1 COMPONENTS ...

Page 5: ...ton Press to display the OSD menu or enter sub menus 2 Down button Press to move down in the menu 3 Up button Press to move up in the menu 4 Exit button Press to exit 5 Power button Press to turn the monitor ON OFF OVERVIEW ...

Page 6: ...Back view 6 Audio output port 7 VGA port 8 HDMI port 9 Power port ...

Page 7: ...4 stand base screws D 2 Remove the upper foam and reveal the lower part of the monitor A Fix the monitor A to the stand connector B with three 10mm M4 stand base screws D in the marked grey holes as illustrated 3 Place the cover F over the stand connector B STAND ASSEMBLY B Attention The monitor is fragile Keep the foam underneath the monitor while assembling the stand D C D F A B ...

Page 8: ...he monitor A Press the release button to remove the stand plate If the monitor was already attached to the stand remove the stand 3 Mount the monitor A as desired with the steps provided with your VESA mount Stand plate Mount not included VESA MOUNT Notes The mounting hole distance for this monitor is 75 x 75mm VESA mount and mounting accessories are not included B C A Release button ...

Page 9: ...d to the audio output port on the monitor The monitor may need to be set as the PC s default sound output device HDMI Connect the HDMI cable into your input device s display output and the monitor s HDMI port VGA Connect a VGA cable not included into your input device s display output and the monitor s VGA port Power cable Earphones Not included VGA cable not included VGA OUTPUT PC CONNECTIVITY HD...

Page 10: ...FreeSync capabilities and the graphics drivers are fully up to date After connecting you may receive a prompt to enable the feature on your computer If you do not receive the prompt you may need to enable the function in your graphics card menu See your graphics card manufacturer s documentation for instructions on how to turn on and or enable FreeSync On screen display OSD menu The OSD menu may b...

Page 11: ...Setting Description Brightness Brightness 0 100 Adjusts the display brightness Contrast 0 100 Adjusts the display contrast Backlight 0 100 Adjusts the display backlight Low blue ON OFF Enables disables the blue light reduction function ECO STANDARD TEXT GAME MOVIE FPS RTS Sets the display s colour balance to pre set levels calibrated for different uses DCR ON OFF Enables disables the dynamic contr...

Page 12: ...00 Adjusts the horizontal position of the OSD menu OSD V position 0 100 Adjusts the vertical position of the OSD menu OSD transparency 0 100 Adjusts the transparency of the OSD menu OSD time out 5 60 Sets how long the OSD menu will remain on screen after no input seconds Reset Image N A Restores the display to VGA image defaults Colour N A Automatically configures the VGA colour settings Reset N A...

Page 13: ...al gaming Movie best suited when watching movies FPS best suited when playing first person shooter games RTS best suited when playing real time strategy games GamePlus menu To access the GamePlus menu press the exit button followed by the menu button The GamePlus menu allows users to access two settings Crosshair Allows users to change the appearance of the crosshair used when gaming Timecount All...

Page 14: ...ize 32 Aspect ratio 16 9 Brightness 300cd m typical Panel IPS Resolution 1920 x 1080 Refresh rate 75Hz Response time 8ms Viewing angle 178 H 178 V Contrast ratio 1000 1 VESA mounting 75 x 75mm Colours 16 7M Signal input HDMI 1 4 x1 VGA x1 Power supported 100 240V 50 60Hz 1 1A SPECIFICATIONS CLEANING CARE Note Do not use cleaning alcohol ammonia based liquids or other harsh cleaners ...

Page 15: ...ower cable Yes HDMI cable Yes Additional functions Low blue light Yes Flicker free Yes Physical dimensions Dimensions w stand 720 5 x 84 6 x 507 0mm Dimensions without stand 720 5 x 42 9 x 423 1mm Net weight 6 3kg Gross weight 8 2kg ...

Page 16: ...tion We hope that this user guide has given you the assistance needed for a simple set up For the most up to date guide for your product as well as any additional assistance you may require head online to help kogan com ...

Reviews: