background image

Accessories

The monitor should arrive with the following accessories included.

AC Power cord

Adaptor

User guide

DVI (24 pin) cable

VGA (15 pin) cable

Setup

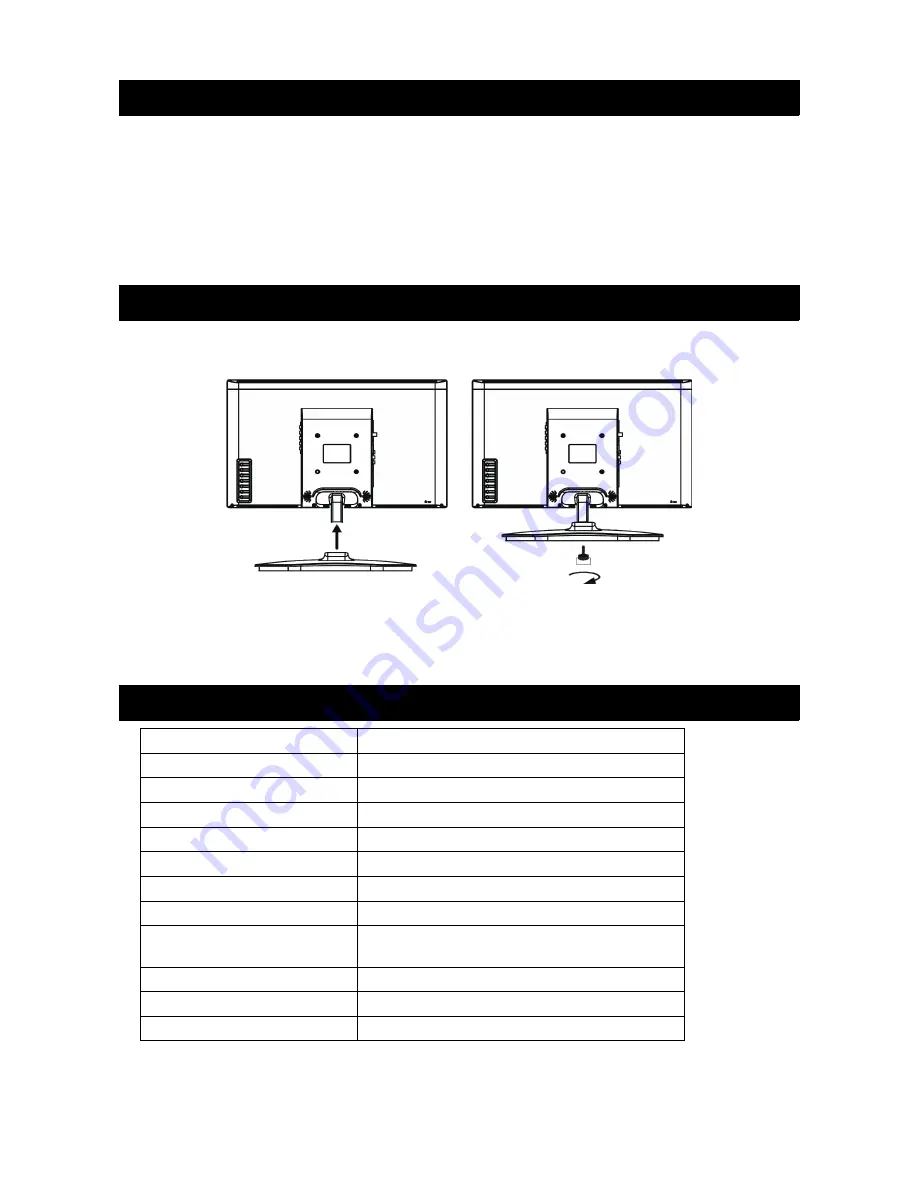
Installing the stand base

1. Place the monitor face down on a soft cushioned surface or blanket.
2. Install the stand base to the monitor.
3. Fix the stand base to the monitor with one screw, as shown.

Technical Specifications

Screen Diagonal

61.0cm (24.0”)

Resolution

1920 x 1080

Brightness (typ.)

250 cd/m2

Contrast ratio

1000:1

Aspect ratio

16:9

Display colour

16.7M

Input connectors

D-Sub, DVI, HDMI, Audio

Speaker output

2 x 2W

Power supply

Adaptor (Input: AC100-240V 50/60Hz
Output: DC12V 3.33A)

Dimensions (H x W x D)

416 x 570 x 185mm

Wall mount hole pattern

100 x 100

Wall mount screw size

M4 x 8

3

Summary of Contents for KALED24144A

Page 1: ......

Page 2: ...lling the stand base 3 Technical Specifications 3 Product Layout 4 Front view 4 Rear view 5 Main Menu 5 BRIGHTNESS 5 IMAGE 6 COLOR TEMP 6 OSD SETTING 6 RESET 7 MISC 7 LOW BLU RAY MENU 7 Supported Timing Modes 8 Care and Maintenance 8 Safety Tips 8 Troubleshooting 8 1 ...

Page 3: ...the cabinet is damaged Contact the Kogan customer support team for advice Put your monitor in a clean dry environment Unplug the monitor immediately if gets wet and contact the Kogan customer support team Always unplug the monitor before cleaning it Clean the cabinet with a clean dry cloth Apply non ammonia based cleaner onto the cloth not directly onto the glass screen Keep the monitor away from ...

Page 4: ...ase to the monitor 3 Fix the stand base to the monitor with one screw as shown Technical Specifications Screen Diagonal 61 0cm 24 0 Resolution 1920 x 1080 Brightness typ 250 cd m2 Contrast ratio 1000 1 Aspect ratio 16 9 Display colour 16 7M Input connectors D Sub DVI HDMI Audio Speaker output 2 x 2W Power supply Adaptor Input AC100 240V 50 60Hz Output DC12V 3 33A Dimensions H x W x D 416 x 570 x 1...

Page 5: ...D menu When not in OSD menu display adjust volume menu 5 VOL Decrease in OSD menu When not in OSD menu display LOW BLU RAY menu LOW BLU RAY mode is disabled when ECO or DCR is active 6 AUTO Display signal source menu After holding down for 3 seconds automatically adjusts the horizontal vertical position clock and phase of screen image in VGA source 7 POWER Power on off 8 LED Indicator LED indicato...

Page 6: ... input 3 5mm jack 5 DC Power input DC 12V Main Menu BRIGHTNESS Sub Menu Menu Item Description BRIGHTNESS 0 100 Black level of image CONTRAST 0 100 White level of image ECO STANDARD Default settings GAME Gaming settings MOVIE Film video settings TEXT Text editing reading settings DCR ON Set the DCR mode on or off OFF 5 ...

Page 7: ...AL Select the colour temperature between Normal Warm Cool or User defined WARM COOL USER RED When colour temperature is set to User defined you can adjust the Red Green and Blue settings GREEN BLUE OSD SETTING Sub Menu Menu Item Description LANGUAGE ENGLISH Select the OSD language FRENCH GERMAN ITALIAN SPANISH DUTCH OSD H POS 0 100 Adjust the horizontal and vertical position of OSD menu OSD V POS ...

Page 8: ...stment SIGNAL SOURCE VGA Select the input signal source between VGA DVI and HDMI DVI HDMI AUDIO SELECT ANALOG Select audio input mode between analog and digital DIGITAL VOLUME 0 100 Adjust speaker volume LOW BLU RAY MENU Every monitor produces a strain of blue spectrum light that is one of the critical causes of eye damage eye strain headaches and sleeping disorders Low Blue Ray mode is designed t...

Page 9: ...remove the power cord immediately and contact the Kogan customer support team Never remove the rear cover of your monitor cabinet The display unit inside contains high voltage parts and may cause electric shock to human bodies Never try to repair your monitor yourself Always call the Kogan customer support team for information Troubleshooting No Power Make sure the AC power cord is securely connec...

Reviews: