Kogan KAHUDQ7GPSA User Manual Download Page 3

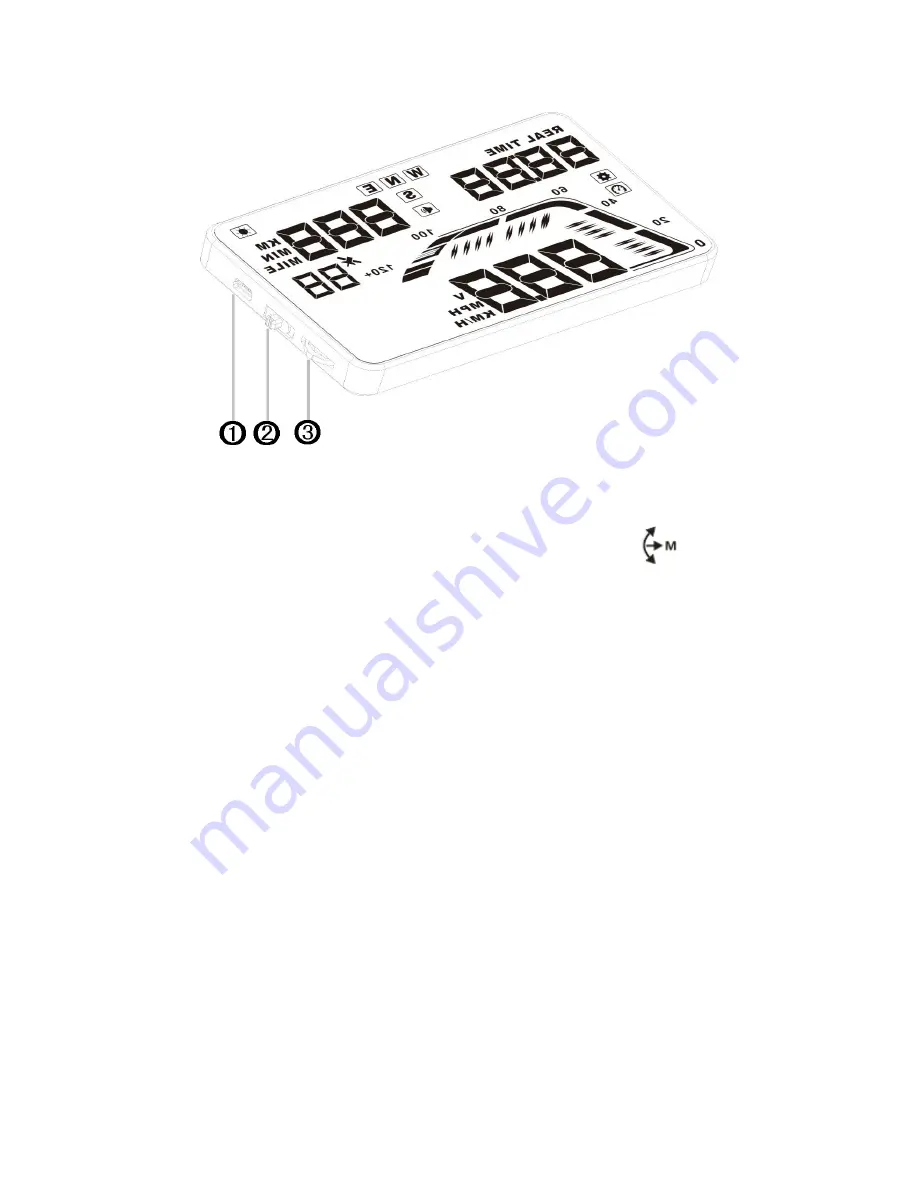
HUD Button Functions

1. USB interface, to connect to the USB car charger.

2. Power ON and OFF

3. Settings button – three way button with various functions.

Up button – push button upwards

OK button – press button inwards

Down button – pull button downwards

With the dial on the left:

Press and hold the button in for 5 seconds, to enter into the settings menu (menu 0-8). Once you

have finished adjusting settings, hold the button in again for 5 seconds to save.

Button up: increase setting values.

Button down: decrease setting values.

Quick press inwards: switch between clock, driving distance, driving time.

Button down and hold: turn alarm on and off.

3

Summary of Contents for KAHUDQ7GPSA

Page 1: ... It will display driving data reflected onto the windscreen This allows you to view information regarding travel without taking your eyes off the road HUD Features Applies to most cars worldwide with plug and play functionality 5 5 high definition display Multi colour design allowing for easy reading Rich content such as speed direction driving time distance real time satellite number altitude spe...

Page 2: ...oltage 10 Light sensor 11 Driving distance time unit 12 Satellite icon 13 Satellite number 14 Speed icon Installation Place the HUD unit so that it is sitting under the windscreen facing upwards then connect the USB car charger to your car s cigarette lighter Start the engine and the HUD will power on with the satellite icon flashing Once the HUD has located a satellite the icon will stop flashing...

Page 3: ... button pull button downwards With the dial on the left Press and hold the button in for 5 seconds to enter into the settings menu menu 0 8 Once you have finished adjusting settings hold the button in again for 5 seconds to save Button up increase setting values Button down decrease setting values Quick press inwards switch between clock driving distance driving time Button down and hold turn alar...

Page 4: ...nto the menu settings Once in the menu settings press the button once and the menu option itself will increase by 1 unit You can then push the button up or pull it down to increase or decrease the value itself Once you are happy with the adjustment press and hold the button for 5 seconds again to save Menu Parameters Adjustment Range Explanation Default Display State 0 Speed 50 150 Speed error 100...

Page 5: ...tude 0 6 Timezone 12 to 12 Timezone from GMT 12 to GMT 12 10 7 Start Reference Voltage 0 150 Automatic power on when at 13 2V or higher Automatic power off when lower than 13 2V 132 8 Restore to Factory Settings 0 1 Set to 1 then press and hold the button for 5 seconds to return to the display interface with settings reset 0 5 ...

Page 6: ...Vietnam Laos Cambodia Thailand Indonesia GMT 7 8 China Malaysia Singapore Philippines Hong Kong Taiwan Macau GMT 8 9 Japan Korea GMT 9 10 Australia Guam GMT 10 11 Solomon Islands Vanuatu GMT 11 12 New Zealand Fiji GMT 12 1 Azores Cape Verde GMT 1 2 Mid Atlantic GMT 2 3 Brazil Argentina Uruguay Chile GMT 3 4 Venezuela Bolivia Paraguay GMT 4 5 Canada Panama Cuba New York GMT 5 6 Mexico GMT 6 7 Salt ...

Page 7: ...m will be pasted then use a dry cloth to clean it 2 Take off the backside marked 1 from the reflection film then paste it to the windscreen glass 3 Once you have adjusted the location you can use a ruler or something else flat to smooth the film out squeezing any bubbles or water out 4 Take off the protection film marked 2 from the reflection film If the film isn t positioned to display all of the...

Page 8: ...o settings menu 7 Adjust the voltage level to 135 or higher Please note that the value shouldn t be set too high as the HUD will not automatically power on due to not receiving the set working voltage Inaccurate Speed When the HUD is powered on press and hold the button for 5 seconds to enter into settings The menu 0 will show the parameter of 107 Push or pull the button up or down to increase or ...

Reviews: