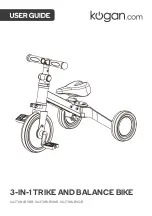
Kogan KA3TKBLBKBB User Manual Download Page 3


Ensure to read all instructions and warnings in this user guide prior to assembly and use. 

Retain this user guide for future reference.  


Adult assembly is required for this bike.  


Adult supervision is required at all times when children are riding the bike.  


Ensure all components of the bike are well connected before use.  


WARNING:

 To avoid risk of suffocation, keep the plastic packaging away from 

children.  


The bike is suitable for children aged 12–36 months. 


The bike must be used in a flat, unobstructed location to ensure that it does not tilt 
during normal use and cause injury. 


Do not use the bike near stairs, thresholds, and steps.  


Do not use this bike in busy areas (for example, on roads, downtown).  


Only one child is permitted on the bike at any given time.  


Ensure children do not spend longer than one hour on the bike at any given time.  


Ensure children wear a safety helmet and knee pads before riding the bike.  


Do not use this bike near heaters, stoves, fire, and other heat sources.  


This bike has a maximum load capacity of 25kg. Do not place anything or anyone 

heavier than 25kg on this bike as this may lead to injuries to users and damage to the 

bike.   


Ensure the saddle is secure before use.  


Ensure all locking devices are locked before using the bike.  


The bike should be used with caution as skill is required to avoid falls or collisions 
causing injury to children or third parties. 


Perform regular checks to ensure the screws and components are secure and the 

bike is not damaged. If damaged, stop use immediately and contact 

help.Kogan.com for assistance.  


Cleaning and care 


Clean the bike body with a dry cloth. If there is significant dirt, wash the bike with 
water and dry with a cloth.  


Store the bike in a dry area.  


Lubricate the axle and rotating parts regularly. This will extend the lifespan of the 

bike and maintain its condition.  


        SAFETY & WARNINGS 

Summary of Contents for KA3TKBLBKBB

Page 1: ...3 IN 1 TRIKE AND BALANCE BIKE KA3TKBLBKBB KA3TKBLBKWB KA3TKBLBKGB...

Page 2: ......

Page 3: ...given time Ensure children wear a safety helmet and knee pads before riding the bike Do not use this bike near heaters stoves fire and other heat sources This bike has a maximum load capacity of 25kg...

Page 4: ...A Front bike frame x1 A 1 Rear bike frame x1 B Handlebar x1 C Front wheel assembly x1 C1 Pedal fixture x1 D Saddle x1 E Allen key Phillips head screwdriver x1 COMPONENTS...

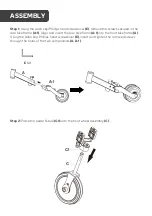
Page 5: ...ame A 1 Align and insert the rear bike frame A 1 into the front bike frame A Using the Allen key Phillips head screwdriver E insert and tighten the removed screws through the holes of the two componen...

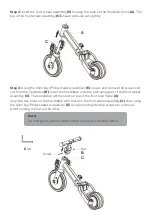
Page 6: ...handlebar B Insert the handlebar onto the protruding part of the front wheel assembly C The handlebar will then rest on top of the front bike frame A Align the two holes on the handlebar with those on...

Page 7: ...through the tube at the desired height and using the Allen key Phillips head screwdriver E tighten to secure E x1 Notes Ensure the saddle is inserted at least beyond the safety mark located on its tub...

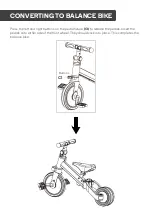
Page 8: ...nd right buttons on the pedal fixture C1 to release the pedals Insert the pedals onto either side of the front wheel They should click into place This completes the balance bike CONVERTING TO BALANCE...

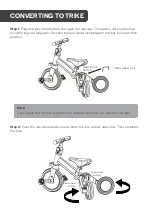
Page 9: ...ear wheel lock between the legs to secure their position Step 2 Press the rear wheel buttons and rotate the rear wheels outwards This completes the trike Rear frame button Rear wheel button Rear wheel...

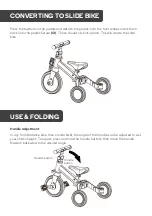
Page 10: ...to place This will create the slide bike Handle adjustment In any form balance bike trike or slide bike the angle of the handle can be adjusted to suit your child s height To adjust press and hold the...

Page 11: ...nd detach the pedals from the front wheel Insert them back onto the pedals fixture C1 These should click into place Press the rear frame button and close the rear legs together The rear frame button w...

Page 12: ...ion We hope that this user guide has given you the assistance needed for a simple set up For the most up to date guide for your product as well as any additional assistance you may require head online...

Reviews: