background image


Set the temperature control to your desired heat. 


Insert the meat or poultry that you are going to cook onto the rotisserie skewer, 

making sure that the meat or poultry is securely tightened with the skewer clamps 

and thumbscrews. Make sure the meat or poultry is centred on the skewer. 


Insert the pointed end of the rotisserie skewer into the drive socket, located on the 

right-hand side of the oven wall. Make sure that the square end of the rotisserie 

skewer rests on the rotisserie skewer support located on the left-hand side of the 

oven wall. 


Slide the baking tray onto the lowest position to catch the food drippings. 


Turn the function control knob to “Upper Heat & Rotisserie” 


Turn the timer control to the desired cooking time. 


When cooking is complete, the oven bell will ring. At this time, turn the function 

control knob to “OFF”. 


Remove the rotisserie skewer from the oven by placing the hooks of the rotisserie 

handle under the grooves on either side of the rotisserie skewer. Left the left side of 

the skewer first by lifting it up and out. Then pull the rotisserie skewer out of the 

drive socket and carefully remove the roast from the oven. 


Take the meal or poultry off the rotisserie skewer and place it on a cutting board or 

platter. 


Broiling


For best results, it recommends that you preheat the oven for 15 minutes at 250°C. 


Place the wire rack in the over at the uppermost position. 


Place the food to be cooked onto a roasting tray. If you wish to use the baking tray 

(broil/drip pan), then you do not need to insert the wire rack in the previous step as 

the baking tray will support itself on the oven support guides. 


Set the Temperature Control Knob to the desired temperature. 


Turn the Timer Control Knob to the desired cooking time. 


Turn the Function Control Knob to “Upper Heat”. 


To check or remove the food, use the tray handle provided to slide the roast in and 

out. 


When broiling is complete, turn the Function Control Knob to “OFF”. 


Summary of Contents for KA33LELOVENA

Page 1: ...33L ELECTRIC OVEN WITH HOTPLATES KA33LELOVENA ...

Page 2: ......

Page 3: ...ull on the cord Extreme caution must be used when moving a drip pan containing hot oil or other liquids Do not cover the crumb tray or any other part of the oven with foil This may lead to the oven overheating Use extreme caution when removing the tray racks or disposing of hot grease or other hot liquids Do not clean the inside of the oven with metal scouring pads as pieces can break off the pad ...

Page 4: ...duced physical sensory or mental capabilities or lack of experience and knowledge only if they have been given supervision or instruction regarding the use of the appliance in a safe way and understand the hazards involved Children must not play with the oven Keep the oven out of reach of children under 8 years of age If the power cord is damaged it must be replaced by a Kogan com technician or si...

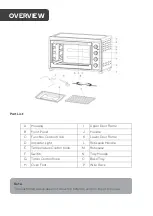
Page 5: ...ntrol Knob K Lower Door Frame D Indicator Light L Rotisserie Handle E Temperature Control Knob M Rotisserie F Switch N Tray Handle G Timer Control Knob O Bake Tray H Oven Foot P Wire Rack OVERVIEW Note The illustration above does not show the hotplate units on top of the oven ...

Page 6: ... oven functions and accessories before first use Temperature Control Choose the desired temperature 100 C 250 C Main Function Control There are five function controls depending upon your cooking requirements Off Upper Heat Upper Heat and Rotisserie Upper and Lower Heat Lower Heat Off No heat elements active Upper Heat The top two heating elements are active Upper Heat Rotisserie The top two heatin...

Page 7: ... radiant type cooking The fan gently sends air to every area of the food quickly browning crisping and sealing in moisture and flavour It produces more even temperature all around the food by air movement so that the food cooks bakes broils evenly versus the normal oven hot and cold spots The convection feature allows cooking baking at lower temperatures which saves energy and keeps the kitchen co...

Page 8: ...he oven by placing the hooks of the rotisserie handle under the grooves on either side of the rotisserie skewer Left the left side of the skewer first by lifting it up and out Then pull the rotisserie skewer out of the drive socket and carefully remove the roast from the oven Take the meal or poultry off the rotisserie skewer and place it on a cutting board or platter Broiling For best results it ...

Page 9: ...ng Please note that the BAKE function only uses the bottom heating elements For best results it is recommended that to preheat the oven for 15 minutes at 250 C Set the Temperature Control Knob to the appropriate temperature Place the wire rack on the lowest or middle rack support guide Place the food onto the wire rack Food should be placed as close as possible to the lower heating element without...

Page 10: ...all socket and allow it to cool down completely 2 Use warm water with a small amount of washing up liquid to clean the baking tray the grill and the removable items then rinse them clean with plenty of water and then dry them thoroughly 3 Use a damp cloth to clean the interior and exterior of the oven and door then dry them thoroughly 4 Place all items back into the oven and close the door Never u...

Page 11: ...Voltage 220 240V 50Hz Power 1500 3200 Watts Left hotplate 1000W Right Hotplate 600W SPECIFICATIONS ...

Page 12: ...s a Quick Start Guide and we hope that this has given you the assistance needed for a simple set up For the most up to date guide for your product as well as any additional assistance you may require head online to help kogan com ...

Reviews: