Kogan FORTIS FSBSKBLSD2A User Manual Download Page 4


Climate, corrosion, or misuse could result in system failure. 


Minimum operational height is 6'6" (1.98 m) to the bottom of backboard. 


This equipment is intended for home recreational use only and 

NOT

 excessive 

competitive play. 


Read and understand the warning label affixed to pole. 


The life of your basketball pole depends on many conditions. The climate, 

placement of the pole, location of the pole, exposure to corrosives such as 

pesticides, herbicides, or salts are all important. 


Adult supervision is recommended when adjusting height. 
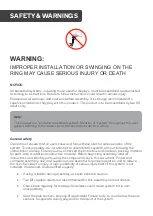
 

Warning 

Read and understand warnings listed below before using this product. Failure to follow these 

warnings may result in serious injury and/or property damage. 
Owner must ensure that all players know and follow these rules for safe operation of the 

system. 


DO NOT HANG on the rim or any part of the system including backboard, support 

braces or net. 


During play, especially when performing dunk type activities, keep player's face 

away from the backboard, rim and net. Serious injury could occur if teeth or face 

come in contact with backboard, rim or net. 


Do not dunk. 


Do not slide, climb, shake or play on base and/or pole. 


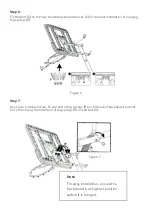
After assembly is complete, fill system completely with water or sand. Never leave 

system in an upright position without filling base with weight, as system may tip 

over causing injuries. 


When adjusting height or moving system, keep hands and fingers away from 

moving parts. 


Do not allow children to move or adjust system. 


During play, do not wear jewellery (rings, watches, necklaces, etc.). Objects may 

entangle in net. 


Surface beneath the base must be smooth and free of gravel or other sharp 

objects. Punctures cause leakage and could cause system to tip over. 


Keep organic material away from pole base. Grass, litter, etc. could cause corrosion 

and/or deterioration. 


Check pole system for signs of corrosion (rust, pitting, chipping) and repaint with 

exterior enamel paint. If rust has penetrated through the steel anywhere, replace 

pole immediately. 


Check system before each use for proper ballast, loose hardware, excessive wear 

and signs of corrosion and repair before use. 


Check system before each use for instability. 

Summary of Contents for FORTIS FSBSKBLSD2A

Page 1: ...PREMIUM HEIGHT ADJUSTABLE BASKETBALL HOOP STAND FSBSKBLSD2A...

Page 2: ......

Page 3: ...al for parts and or additional instruction material Before beginning assembly read all instructions and identify parts using the components list in this document Proper and complete assembly use and s...

Page 4: ...backboard rim and net Serious injury could occur if teeth or face come in contact with backboard rim or net Do not dunk Do not slide climb shake or play on base and or pole After assembly is complete...

Page 5: ...low water in tank to freeze During sub freezing weather add 2 gallons of non toxic antifreeze sand or empty tank completely and store Do NOT use salt While moving system do not allow anyone to stand o...

Page 6: ...A M12 x 180 x1 B M12 x 180 x2 C 1 4 M12 x 180 x1 C 5 8 M12 x 180 x1 D M12 x 180 x1 E M8 x 80mm x5 F M8 x 110mm x2 G M8 x 90mm x1 H M8 x 45mm x1 I M8 x 40mm x2 J M8 x 16mm x4 K M8 x 16mm x2 COMPONENTS...

Page 7: ...L x2 U1 x1 M x2 N x1 U2 x1 O x2 K x1 U3 x1 P x1 Q x1 U4 x1 R x2 S x2 V1 x1 T x2 V2 x1 W x1 V3 x1...

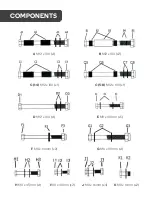
Page 8: ...X x1 Y x1 GG x1 HH x1 AA x1 BB x1 KK x1 CC x1 DD x1...

Page 9: ...Figure 1a then insert the bottom pole Y into base Insert shaft V3 into bottom pole Y then fix the shaft V3 into the groove on the underside of the base as per Figure 1b Figure 1a Figure 1b The top of...

Page 10: ...m pole Y Fix the middle pole X bottom pole Y and top end of four pole braces together by x1 G bolt set G1 G2 G3 and x1 E bolt set E1 E2 E3 as shown in Figure 2 3 Fix the pole bracket Q and K on the mi...

Page 11: ...m AA backboard DD and backboard bracket CC by F bolt set Fl F2 F3 and I bolt set I1 I2 I3 Note that the x2 small springs L are fixed in front of the two up holes of the rim AA by F bolt set F1 F2 F3 F...

Page 12: ...board bracket CC behind the backboard DD by bolt K1 4 As shown in the figure connect the backboard brace S and T on backboard bracket CC by B bolt set B1 B2 B3 B4 B5 The sleeve B3 must be installed in...

Page 13: ...C6 C7 C8 as shown in Figure 4 tighten all the nuts Step 5 Install the pole W X together with x2 of E bolt set E1 E2 E3 then install the adjustment mechanism HH GG with A bolt set A1 A2 A3 A4 H set H1...

Page 14: ...of hanging big springs R Step 7 As shown in below fixture fix one end of big springs R on the hole of backboard bracket CC then hang the other end of big springs R on the bolt D Note For easy installa...

Page 15: ...or safety reason sand instead of water is recommended to fill up the base during the sub freezing weather Please note that sand cannot be poured out once filled in the base Lid Water lid O Lid Figure...

Page 16: ...wards then pull the rim in either direction Product Moving 1 Adjust the rim to the lowest level before moving 2 Avoid friction with the ground while moving 3 Move to the final desired location before...

Page 17: ...NOTES...

Page 18: ......

Page 19: ...NOTES...

Page 20: ...ion We hope that this user guide has given you the assistance needed for a simple set up For the most up to date guide for your product as well as any additional assistance you may require head online...

Reviews: