background image

7

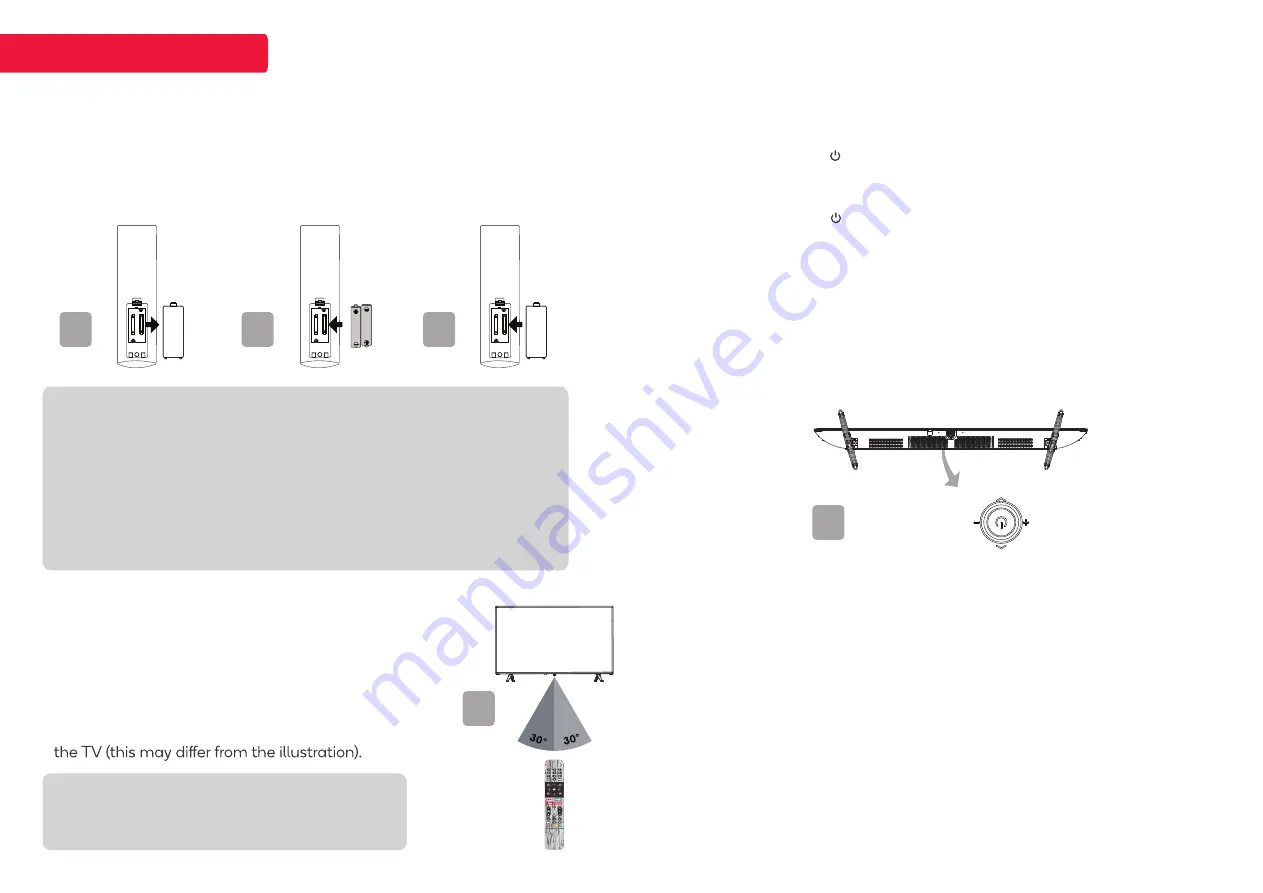
3. Remote Control Assembly

a. 

Open the battery compartment cover on the back side.

b. 

Insert two 1.5V AAA size batteries, making sure to match the polarity 

markings (+ / -) of the batteries with the diagram inside 

the compartment.

c. 

Replace battery compartment cover.

TV CONTROL

WARNINGS

 • If you do not intend to use the remote control for a long period of time, 

remove them to avoid damage due to leakage.

• Do not use old and new batteries together.
• The batteries (battery pack or batteries installed) shall not exposed to 

excessive heat such as sunshine, fire or the like.

TIPS

Do not block the path between the sensor 

and the remote control.

4. Using Remote Control Without Bluetooth

Your Android TV remote control has bluetooth 

capability, but until this is paired with your TV, you 

will need to ensure the distance between the remote 

control and the TV is no greater than 8 metres, at an 

angle of no more that 30 degrees on either side 

(4a)

Point the remote towards the sensor at the front of 

4a

5. Turning on / Tuning off the TV

a. 

Connect the power cord with the TV and a suitable power outlet. The

TV’s power indicator is lit in red, showing that the TV is in standby mode.

b. 

Press the POWER ( ) button on your remote control, or press middle of


6

3a

3b

3c

• Danger of explosion if the batteries are incorrectly replaced. 

Replace batteries only with the same or equivalent type. 

TV Control Button to turn on the TV. The power indicator is lit in green

in working mode.

6. TV Control Button

c.

Press the POWER ( ) button on your remote control to turn the TV
into standby mode.

d.

To power off the TV completely, please unplug the power cord from the 

power outlet.

e.

Do not leave your TV in standby mode for long periods of time. If you

will not use the TV for a long time, it is recommended to unplug the TV

from both the power outlet and antenna.

Right

Forward

Backward

Left

1. In standby mode, press it to turn on the TV.

2. In working status, 

    • Without the source list, short press it to access the source list. 

    • With the source list, short press it to enter the selected source. 

    • Long press it to exit the source list or turn the TV to standby mode.

a.  Press Middle

Adjust the TV sound volume.

b.  Press Left / Right

Switch channels, or select the input source in source list.  

c.  Press Forward / Backward

Summary of Contents for 9 TU9220 Series

Page 1: ...USER MANUAL 55 SMART HDR 4K LED TV SERIES 9 TU9220 KALED55TU9220SKA ...

Page 2: ...product at all times The device may malfunction when under electrostatic discharge It can be manually resumed by switching power off completely at wall outlet then switching power on again To avoid any injury caused by overturn of the product when installed with base stands please always ensure the whole product is placed horizontally within the supporting surface and that the television is not ov...

Page 3: ...duct It is not recommended to keep a certain still image displayed on the screen for a long time as well as displaying extremely bright images on screen from actual product appearance Product design and specifications may be changed without notice SAFETY AND WARNINGS CAUTION TO REDUCE THE RISK OF ELECTRIC SHOCK DO NOT REMOVE COVER OR BACK NO USER SERVICEABLE PARTS INSIDE REFER TO QUALIFIED SERVICE...

Page 4: ...x1 B Remote control x1 Batteries 2 C Stand x2 Screw x4 D TV Restraining Braket x2 Screw x2 E AV Converting Cable x1 F Quick Start Guide x1 G Warranty Card x1 C A B D E 55 SMART HDR 4K LED TV QUICK START GUIDE SERIES 9 XU9220 KALED55XU9220STA F G ...

Page 5: ...RC function Audio Return Channel USB 2 0 USB storage devices can be inserted to pause live DTV in Timeshift mode or to watch media files stored on device in media player mode ANT For free to air TV use an antenna cable not supplied to connect to a working antenna either via an antenna wall socket or directly LAN For a wired internet connection via a broadband modem or router connect an Ethernet ca...

Page 6: ...y Antenna wall socket 2b USB 2 0 AUDIO OUT Antenna cable not supplied 1 Stand Assembly 1b b Attach stands to base of TV ensuring A and B markings on the TV and stands match with each other c Insert two stand screws for each stand and use Phillips head screwdriver not supplied to tighten a Take out the TV and carefully put it screen downward on a stable and flat table with a soft cloth or cushion o...

Page 7: ... power cord with the TV and a suitable power outlet The TV s power indicator is lit in red showing that the TV is in standby mode b Press the POWER button on your remote control or press middle of 6 3a 3b 3c Danger of explosion if the batteries are incorrectly replaced Replace batteries only with the same or equivalent type TV Control Button to turn on the TV The power indicator is lit in green in...

Page 8: ...e current operation 15 Volume Up Down VOL Adjust the sound volume 14 Program Up Down P Switch channels 7 HOME Access the home page 18 USB Play Control Buttons Fast backward the playback Fast Backward Fast forward the playback Fast Forward Pause the playback PAUSE Start the playback PLAY 19 SUBTITLE Turn on or turn off the subtitle function 21 Color Buttons R G Y B Execute the prompt function in sp...

Page 9: ...he wireless network it will check for updates like Google service updates and so on Then please select whether or not to sign in to your Google account Step 5 Read to accept the Google terms of service and privacy policy Step 6 Select whether or not to let Google or third party to use your TV location Step 7 Select whether or not to allow Google to help improve your Android TV Step 8 Introduction ...

Page 10: ...he settings menu 7 Clock Show the current time Time and date can be adjusted in the settings menu 8 Apps Access the App Centre to display all installed apps Free to air channels can be accessed under the Live TV option 9 Favourites List A customisable list of apps available at a single click 10 Play Next Displays the program you are watching or have queued to play next You can add to this list by ...

Page 11: ...there is no more space for recording new program the TV will start to play the program automatically from the recording beginning to release the space of program which has been played for new program recording If you want to change the settings for Time shift function please select MENU More TV Setting Setup TimeShift Setting Press the RED button to edit the selected program Remind Setup a watchin...

Page 12: ...ture Gamma Adjust the light intensity of original image Color Temperature Adjust the overall color tone of the picture Advanced Adjust the following advanced settings of the picture which may vary depending on the region or model Remove the noise from the picture signal Adjust the luma of the picture automatically depending on the input signal Control local contrast Reduce the signal created while...

Page 13: ... and press POWER button to close the TV the TV will close but the system still runs continuously In such case it will consume more energy but it could take short time to turn on the TV again Screen Mode Select the desired screen mode Choices may vary depending on the input source It is available only after you have searched for channels OAD Turn on or turn off the function of OAD manual download I...

Page 14: ...guration Setup WOW WOL function to turn on the TV from standby mode by your mobile device through network connection Inputs Setup the input sources Setup to control the connected HDMI devices Accounts Sign In Sign in to your Google Account for new apps recommendations movies and more from Google Apps Show the list of recently opened installed or system apps Setup specific app permissions Device Pr...

Page 15: ...st backward or fast forward Browse Photos While browsing a photo press the following buttons to control the photo playback Button Function OK Access photo menu settings Skip to previous or next photo MENU Access the menu of quick settings Show the photo playlist Supported File Formats in Media Player Type Formats Video Audio jpg jpeg png bmp gif Photo Video Codec H 263 H 264 H 265 VP8 VP9 MPEG2 MP...

Page 16: ... as a guide to mark the positions for the holes on the wall with a pencil b Use a drill to create four holes at the marked positions on the wall Securely fix the wall mounting bracket on the wall with four expansion bolts and four self tapping screws as shown in the following picture c Fix the TV hanging bracket onto the TV rear cover with M6 screws and plastic spacers as shown in the following pi...

Page 17: ...200 1 Native Aspect Ratio 16 9 Refresh Rate 60Hz Resolution 3840 x 2160 Response Time 8ms Size 55 Viewing Angle 176 176 Features EPG Yes HDCP Yes 2 2 TV Resolution 4K UHD Browser QJY Inputs Composite AV 1 ANTENNA 1 Outputs Optical Audio Out 1 Performance CPU ARM CA53 Quad Core with TEE1 5GHz GPU G52 MC1 OS Android 10 0 RAM 2GB Storage Capacity 8GB Power Average Consumption 150W Energy Consumption ...

Page 18: ...lume settings on any external speakers connected to your television Adjust the TV volume accordingly Check another channel or input Check that MUTE hasn t been turned on Picture rolls vertically Check all connections No colour wrong colour or tints Make sure the program itself is broad cast in colour Select the picture menu then adjust related submenus Blurred or snowy picture distorted sound Chec...

Reviews: