background image

41

Station

Enable image transmission and remote 

control by connecting the camera with a 

Wi-Fi access point created by your smart 

device.
1.   Enable the Wi-Fi access point of smart 

device.

2.  Select 

 on camera and then press 

the   button to confirm connection 

with smart device.

Station

Wi-Fi Mode

Device1-SSID
Device2-SSID
Device3-SSID

Searching for devices.

*SSID

6FDQ

%DFN

Press the 

A

C

 /

C

A

 button to select:

• Scan:  Search again surrounding 

wireless devices.

• 

Select the name of device to 

be connected.

• Back:   Back to Wi-Fi mode select 

screen.

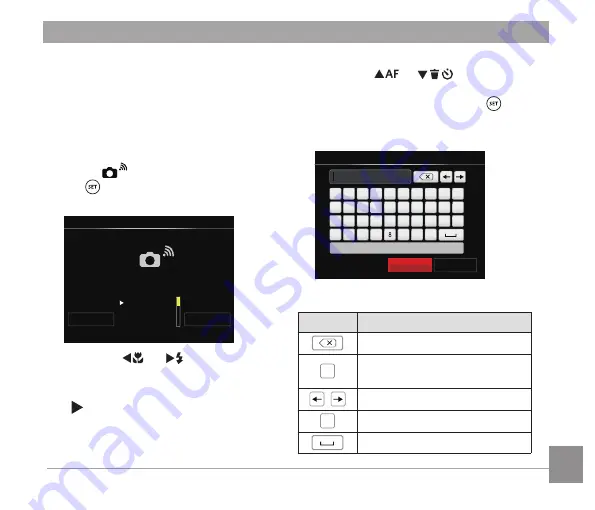
3.  Press the 

A

C

 /

C

A

 button to 

select the name of smart device to be 

connected and then press the   button 

to confirm. Then, the camera enters the 

password input interface.

Type the network security key

Enter Password

#!?

A

B

C

D

E

F

G

H

I

J

K

L

M

N

O

P

Q

R

S

T

U

V

W

X

Y

Z A/a

4

5

6

7

9

0

1

2

3

Cancel

Save 

Meanings of interface icons:

Icon

Description

  Backspace

$D

Switch between capital and 

lowercase letters


Move the Cursor

#!?

Switch the symbol input
Space

Summary of Contents for PIXPRO AZ528

Page 1: ...KODAK DIGITAL CAMERA PIXPRO AZ528 User Manual...

Page 2: ...vice may not cause interference and 2 this device must accept any interference including interference that may cause undesired operation of the device Radiation Exposure Statement This product complie...

Page 3: ...rements of the R TTE Directive 2014 53 EU The following test methods have been applied in order to provepre sumption of conformity with the essential requirements of the R TTE Directive 2014 53 EU EN...

Page 4: ...tibility EMC standard for radio equipment and services Part 17 Specific conditions for 2 4 GHz wideband transmission systems and 5 GHz high performance RLAN equipment Manufacturer Sintai Optical Shenz...

Page 5: ...the following measures Reorient or relocate the receiving antenna Increase the separation between the equipment and receiver Connect the equipment into an outlet on a circuit different from that to w...

Page 6: ...l are used for identification purposes only and are properties of their respective owners This manual provides you with instructions on how to use your new KODAK PIXPRO Digital Camera Every effort has...

Page 7: ...comes in contact with the camera turn the camera off remove the battery and the memory card and dry it completely within 24 hours When you take the camera from a cold environment to a warmer environme...

Page 8: ...ing discharging excessive heat or possible leakage Do not attempt to disassemble the battery Do not expose the battery to water Always keep the battery contacts dry Do not heat the battery or throw it...

Page 9: ...ory card Copy the data to your computer before you edit them When the camera is stored for a long period of time be sure to download your photos and remove the memory card Store the memory card in a d...

Page 10: ...photos or video Do not expose the camera s LCD to water In a humid environment only wipe it with a soft and dry cleaning cloth If the LCD screen is damaged pay particular attention to the liquid cryst...

Page 11: ...ing Camera On and Off 23 Set your Language Date Time 24 Set your Language Date Time after the First Power On 24 Resetting your Language 25 Resetting Date Time 26 MODE OVERVIEW 27 Display Setting 27 LC...

Page 12: ...the Zoom Function 53 Focus Setting 54 Macro Mode 55 Self Timer Setting 56 Flash Mode 57 White Balance Setting 58 Continuous Shot 59 EV Settings 60 EV Adjustment 60 ISO Adjustment 61 Shutter Adjustment...

Page 13: ...MENUS 71 Photo Setup Menu 71 Expo Metering 71 Image Size 72 OIS Optical Image Stabilization 73 Cont AF Continuous Auto Focus 73 HDR High Dynamic Range 74 Beautifier 74 Scene 75 Photo Shooting Settings...

Page 14: ...Playback Mode 85 HDR High Dynamic Range 86 Touch Up 86 Rotate 87 Resize 87 Color 88 Playback Settings Menu 89 Protect 90 Delete 91 DPOF Digital Print Order Format 92 Trim 92 General Settings Menu 93...

Page 15: ...1 Setting the USB Mode 101 Transferring files to your computer 102 Connecting to a PICTBRIDGE Compatible Printer 103 Setting the USB Mode 103 Connecting to your Printer 104 Using the PICTBRIDGE Menu 1...

Page 16: ...ailer first or our customer service center The battery chargers may be a little different in shape due to the different countries or regions this camera is sold to The illustration may not match the a...

Page 17: ...16 Install Lens Cap and Neck Strap...

Page 18: ...17 Part Names 1 Micro USB Port 2 Zoom Lever 3 Shutter Button 4 Strap Eyelet 5 Exposure Compensation Button 6 Continuous Shot Button 7 Power Button 8 AF Assist Beam Self Timer Lamp 9 Flash Lamp 10 Lens...

Page 19: ...16 Menu Button 17 A C AF Button Up Button 18 A C Macro Button Left Button 19 C A Flash Button Right Button 20 C A Delete Button Self Timer Button Down Button 21 Display Button 22 Playback Button 23 S...

Page 20: ...ection of arrow 1 2 2 Insert the battery into the battery compartment according to the negative and positive directions as illustrated in the picture Push the battery down until it locks in place Inst...

Page 21: ...to be purchased separately This camera takes a standard SD SDHC memory card We recommend using a name brand memory card that is Class 4 or higher and has a capacity of 4GB to 32GB The camera is not co...

Page 22: ...f the power charger into the power outlet to charge the battery After the battery is stored for a long period of time use the supplied power charger to charge the battery prior to use To have maximum...

Page 23: ...22 22 3 When the camera is turned off you can also connect the camera to your PC using a USB cable to charge the battery 3 Please charge the battery indoors between 0 C and 40 C 32 F and 104 F...

Page 24: ...e power button to turn the camera on To turn the camera off press the power button again Power Button When the power is off press and hold the button to power on and enter playback mode Turning Camera...

Page 25: ...nfirm the selection the Date Time settings screen appears 4 Press the A C C A button to select the Date Time to be adjusted Time is displayed in YYYY MM DD HH MM 5 Press the A C C A button to adjust t...

Page 26: ...r the menu 4 Press the A C C A A C C A buttons to select your desired language and press the button to confirm 5 Press the button and the shooting screen appears Sound Settings Power Saver Auto Langua...

Page 27: ...lect the Date Time to be adjusted Time is displayed in YYYY MM DD HH MM 5 Press the A C C A button to press the value for your selected block After you finish your settings press the button to confirm...

Page 28: ...VERVIEW Press the button to display the settings Classic Full Off Classic Displays the camera parameters on screen 0 3 EV F2 8 400 ISO 1234 00 56 00 SD 1 50 Full Camera parameters with Grid and Histog...

Page 29: ...xposure Compensation 16 Shutter Speed 17 Histogram 18 Aperture Value 19 OIS Optical Image Stabilization 20 HDR 21 Expo Metering 22 Continuous Shot 23 AF Mode 24 Flash Mode 1234 0 3 EV 400 ISO 00 56 00...

Page 30: ...lor Effect 8 Video Quality 9 Remaining Recording Time 10 Exposure Compensation 11 OIS Optical Image Stabilization 12 Focus Frame 13 Expo Metering 14 AF Mode For optimal video shooting it is recommende...

Page 31: ...of photos and total number of photos 4 SD Memory Card Built in Memory 5 Battery Status 6 Zoom Magnification Area 7 Image Zoom Ratios 8 Image Zone 9 Shooting Date 10 Continuous Capture Group Playback...

Page 32: ...bject you want to take a picture of 3 Use the zoom lever to select Tele or Wide position to zoom in or out on your subject 4 Press the shutter button down half way to allow the camera to focus on your...

Page 33: ...can switch the ISO and EV value according to personal preference the camera can automatically set the shutter speed and aperture value Shutter priority Setting allows you to adjust the shutter speed...

Page 34: ...ng touches and eye brightening capabilities Wi Fi Mode Enable image transmission and remote control by connecting smart device with Wi Fi Scene Mode Choose from 13 different pre set scene types and ef...

Page 35: ...nt setting 3 Press the A C C A button to adjust the parameters 4 Press the button to confirm the settings and enter the shooting screen Please refer to the table below for any nonadjustable options in...

Page 36: ...most suitable scene to capture the best pictures SD 00 56 00 Auto Mode The camera automatically adjusts the exposure and focus to ensure the best possible pictures Landscape Mode For landscapes autom...

Page 37: ...e and night scenes Backlit Portrait When the sun or any other light source is behind you automatically adjusts the fore ground exposure to produce the best pictures possible Night Mode For night scene...

Page 38: ...ace beautifier mode 2 Press the button and press the A C C A button to select 3 Press the A C C A button to select an option and press the button to confirm and return to photo shooting mode 1234 0 3...

Page 39: ...in receiving signals To maintain a connection please keep the camera within 10 meters 32 8 feet without signal shielding interference Please do not use Wi Fi connection functionality on a plane The ca...

Page 40: ...Wi Fi device to connect to it 2 Press the A C C A button to select and set options Settings Customize the Wi Fi settings for the camera system Station Use the Station Mode to connect to a Personal Ho...

Page 41: ...he A C C A button to select Refresh Create a new WPA2 PSK password Back Back to previous page Settings of Smart Device 1 Enable the Wi Fi of smart device and then search surrounding wireless devices 2...

Page 42: ...on to select Scan Search again surrounding wireless devices Select the name of device to be connected Back Back to Wi Fi mode select screen 3 Press the A C C A button to select the name of smart devic...

Page 43: ...s the A C C A A C C A buttons to select and then press the button to confirm your selection Enter the completion of WPA2 PSK after password storage 5 Connect immediately after saving If connected the...

Page 44: ...the menu DSC Device MAC Address PIXPRO AZ528 38 67 93 XX XX XX 3 Press the button to confirm settings and then skip the menu To Disconnect from Wi Fi Wi Fi Mode Disconnect from device No Yes No Keep...

Page 45: ...P Q R S T U V W X Y Z A a 4 5 6 7 9 0 1 2 3 For the method of input please refer to the introduction on password input on Page 41 MAC Address Check the wireless MAC Address of this camera App Operatin...

Page 46: ...hen configures the most appropriate settings for the best possible photos 1 Rotate the mode dial to select 2 Press the A C C A A C C A buttons to select a scene and press the button to confirm Multi E...

Page 47: ...t blur Night Portrait For portraits against night time scenery The use of a tripod is recommended Landscape For landscapes and outdoor shots Vivid reproduction of greens and blues Portrait Most suitab...

Page 48: ...ame if not there is an orange frame At most 10 dog cat faces can be detected at one time Multi Exposure Keep camera steady before shooting Press and hold the Shutter button to take 7 photos continuous...

Page 49: ...s You can also press the button or press the Shutter button halfway down to be ready to take pictures 3 Compose your shot on the LCD and half press the shutter button to focus on the subject After foc...

Page 50: ...ailable at this time During panorama mode shooting press the button to interrupt shooting and save the current pictures taken Press the C A button to cancel shooting and not to save the previously tak...

Page 51: ...ter the movie screen 2 Press the button or the Shutter button to start recording 00 00 06 x3 6 3 Press the button or the Shutter button again to stop recording save it automatically and then the camer...

Page 52: ...the button to enter the shooting screen 3 As shown in the picture press the button to confirm setting or to exit without setting by turning the mode dial Rotate the mode dial to skip Go to setting CS...

Page 53: ...he mode If you want to remove the parame ter setting of Custom Settings please see the reset function on page 98 to operate 3 Press the button and then the A C C A button to select and press the butto...

Page 54: ...al Zoom Toggle the Zoom Lever of the camera to zoom in or out on the subject while taking pictures Zoom Lever When the Optical Zoom reaches the threshold as Digital Zoom release and turn the Zoom Leve...

Page 55: ...Single AF The focus frame appears on the center of the LCD to focus on the subject Multi AF The camera automatically focuses the subject in a wide area to find the focus point Object Tracking Smart tr...

Page 56: ...to configure the settings 1 Press the A C button to enter the Macro menu Macro Off 2 Press the A C C A button to select the following 2 modes Macro Off Select this option to disable Macro Macro On Se...

Page 57: ...Button is pressed Self Timer 10 sec A single picture is shot 10 seconds after the Shutter Button is pressed Self Timer Smile Press the Shutter Button and a picture will be taken immediately after a s...

Page 58: ...sh is turned off Flash Auto Camera flash goes off automatically based on existing light conditions Fill Flash The flash goes off when a picture is taken supplementing the existing light in a scene and...

Page 59: ...ite Balance menu AWB AWB 2 Press the A C C A button to select the following 8 modes AWB Daylight Cloudy Fluorescent Fluorescent CWF Incandescent Manual WB Fully press the Shutter button to detect the...

Page 60: ...ake several pictures at a time Cont Shot High Speed VGA For continuous shot with VGA pixel Cont Shot Fast 4M For continuous shot with 4M pixels Time Lapse Take pictures based on the preset interval 30...

Page 61: ...e is from EV 3 0 to EV 3 0 The EV function menu of the camera includes functions such as EV Exposure Value Adjustment ISO Shutter Adjust ment Aperture Adjustment etc Using the appropriate function set...

Page 62: ...1600 and 3200 Shutter Adjustment For shutter speed the camera may automatically set the aperture value corresponding to the manually set shutter speed so as to obtain a most suitable exposure value T...

Page 63: ...all aperture opening will keep both the background and main object in clear focus Adjustable in Mode 400 ISO 0 3 EV 0 3 EV 400 ISO 1 50 1 50 F2 8 F2 8 In shooting mode press the button to begin record...

Page 64: ...C C A button to select the Image Color Setting options represents options that are available in Movie mode There are 20 Image Color options in photo shooting mode Normal Sepia Vignetting Vivid Partia...

Page 65: ...elected video clip press the button to enter the Movie Playback mode An operation guide appears on the screen when playing back a video Press the appropriate buttons to enable the corresponding functi...

Page 66: ...photos and videos on the screen W Zoom Out T Zoom Out 1 Slide the Zoom Lever to switch between 3x3 and 4x4 thumbnails 2 Press the A C C A A C C A buttons to select a picture or video clip to view and...

Page 67: ...to be zoomed in on 3 Rotate the Zoom Lever clockwise to to zoom in 4 The screen will display the number of times and area of the photo zooming operation 5 Press the A C C A A C C A buttons to navigate...

Page 68: ...ton to select the photos and videos to be deleted 3 Press the C A button and the deletion screen is displayed Delete One Exit 4 Press the A C C A button to select Delete One or Exit and press the butt...

Page 69: ...slide option 3 Press the A C C A button to select the slideshow playing option or Cancel to return to the playback screen Cancel 4 Press the button to confirm the setting The Continuous Capture Group...

Page 70: ...4M can make continuous capture for group image playback 1 Press button to enter playback screen 2 Press the A C C A button to select Cont Group 3 Press to start playback 25 1 45 SD 06 20 06 20 00 00...

Page 71: ...y return to the initial panorama screen 1 Press the button to enter Playback Screen 2 Press the A C C A button to select animated panoramic photos 3 Press the button to play in selected shooting direc...

Page 72: ...s for more details about each setting Expo Metering Use this setting to select the target size of the camera s field of view to be metered AiAE Artificial Intelligence AE Evaluates the light intensity...

Page 73: ...larger sizes without sacrificing the image quality Size High quality printing Size Full size printing Size 16 9 display Size Poster printing Size A3 printing Size A4 printing Size 4 x 6 printing Size...

Page 74: ...image stabilization mode in dark environments Shooting in a windy or unstable environment such as a moving vehicle may cause blurry images It is recommended to turn off OIS when using a tripod Cont AF...

Page 75: ...ailed instructions HDR High Dynamic Range Use this setting to control wide dynamic image range when taking static pictures Photos with extreme contrast of bright and dark areas will still maintain dis...

Page 76: ...Portrait Press SET To Select Scene Please refer to P45 for more detailed instructions Shooting menu in the Photo Shooting Mode O Available X Not Available Options Photo Shooting Modes O O O O O O O O...

Page 77: ...n to enter the menu 3 Press the A C C A button to select and press the C A button to enter the menu 4 Press the A C C A button to select the item to be set and press the C A button to enter the menu 5...

Page 78: ...ssion ratio Quality Best Fine Normal There are three options for picture quality Best Fine Normal AF Assist Beam In a darker environment AF Assist Beam can be turned on for better focus AF Assist Beam...

Page 79: ...ely after they are taken Each photo is displayed on the LCD based on the selected time Quick Review Off 1 sec 2 sec 3 sec There are 4 options Off 1 sec 2 sec 3 sec Date Imprint Include a Date Time sta...

Page 80: ...ameters The stored mode and parameters are retrieved in mode Custom Settings Reset camera settings to custom settings mode No Yes There are 2 options No Yes In mode select Custom Settings the camera w...

Page 81: ...ton to confirm Expo Metering Exposure Metering Use this setting to select the target size of the camera s field of view to be metered Expo Metering AiAE AiAE Artificial Intelligence AE Evaluates the l...

Page 82: ...images to SD card are as follows No Image Pixel Frame Recommendation Recording time 4GB About 1 1920x1080 30 Class 6 30 minutes 2 1280x720 60 Class 6 32 minutes 3 1280x720 30 Class 4 59 minutes 4 640...

Page 83: ...fps shooting time is 30 seconds playback time is 2 minutes Sound recording is disabled when 640x480 120fps is chosen OIS Optical Image Stabilization This mode can help reduce photo blur caused by unst...

Page 84: ...C A button to select and press the button to enter the Movie Setting menu Press SET To Enter Menu 3 Press the A C C A button to select and press the C A button to enter the menu 4 Select the item to...

Page 85: ...s the current movie mode and its parameters The stored mode and parameters can be retrieved directly in mode Custom Settings Reset camera settings to custom settings mode No Yes Digital Zoom Turn the...

Page 86: ...mal Mode Press SET To Confirm Refer to the following pages for more details about each setting Playback Mode Select and press the button to enter the settings screen Normal Mode Display all images Nor...

Page 87: ...ancel After using the HDR function the image will be saved as a new file and the original file is still stored in the memory Touch Up The playback beauty feature allows for beautification using three...

Page 88: ...rotated picture file will replace the original photo Resize This setting allows you to resize a picture to a particular resolution and saves it as a new picture Select and press the button to enter t...

Page 89: ...original photo Press the button to enter the settings screen Cancel There are 19 options available Cancel Sepia Vignetting Vivid Partial Color Red Salon Japan Style 8M Partial Color Blue Fish Eye Ital...

Page 90: ...A C C A button to select and press the C A button to enter the menu Protect DPOF Delete Trim 3 Press the A C C A button to select the item to be set and press the C A button to enter the menu 4 Press...

Page 91: ...roup Reset All Reset Date Folder There are 5 options available One Lock the selected photo or video if it is unprotected unlock the selected photo or video if it is protected Date Folder Protect all p...

Page 92: ...in the Date Folder Cont Group Delete all photos in the Cont Photo Folder All Delete all photos or videos The indicator means a file is protected File protection must be removed first before a file ca...

Page 93: ...e picture Select to cancel changes and return to the trim prompt screen The image cannot be clipped trimmed again once it has been clipped to 640X480 DPOF Digital Print Order Format The DPOF feature a...

Page 94: ...to enter the menu Sound Settings Power Saver Auto Language English World Time Home Date Time 2019 03 21 00 00 3 Press the A C C A button to select the item to be set and press the C A button to enter...

Page 95: ...y after a certain period of inactivity Power Saver Auto Normal Best Auto Normal Best Power Saver LCD power off time Turn off time Auto 3 min 5 min Normal 1 min 3 min Best 30 sec 1 min Sound Settings W...

Page 96: ...to select the departure place and destination fields 2 Press the A C C A button to select a city located in the same time zone as that of the field Press the button to confirm settings Date Time Refer...

Page 97: ...the C A button to enter the menu 3 Press the A C C A button to select the item to be set and press the C A button to enter the menu Format File Numbering Copy to Card Reset FW Version X XX 4 Press th...

Page 98: ...e camera will format its memory If there is no memory card in the camera the built in memory will be formatted if there is a memory card only the card will be formatted Copy to Card Use this setting t...

Page 99: ...Reset Reset camera settings to factory defaults No Yes File Numbering After you take a picture or video clip the camera will save it with a sequential number You can use this to reset the file number...

Page 100: ...ting to view the current camera firmware version FW Version Current Ver 1 XX Back When there is a new firmware version in the memory card select Yes to update FW Version Current Ver 1 XX New Ver 2 XX...

Page 101: ...he A C C A button to select and press the C A button to enter the menu 3 Press the A C C A button to select the item to be set and press the C A button to enter the menu USB PC TV System NTSC 4 Press...

Page 102: ...B port can be set to connect with either a computer or a printer The following steps will allow you to ensure that the camera is correctly configured to connect with a PC 1 Press the A C C A button to...

Page 103: ...our PC as you would copy any typical folder or file Follow the steps below to connect the camera to a computer 1 Make sure the computer is turned on 2 Connect one end of the supplied Micro USB cable t...

Page 104: ...ort can be set to connect with either a PC or a Printer the following steps will ensure that the camera is correctly configured to connect with a Printer 1 Press the A C C A button to select USB and p...

Page 105: ...et incorrectly in which case you should disconnect the Micro USB cable check the USB mode settings ensure that the printer is turned on and then try connecting the Micro USB cable again 1 Make sure th...

Page 106: ...A button to enter the item Refer to the following sections for more detailed information on each setting Using the PICTBRIDGE Menu Print with Date If you have set the date and time on your camera the...

Page 107: ...button to confirm printing select Cancel and press the button to cancel printing Print without Date Use this setting to print the photos without dates on them 1 In the PICTBRIDGE menu select Print wit...

Page 108: ...g select Cancel and press the button to cancel printing Print Index You can print all photos in the camera via this function 1 In the PICTBRIDGE menu select Print Index and the screen as shown below a...

Page 109: ...ct Print DPOF Images and the screen as shown below appears Print DPOF Images Cancel Yes 2 Select Yes and press the button to confirm printing select Cancel and press the button to cancel printing Exit...

Page 110: ...llows 1 Press the A C C A button to select TV System and press the C A button to enter the menu 2 Press the A C C A button to select NTSC and press the button to confirm TV System PAL NTSC The video o...

Page 111: ...ength 4 3mm Wide 223 6mm Tele 35mm film equivalent 24mm Wide 1248mm Tele F number F2 8 Wide F5 6 Tele Lens Construction 13 groups 15 elements Optical Zoom 52x Optical Zoom Normal Wide 60cm Tele 300cm...

Page 112: ...DPOF Ver1 1 Support Yes File Format Still Image Exif 2 3 JPEG Movie MOV Image H 264 Audio Linear PCM Stereo Shooting Modes Auto Mode Program AE Shutter priority Aperture priority Manual Mode Face Bea...

Page 113: ...ontrol Method Program AE AE Lock Available Shutter Prior AE Aperture Prior AE Exposure Compensation 3 EV in 1 3 Step Increments Shutter Speed 1 2000 30 Seconds Continuous Shot Yes Playback Modes Singl...

Page 114: ...Wi Fi Yes 802 11b g n Remote Viewfinder Yes via smart device Power Rechargeable Li ion Battery LB 060 3 7V 1100mAh In Camera Charging Shooting Capability Battery Performance Approx 240 Shots Based on...

Page 115: ...using tripod When continuous exposure is enabled this prompt message is displayed when the photo shooting screen is displayed for the first time The message will disappear after 2 seconds Built in mem...

Page 116: ...em Remove cable reinsert cable and retry connection Write Protect The SD card is locked Turn off camera and remove SD card Slide tab on the side of card to unlock Card Full The memory of the SD card i...

Page 117: ...nd the re cording will not continue Replace SD card with a Class 4 or higher card Cannot write to SD card The camera cannot write to the SD card Turn off the camera Remove and reinsert the SD card and...

Page 118: ...ported or the file is damaged and cannot be recognized properly This message will only disappear after the file is deleted No Picture When the play button is pushed and there are no files on memory ca...

Page 119: ...amera is actually shutting off and not entering Power Save Mode where the LCD will turn off after the camera has been idle for a period of time The picture is blurry Camera shakes while taking a pictu...

Page 120: ...e the jammed paper Saving data to memory card is slow Using a memory card below Class 4 may result in slower recording times Use a memory card with write Class 4 or higher than 4 to improve performanc...

Page 121: ...nnection For different models this operation may be varied please subject to your user manual 1 2 3 1 2 iOS system Android system When shooting with stacked filters attached the corners of the photo m...

Page 122: ...Kodak Company All other logos products or company names that are referred to in this document are trade names trademarks or registered trademarks of their respective owners and holders The owners and...

Reviews: