Kodak i6000 Series User Manual Download Page 4

2

A-61557 December 2006 

Safety and regulatory 
agency approvals

The 

Kodak

 i6000 Series Check Scanners conform to applicable 

national and international product safety and electronic emission 
regulatory requirements. This includes, but is not limited to, the 
following:

Environmental 
information

• The 

Kodak

 i6000 Series Check Scanners are designed to meet 

worldwide environmental requirements.

• Guidelines are available for the disposal of consumable items that 

are replaced during maintenance or service; follow local regulations 
or contact Kodak locally for more information.

• Disposal of this material may be regulated due to environmental 

considerations. For disposal or recycling information, contact your 
local authorities or, in the USA, visit the Electronics Industry Alliance 
website: www.eiae.org.

• The product packaging is recyclable.

• Parts are designed for reuse or recycling.

European Union

This symbol indicates that when the last user wishes to discard this 
product, it must be sent to appropriate facilities for recovery and 
recycling. Please contact your local Kodak representative or refer to 
www.kodak.com/go/recycle for additional information on the collection 
and recovery programs available for this product.
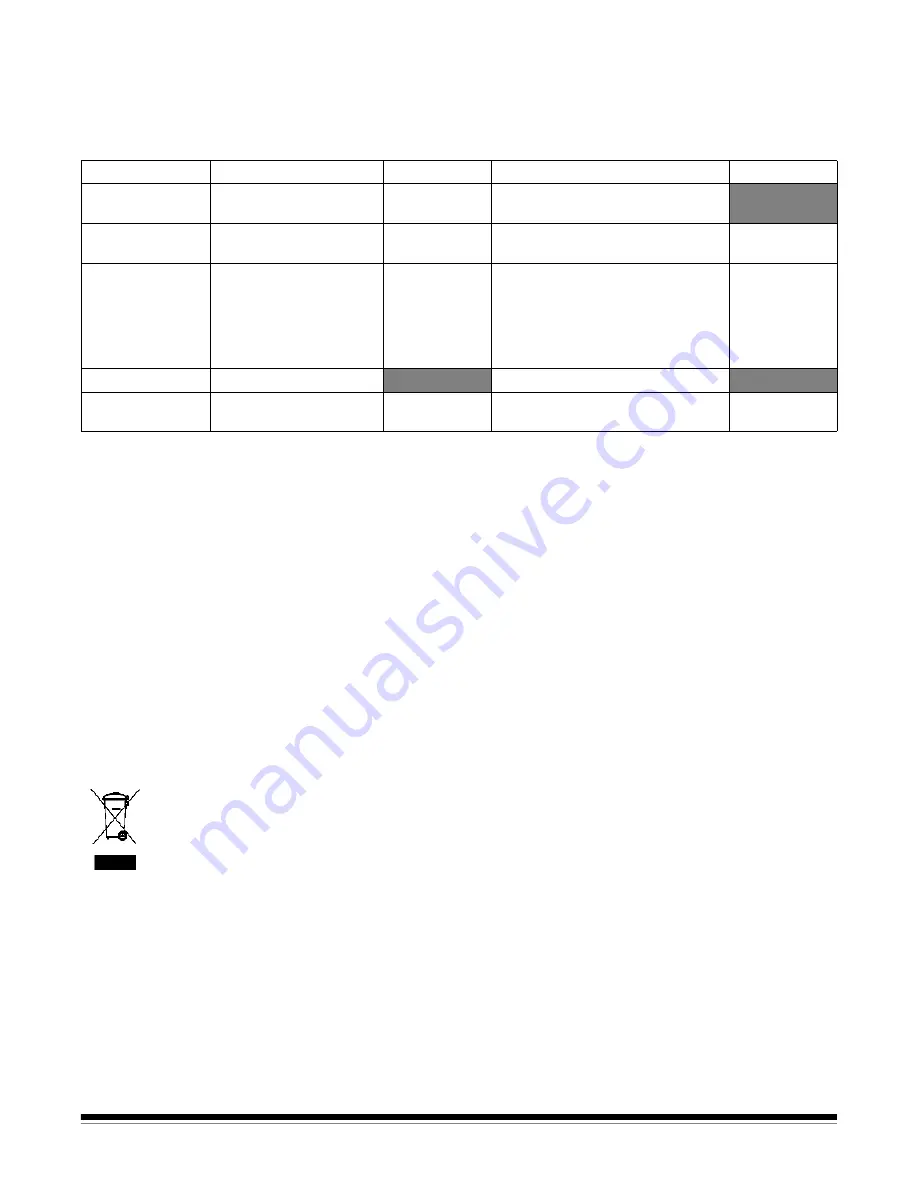


Country or Region

Safety Approval

Safety Mark

Electromagnetic Compatibility

EMC Mark

Canada

CAN/CSA-C22.2 

No. 60950-1 

CUL

Canada ICES - 003 Issue 3 
Class A

China

GB4943

CCC

“S&E”

GB 9254 Class A
GB 17625.1 Harmonics

CCC

“S&E”

European Union

EN 60950-1

CE

TUV GS

EN 55022 
ITE Emissions Class A
EN61000-3-2 
Powerline harmonics
EN 61000-3-3 Flicker
EN 55024 ITE Immunity

CE

International

IEC 60950-1

CISPR 22 Class A

United States

UL 60950-1

UL

CFR 47 Part 15 Subpart B 
FCC Class A

FCC

Summary of Contents for i6000 Series

Page 1: ...i6000SeriesCheckScanners User sGuide A 61557 CATNo 1464916 PartNo 9E4728...

Page 2: ...System requirements 5 Installing the scanner 6 Installing the drivers 7 Windows 2000 7 Windows XP 13 Scanner components 19 3 Using the Scanner 21 Turning the scanner on and off 21 Document preparatio...

Page 3: ...mmon sense precautions applicable to the operation of any machinery These include but are not limited to the following Do not wear loose clothing unbuttoned sleeves etc Do not wear loose jewelry brace...

Page 4: ...ctronics Industry Alliance website www eiae org The product packaging is recyclable Parts are designed for reuse or recycling European Union This symbol indicates that when the last user wishes to dis...

Page 5: ...is equipment generates uses and can radiate radio frequency energy and if not installed and used in accordance with the instruction manual may cause harmful interference to radio communications Operat...

Page 6: ...up to 100 documents per minute This User s Guide provides information and procedures for the Kodak i6000 Series Check Scanners The information in this User s Guide is for all i6000 Series Check scann...

Page 7: ...lish Installation and Maintenance CD Cleaning supplies cleaning cards and swabs Country Contact Sheets System requirements The following system requirements are recommended to obtain the best performa...

Page 8: ...Failure to do so may result in degraded MICR read rates 1 Place the scanner on a flat surface near the PC that you are connecting it to Do not install it in a location where it will be in direct sunli...

Page 9: ...Windows 2000 1 Logon to the PC with an account that has system administrative privileges 2 Place the Installation CD in your CD ROM drive The installation utility will start up automatically 3 Click...

Page 10: ...8 A 61557 December 2006 4 Click Next to select the type of setup 5 Select the Typical installation and click Next...

Page 11: ...oftware icon will be placed on your desktop 8 Remove the installation CD from the CD drive 9 When finished with the installation turn on the scanner 10 Double click on the icon to start the ScanTest S...

Page 12: ...ct Properties The Properties dialog box will be displayed 2 Select the Hardware tab and click Device Manager to display the Device Manager window 3 Select Other devices and highlight USB Device then c...

Page 13: ...A 61557 December 2006 11 The Update Device Driver Wizard window is displayed 5 Click Next 6 Select Search for a suitable driver for my device recommended and click Next...

Page 14: ...12 A 61557 December 2006 7 Select CD ROM drives and click Next 8 Click Finish The Kodak ScanTest Software icon will be placed on your desktop...

Page 15: ...P 1 Logon to the PC with an account that has system administrative privileges 2 Place the Installation CD in your CD ROM drive The installation utility will start up automatically 3 Click Next to disp...

Page 16: ...14 A 61557 December 2006 4 Click Next to select the type of setup 5 Select the Typical installation and click Next...

Page 17: ...following window will be displayed 7 Click Finish The Kodak ScanTest Software icon will be placed on your desktop 8 Remove the installation CD from the CD drive 9 When finished with the installation t...

Page 18: ...operties The Properties dialog box will be displayed 2 Select the Hardware tab and click Device Manager to display the Device Manager window 3 Select Universal Serial Bus controllers and highlight Tel...

Page 19: ...A 61557 December 2006 17 5 Click Next 6 Select Install from a list or specific location Advanced and click Next 7 Select Search removable media floppy CD ROM and click Next...

Page 20: ...18 A 61557 December 2006 8 Click Finish The Kodak ScanTest Software icon will be placed on your desktop...

Page 21: ...5 Indicator lights for more information Exit tray Exit stop wire collects the scanned documents Scanner covers the scanner has three scanner covers top side and back covers which can be removed for m...

Page 22: ...hicknesses and textures of documents Inkjet printer optional prints endorsements on the back of documents before scanning The printer has one position and is programmable to endorse the documents with...

Page 23: ...the automatic feeder this allows the feeder to introduce documents into the scanner one at a time Remove all staples rubber bands and paper clips etc before scanning Documents should be in good condit...

Page 24: ...Be sure that the checks are flat and not lifted at a slight angle The documents should be placed in the input tray facing away from the scanner 2 Using your application software click Scan For i6060...

Page 25: ...h cleaning cycle it is recommended to use the cleaning swabs on the four main drive rollers and do a weekly monthly cleaning procedure as described later in this chapter NOTES Cleaning frequency can b...

Page 26: ...6 Place the cleaning card in the input tray and select Scan You may need to give the cleaning card a slight push to start it through the transport 7 Turn the cleaning card over and repeat Step 6 8 Sca...

Page 27: ...in the previous section 2 Turn the scanner off 3 Remove the scanner top cover 4 Lift and remove the side cover 5 Pull the exit stop wire out about 4 inches to provide adequate clearance for removing t...

Page 28: ...Loosen and remove the thumbscrew that holds the scan tower door in place 8 Open the scan tower door 9 Using the cleaning swab wipe both surfaces of the scan heads 10 Close the scan tower door and rein...

Page 29: ...the drive rollers black and white with the swab While the rollers are turning use an up and down motion to clean the entire roller You may need to use several cleaning swabs if the rollers are very di...

Page 30: ...er 2 Remove the scanner top cover 3 Lift up the tab at the rear of the ink cartridge and pull it out of the ink cartridge holder 4 Dispose the empty ink cartridge in accordance with all federal state...

Page 31: ...situation before calling Technical Support Indicator lights The two indicator lights provide information on the current state of the scanner LED Scanner State Right LED on red Scanner is powered on R...

Page 32: ...lear the paper path grasp the document with both hands and carefully wiggle it back and forth as you lift it out of the paper path If the document cannot be easily removed do the following 1 Remove th...

Page 33: ...ng edges Check for bent or excessively curled leading edges and straighten as needed Verify that the documents are not stuck together Be sure that checks are properly inserted in the input tray for sc...

Page 34: ...kjet cartridge is properly installed If it is remove the cartridge and reseat it Try installing a new inkjet cartridge If you have verified that the ink cartridge is installed correctly or have replac...

Page 35: ...bits pixel 256 shades of gray 1 bit pixel bi tonal B W 4 bits pixel 16 shades of gray software selectable from the API Color image depth 24 bits pixel 16 777 216 shades Image resolution 200 x 200 dots...

Page 36: ...ootprint 5 1 in 12 9 cm x 8 6 in 21 8 cm Acoustic Noise Sound Power level 56 Lpa dbA peak the operator position Electrical requirements Power Consumption 50 watts maximum 115 Vac 10 60 Hz 230 Vac 10 5...

Page 37: ...ootprint 5 1 in 12 9 cm x 8 6 in 21 8 cm Acoustic Noise Sound Power level 56 Lpa dbA peak the operator position Electrical requirements Power Consumption 50 watts maximum 115 Vac 10 60 Hz 230 Vac 10 5...

Page 38: ...Eastman Kodak Company 343 State Street Rochester NY 14650 USA Kodak 2006 TM Kodak www kodak com go docimaging...

Reviews: