Kodak EZ 200 User Manual Download Page 55

39

Chapter 5

Finding Your IP Address

To find your computer’s IP address:

1

Make sure you are connected to your Internet service provider.

2

From the Start menu on your desktop, select Run.

3

In the text box, type the following:

winipcfg

4

Click OK.

NOTE: The IP address can change each time you connect to your
provider. We recommend that you ask the person you are calling for
their IP address each time you initiate a video conference.
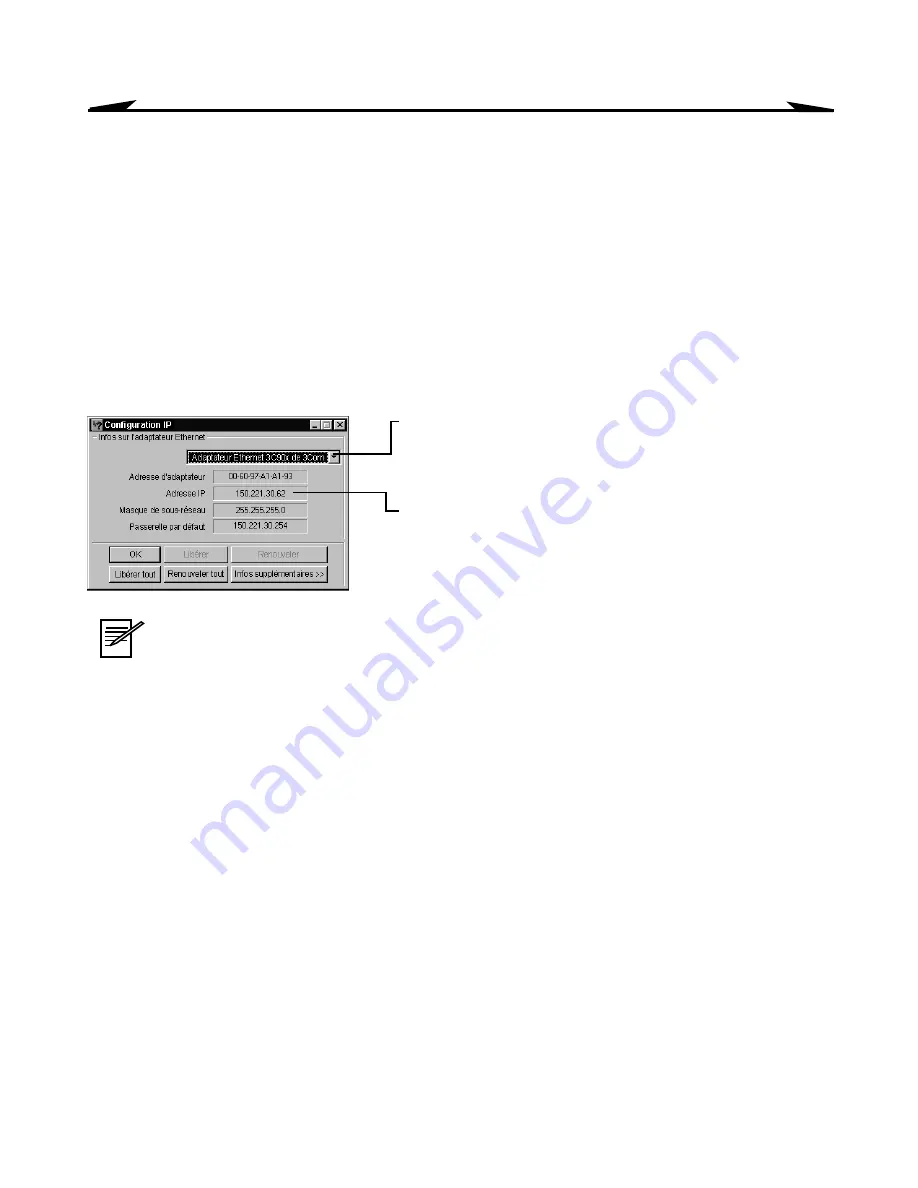
5

In the IP Configuration window,
select your Internet service provider
from the drop down list.
Your IP address appears in the IP
Address text box.

Summary of Contents for EZ 200

Page 1: ...Eastman Kodak Company Rochester NY 14650 Eastman Kodak Company 2000 Kodak is a trademark of Eastman Kodak Company P N 6B4802 User s Guide Digital Camera ...

Page 2: ...Power button Shutter button Strap post LCD Mode button Self timer light Digital Camera mode focus position Focus ring Viewfinder USB connector Speaker Battery door Tripod socket FRONT TOP BACK BOTTOM ...

Page 3: ... Digital Camera mode not connected to your PC or PC Camera mode connected to your PC For details consult the body of this User s Guide Install the Software 1 Insert the KODAK EZ200 Software CD 2 Follow the on screen instuctions 3 Connect the camera when prompted 4 Restart the computer if prompted FIRST ...

Page 4: ...Quick Start Digital Camera Mode not connected to your PC Load the Batteries Turn On the Camera 1 2 ...

Page 5: ...ou cannot take a picture unless the focus ring is set to the position shown NOTE In Digital Camera mode 4 High Quality Web Quality no icon HQ Self timer Burst Silent Movie Clip Five Capture Modes Five Capture Modes Five Capture Modes Five Capture Modes ...

Page 6: ...Quick Start Take a Picture or Video Connect to the PC 5 6 ...

Page 7: ...Pictures and Movie Clips See Chapter 4 Using Your EZ200 Camera as a PC Camera for instructions on using your pictures on your PC 1 Press the Shutter button 2 Select ARCSOFT PHOTOIMPRESSIONS 3 Click Get Images 4 Click Save All 7 ...

Page 8: ...ture From Live Video 1 Connect to the PC 2 Press the Shutter button 3 Select ARCSOFT PHOTOIMPRESSION 4 Turn the focus ring until the live video display is clear 5 Click Take Picture 6 Click Transfer See page 34 for more information about working with your pictures 1 ...

Page 9: ...your desktop select Programs MICROSOFT NetMeeting 3 Click Start Video 4 Turn the focus ring on the camera until the live video display is clear 5 Enter the IP address of the person you are calling 6 Click Place Call See page 37 for more information about holding a video conference 2 ...

Page 10: ......

Page 11: ...to a PC take great digital still pictures perfect for e mailing capture fast action shots with the Burst feature capture silent movie clips PC Camera Mode connected to a PC take digital still pictures close up capture movie clips with audio download your pictures and video clips to a PC It s easy and quick make live video phone calls video conferencing Visit Kodak on the World Wide Web at www koda...

Page 12: ...Eastman Kodak Company 343 State Street Rochester N Y 14650 Eastman Kodak Company 2000 Kodak is a trademark of Eastman Kodak Company P N 6B4802 ...

Page 13: ...ies 4 Displaying the Picture Video Count 5 Turning Camera Sounds On and Off 6 2 Installing the Software 8 WINDOWS System Requirements 8 Software Programs 9 Installing the Software 9 3 Using Your EZ200 Camera as a Digital Camera 11 Checking the Focus Setting Digital Camera Mode 12 Choosing a Capture Mode 13 Taking a Still Picture 14 Including Yourself in the Picture 15 ...

Page 14: ...era to Your Computer 21 Storing Your Pictures on Your PC 22 Downloading Pictures From the Camera 23 Taking Still Pictures 24 Saving Still Pictures 26 Shooting Video Clips 27 Using Video Conferencing 27 5 Using the Software 28 Using KODAK EZ200 Software 29 Getting Started with ARCSOFT PHOTOIMPRESSION 2000 34 Getting Started with ARCSOFT VIDEOIMPRESSION 35 Getting Started with MICROSOFT NetMeeting 3...

Page 15: ...s from Your Printer 41 Troubleshooting 42 7 Getting Help 48 Software Help 48 Kodak Online Services 48 Kodak Fax Support 48 Telephone Customer Support 49 8 Warranty and Regulatory Information 51 Limited Warranty 51 Limited Warranty Coverage 51 Limitations 52 Your Rights 53 Outside the United States 53 Regulatory Information 53 ...

Page 16: ...iv 9 Appendix 55 EZ200 Camera Specifications 56 General Camera Maintenance 58 General Safety 58 Using Your Batteries 59 Index 60 ...

Page 17: ...EZ200 Digital Camera features and how to prepare the camera for taking pictures Loading the Batteries page 2 Turning the Camera On and Off 2 Power Save Feature 3 LCD Overview 3 Checking the Batteries 4 Displaying the Picture Video Count 5 Turning Camera Sounds On and Off 6 ...

Page 18: ...four AAA batteries in the correct orientation as illustrated See the orientation label inside the battery compartment 3 Close the door Push the Power button to turn the camera on and off When you turn on the camera it beeps a high tone and the LCD Panel turns on When you turn off the camera it beeps a low tone and the LCD Panel turns off ...

Page 19: ...ur pictures and videos are saved when the camera turns off To resume taking pictures turn the camera back on LCD Overview The KODAK EZ200 LCD displays the camera settings and status A A LCD B Speaker C Picture Quality D Self timer E Picture Video count F Battery G Video clip Burst H Focus error if blinking B C E F G D H ...

Page 20: ...We do not recommend the use of rechargeable batteries in the KODAK EZ200 Digital Camera For guidelines on battery usage see page 59 1 Turn on the camera 2 Check the battery symbol that appears in the LCD Panel Full Full Full Full batteries are fully charged Low Low Low Low power level is low batteries need to be replaced ...

Page 21: ...r Seconds of Video Remaining Pictures or Seconds of Video Remaining Pictures or Seconds of Video Remaining B B B B To display how many pictures or seconds of video are still available for capture 1 Press the Shutter button half way down and hold for one second The LCD displays the number of pictures remaining on the camera If you are in video capture mode C C C C the LCD displays the number of sec...

Page 22: ... can set the camera to make sounds for most functions or to make no sounds at all NOTE Turn the camera sounds off when taking pictures at events that require a quiet environment To turn Camera Sounds on or off Press and hold the Mode button down for 3 seconds The camera beeps and the Speaker icon in the LCD changes to the opposite setting Speaker on Speaker off ...

Page 23: ...tter clicks or tones when you Capture a still picture Turn the camera on or off Capture a Burst series Change the Capture mode Start and stop a video capture The camera sounds a low pitched double warning tone double warning tone double warning tone double warning tone when The camera is out of focus A low light condition exists Camera memory is full ...

Page 24: ...Chapter 5 Using the Software for instructions on how to begin using the software with your camera WINDOWS System Requirements WINDOWS 98 WINDOWS 2000 WINDOWS ME Available USB port Personal computer with a Pentium 266 MHz microprocessor minimum and a CD ROM drive Color display monitor with a minimum resolution of 640 x 480 and 256 colors 16 bit high color 16 bit preferrer 32 MB or more of available...

Page 25: ...oftware MICROSOFT NetMeeting Software MICROSOFT NetMeeting Software MICROSOFT NetMeeting Software make live video telephone calls over the Internet video conferencing Installing the Software You must install the KODAK EZ200 Software before you can download pictures from the camera or use your camera with the software programs included with your camera Install the software 1 Close any open software...

Page 26: ...later 5 When prompted plug the camera into your PC with the provided USB Cable see page 21 A series of dialog windows appear indicating that the EZ200 software drivers are being loaded Follow the on screen instructions 6 If prompted restart the computer when the software installation is complete NOTE While the Installer is automatically loading your software take a few minutes to fill out and send...

Page 27: ...ecking the Focus Setting Digital Camera Mode page 12 Choosing a Capture Mode 13 Taking a Still Picture 14 Including Yourself in the Picture 15 Shooting a Burst Series of Pictures 16 Shooting Silent Movie Clips 17 Deleting Your Images from the Camera 18 To download pictures and video clips from the camera to your computer see Downloading Pictures From the Camera on page 23 ...

Page 28: ...et the focus ring to the position All other positions of the focus ring are for use in PC Camera mode only See page 24 If you set the focus ring to any position other than the camera alerts you in the following ways The focus icon in the LCD blinks The camera beeps a low double tone when you press the Shutter button The camera cannot take a picture ...

Page 29: ...b Quality Web Quality Web Quality still picture quality suitable for website or e mail use Store up to 128 pictures on the camera High Quality with Self timer High Quality with Self timer High Quality with Self timer High Quality with Self timer put yourself in the picture with the 10 second self timer still picture quality Burst Burst Burst Burst take a series of five consecutive Web quality stil...

Page 30: ...osition see page 12 A low double tone could also indicate a low light condition See page 46 in the Troubleshooting section 1 Press the Mode button to choose High quality or Web quality no icon 2 Set the focus ring to the position 3 Center the subject in the viewfinder 4 Press the Shutter button completely down to take the picture The camera takes the picture and the the number of pictures displaye...

Page 31: ...ount on the LCD increases by one If the camera beeps a low double tone and does not take a picture make sure the focus ring is set to the position see page 12 A low double tone could also indicate a low light condition See page 46 in the Troubleshooting section 1 Press the Mode button until the icons are displayed in the LCD Quality is always set to in Self Timer mode 2 Set the focus ring to the p...

Page 32: ...st action sequences One Burst series of five pictures takes more memory on your camera than one still picture The camera takes five pictures within one second The picture count on the LCD increases by one If the camera beeps a low double tone and does not operate make sure the focus ring is set to the position see page 12 1 Press the Mode button repeatedly until the icon is displayed in the LCD 2 ...

Page 33: ...the LCD increases by one If the camera beeps a low double tone and does not operate make sure the focus ring is set to the position see page 12 A low double tone could also indicate a low light condition See page 46 in the Troubleshooting section 1 Press the Mode button until the icon is displayed in the LCD 2 Set the focus ring to the position 3 Center the subject in the viewfinder 4 Press the Sh...

Page 34: ...onnected to the computer 2 Turn on the camera 3 Press and hold down both the Mode button and the Shutter button for 3 seconds Make sure to press the Mode button first The picture count in the LCD is replaced with two dashes 4 Release the buttons All images stored in the camera memory are deleted and the number 00 is displayed in the LCD ...

Page 35: ...h the provided USB cable you are in PC Camera mode Using the Camera Base page 20 Connecting the Camera to Your Computer 21 Storing Your Pictures on Your PC 22 Downloading Pictures From the Camera 23 Taking Still Pictures 24 Saving Still Pictures 26 Shooting Video Clips 27 Using Video Conferencing 27 ...

Page 36: ... free support when you use the camera in PC Camera mode connected to the computer 1 Slide the camera into the base until it clicks in place 2 Position the camera and base where it can capture your subject in the live video display on the screen for example on top of the monitor ...

Page 37: ...e on page 9 Connect the Camera 1 Connect the USB cable from your computer USB port to the camera USB port When your camera is connected to the computer it is powered by the USB cable not the batteries Start the EZ200 Software 1 Place the camera in the base 2 Press the Shutter button all the way down A dialog window appears listing the imaging applications on your computer that are compatible with ...

Page 38: ...tures you take in PC Camera Mode Pictures you take in PC Camera Mode Pictures you take in PC Camera Mode transfer your pictures to your imaging application using the Transfer and Transfer All buttons in the KODAK EZ200 Software See Saving Still Pictures on page 26 3 Select ARCSOFT PHOTOIMPRESSION for capturing and editing digital still pictures or select ARCSOFT VIDEOIMPRESSION for capturing and e...

Page 39: ...onth day year_hour 24 hr format minute and second For example pictures saved on May 26 2000 at 1 Connect the camera to your computer and press the Shutter button to open the imaging application and the KODAK EZ200 Software See Connecting the Camera to Your Computer on page 21 2 In the EZ200 Software window click Get Images Thumbnail representations of all of the pictures and videos on your camera ...

Page 40: ... Burst2 JPG When the pictures and movie clips are stored on your computer you can open them in the software application of your choice The images are not displayed automatically in the imaging application Taking Still Pictures Take still pictures in PC Camera mode connected to the PC and save them in your imaging application 1 Connect the camera to your computer 2 Place the camera in the base see ...

Page 41: ... can use the focus ring to get clear pictures as close as 2 0 inches 5 cm 5 Click Take Picture or press the Shutter button on the camera A thumbnail representation of the picture is displayed on the right side of the screen These pictures are stored in temporary memory on your computer not your camera until you save them See next page ...

Page 42: ...nt thumbnails Control click to de select a thumbnail Use the up and down arrows to scroll through more than one page of pictures 2 Click Transfer to transfer the selected pictures to the imaging application Click Transfer All to transfer all of the pictures at once The selected pictures are transferred to the imaging application and saved automatically on your computer hard drive in a folder calle...

Page 43: ... Camera to capture and edit video clips See page 35 to get started with ARCSOFT VIDEOIMPRESSION Using Video Conferencing Use MICROSOFT NetMeeting Software and your KODAK EZ200 Digital Camera to make live video phone calls over the Internet See page 37 to get started with MICROSOFT NetMeeting software ...

Page 44: ...ibes the software included with your KODAK EZ200 Digital Camera Using KODAK EZ200 Software page 29 Getting Started with ARCSOFT PHOTOIMPRESSION 2000 34 Getting Started with ARCSOFT VIDEOIMPRESSION 35 Getting Started with MICROSOFT NetMeeting 37 ...

Page 45: ...ures in PC Camera mode connected to the PC or use your camera with other imaging software applications KODAK EZ200 Software Overview Live Video Display A When the camera is connected to your computer the camera captures and displays a live video image on the EZ200 Software screen A Thumbnail images Scrolling arrows Tool tip Buttons KODAK EZ200 Software Screen A C B D E display Live video C B D E ...

Page 46: ...ictures and video clips downloaded from the camera with the Get Images button to your computer hard drive Take Picture Take Picture Take Picture Take Picture captures a still picture of the current live video display Settings Settings Settings Settings opens a dialog box that allows you to select camera and picture settings see Changing Camera Settings on page 32 Transfer Transfer Transfer Transfe...

Page 47: ... description of the feature button or thumbnail image appears under the live video display Viewing Picture Information The thumbnail images displayed on the right side of the screen represent the pictures or silent movie clips that were downloaded from the camera or the pictures taken with the Take Picture button To view information about a picture roll the mouse pointer over the thumbnail image T...

Page 48: ...ure 320 x 240 Web quality burst still image All images in the burst series are displayed Video Clip 160 x 120 Silent movie clip first frame only is displayed To play the movie clip double To play the movie clip double To play the movie clip double To play the movie clip double click on the thumbnail image click on the thumbnail image click on the thumbnail image click on the thumbnail image 1 Clic...

Page 49: ...tton accepts your changes but does not close the window Starting KODAK EZ200 Software You launch the KODAK EZ200 Software through the photo imaging application of your choice when you connect the camera to your PC with the provided USB cable 1 Connect the camera to your computer with the provided USB cable 2 Press the Shutter button and select your imaging application The imaging application and E...

Page 50: ... desktop select Programs 2 Select ArcSoft PhotoImpression 2000 to open the application 3 Click Get Photo 4 Select From File and click Browse 5 Browse to the location on your hard drive where you saved your EZ200 pictures 6 Select the pictures you want and begin using ARCSOFT PHOTOIMPRESSION to edit print and share your pictures For more details on using ARCSOFT PHOTOIMPRESSION features click the H...

Page 51: ...From the Start menu on your desktop select Programs 2 Select ArcSoft VideoImpression to open the application 3 Click New 4 Click Get 5 Browse to the location on your hard drive where you saved your EZ200 video clips 6 Select a video clip and begin using ARCSOFT VIDEOIMPRESSION to have fun with your video files For more details on using ARCSOFT VIDEOIMPRESSION features click the Help button at the ...

Page 52: ...rograms 3 Select ArcSoft VideoImpression to open the application 4 Click New 5 Click Capture The EZ200 Digital Camera displays live video on the screen 6 Click Record to begin recording the live video 7 Click Pause to end recording 8 Click Save to name and save your video For more details on using ARCSOFT VIDEOIMPRESSION features click the Help button at the top of the screen or visit ARCSOFT s we...

Page 53: ... MICROSOFT NetMeeting software installed on their computers and a camera to view the other parties Starting MICROSOFT NetMeeting 1 Connect the EZ200 Digital Camera to your PC see page 21 2 From the Start menu on your desktop select Programs 3 From the program application choices select MICROSOFT NetMeeting to open the application NOTE The Startup Wizard is an excellent way to walk through your fir...

Page 54: ...d in the video conference only two people at a time may see each other For further information on using MICROSOFT NetMeeting or establishing a video conference call consult the Help menu available from the application or visit MICROSOFT s website at www microsoft com 1 Click Start Video to view your own live video If your video image does not appear select Video on the Tools pull down menu Then se...

Page 55: ... In the text box type the following winipcfg 4 Click OK NOTE The IP address can change each time you connect to your provider We recommend that you ask the person you are calling for their IP address each time you initiate a video conference 5 In the IP Configuration window select your Internet service provider from the drop down list Your IP address appears in the IP Address text box ...

Page 56: ...r Viewing 40 Getting Better Results from Your Printer 41 Troubleshooting 42 Connecting Your Camera If you are getting messages on your computer that state you are not connected get help on our website at www kodak com Click Service and Support Adjusting Your Monitor for Better Viewing Your monitor display settings may need to be adjusted to view pictures from the camera Refer to your computer User...

Page 57: ... takes more time than black and white More complex pictures increase the printing and drying time Color printing is more memory intensive than black and white If your computer gives you an insufficient memory message you may need to close some applications change some settings or add additional memory Color prints may not photocopy as clearly as black and white If you plan to photocopy your pictur...

Page 58: ...Computer Monitor Computer Monitor Computer Monitor Problem Problem Problem Problem Cause Cause Cause Cause Solution Solution Solution Solution The image on your monitor is jagged or inappropriately colored The monitor is not set correctly Go to Start Settings Control Panel Display Settings Under Color select a higher color depth High Color 16 bit or higher EZ200 Software screen takes up too much s...

Page 59: ... cable to the camera and computer ports see page 21 There is a problem with your USB connection Visit our web site at www kodak com and click Service and Support The software is not installed Install the software see page 9 Camera Camera Camera Camera Problem Problem Problem Problem Cause Cause Cause Cause Solution Solution Solution Solution Camera does not turn on The batteries are not installed ...

Page 60: ...mera mode the focus ring is not set to the position Turn the focus ring to the setting see page 12 The batteries are low Replace the batteries see page 2 The camera sound is turned off The shutter button is working Turn the Camera Sound on see page 6 Part of the picture is missing Something was blocking the lens when the picture was taken Keep hands fingers or other objects away from the lens when...

Page 61: ...rshly lit Reduce the light move your subject or change your picture taking position The picture has a vertical stripe A very bright spot is in the scene Move your subject or change your picture taking position The picture is not clear The lens is dirty Clean the lens See the Appendix Subject is too close when taking the picture in Digital Camera mode Stand at least 30 in 0 75 m away from your subj...

Page 62: ... prevent blurring The camera emits a low double tone warning when the Shutter button is pressed all the way down the focus icon in the LCD blinks In Digital Camera mode not connected to the PC the focus ring is not set correctly The camera does not operate Turn the focus ring to the setting see page 12 The camera emits a low double tone warning when the Shutter button is pressed all the way down t...

Page 63: ...oftware KODAK EZ200 Software Problem Problem Problem Problem Cause Cause Cause Cause Solution Solution Solution Solution Live video freezes you cannot use application The camera was unplugged while the application was running Plug in the camera and click the Exit button ...

Page 64: ...kaged with your camera refer to the application s online help or contact the software manufacturer through their websites at Kodak Online Services Kodak Fax Support ARCSOFT PHOTOIMPRESSION VIDEOIMPRESSION http www arcsoft com MICROSOFT NetMeeting http www microsoft com World Wide Web http www kodak com click Service and Support U S and Canada 1 800 508 1531 Europe 44 0 131 458 6962 U K 44 0 131 45...

Page 65: ...memory MB ____________________________________ Exact error message you received ______________________________ Version of installation CD ____________________________________ Camera serial number ______________________________________ Telephone Numbers U S U S U S U S call toll free 1 800 235 6325 between the hours of 9 00 a m and 8 00 p m Eastern Standard Time Monday through Friday Canada Canada ...

Page 66: ...rk Danmark 3 848 71 30 Ireland Eire 01 407 3054 Finland Suomi 0800 1 17056 France 01 55 1740 77 Germany Deutschland 069 5007 0035 Greece 0080044125605 Italy Italia 02 696 33452 Netherlands Nederland 020 346 9372 Norway Norge 23 16 21 33 Portugal 021 415 4125 Spain Espana 91 749 76 53 Sweden Sverige 08 587 704 21 Switzerland Schweiz Suisse 01 838 53 51 UK 0870 2430270 International Toll Line 44 131...

Page 67: ...equired with any request for warranty repair Limited Warranty Coverage THIS LIMITED WARRANTY WILL BE HONORED ONLY WITHIN THE GEOGRAPHICAL LOCATION THAT THE KODAK EZ200 DIGITAL CAMERA WAS PURCHASED Kodak will REPLACE the KODAK EZ200 Digital Camera if it fails to function properly during the warranty period subject to any conditions and or limitations stated herein Such replacement is the sole remed...

Page 68: ...BY KODAK SUCH AS ADAPTERS AND CABLES OR CLAIMS MADE AFTER THE DURATION OF THIS WARRANTY Kodak makes no other express or implied warranty for this product In the event that the exclusion of any implied warranty is ineffective under the law the duration of the implied warranty will be one year from the purchase date The option of replacement is Kodak s only obligation Kodak will not be responsible f...

Page 69: ...imposed by law even though defect damage or loss may be by negligence or other act Regulatory Information FCC Compliance and Advisory This device complies with Part 15 of the FCC Rules Operation is subject to the following two conditions 1 this device may not cause harmful interference and 2 this device must accept any interference received including interference that may cause undesired operation...

Page 70: ...rface cables have been provided with the product or specified additional components or accessories elsewhere defined to be used with the installation of the product they must be used in order to ensure compliance with FCC regulation Canadian DOC Statement DOC Class B Compliance DOC Class B Compliance DOC Class B Compliance DOC Class B Compliance This digital apparatus does not exceed the Class B l...

Page 71: ... serves as a resource for specific technical information and care for your camera and contains the following information EZ200 Camera Specifications page 56 General Camera Maintenance 58 General Safety 58 Using Your Batteries 59 ...

Page 72: ...0 Still picture Web quality Burst image 320 x 240 Frame Rate by image type Video clip Digital Camera 20 fps QSIF 160 x 120 Video streaming PC Camera 30 fps CIF 352 x 288 26 fps VGA w 500 MHz system 15 fps VGA w 266 MHz system Color 24 bit millions of colors Picture File Format JPEG stills AVI video Picture Storage 4 MB internal memory Viewfinder Optical Galilean ...

Page 73: ...ra Digital Camera Digital Camera Digital Camera mode mode mode mode 4 AAA alkaline batteries P P P PC Cam C Cam C Cam C Camera era era era mod mod mod mode e e e Power supplied by PC through USB Tripod Socket 25 in 006 m threaded Dimensions Width 3 6 in 92 mm Depth 1 4 in 36 5 mm Height 2 7 in 68 6 mm Weight 3 2 oz 90 g without batteries 4 7 oz 134 3 g with batteries Operating Temperature 32 to 10...

Page 74: ... tissue It may scratch the lens tissue It may scratch the lens 1 Blow gently on the lens to remove dust and dirt 2 Moisten the lens by breathing lightly on it 3 Wipe the lens gently with a soft lint free cloth or an untreated lens cleaning tissue General Safety To keep from damaging your camera avoid exposing it to moisture and extreme temperatures Do not allow any chemicals such as suntan lotion ...

Page 75: ...y fluid leaks onto your skin immediately wash the affected skin with soap and plenty of water Customers inside the US can contact Kodak Health Safety and Environment Information at 1 716 722 5151 in the U S Customers outside the U S should contact their local health care provider We do not recommend the use of rechargeable batteries in the KODAK EZ200 Digital Camera Battery performance is reduced ...

Page 76: ...alling 9 ARCSOFT VIDEOIMPRESSION getting started 35 installing 9 auto shutoff 3 B base camera 20 batteries checking power level 4 guidelines 59 loading 2 safety 59 tips 59 burst feature 16 C camera 3 base 20 cleaning 58 communication problems 43 connected to pc 19 connecting to pc 21 deleting images 18 downloading pictures 23 maintenance 58 problems 43 45 safety 58 settings 32 software included 9 ...

Page 77: ... 21 help 40 USB cable 21 customer support numbers 49 D deleting images from camera 18 digital camera mode 1 deleting images 18 focus setting 12 taking a series burst 16 taking silent movie clips 17 taking still pictures 14 using camera in 11 downloading images 23 E Exit button 30 EZ200 Software installing 9 overview screens 29 problems 47 starting 21 using 29 F fax numbers support 48 FCC complianc...

Page 78: ...era sounds 6 capture modes 13 focus setting 12 movie clip 13 overview 3 quality 13 self timer 13 speaker on off 6 image types 32 including yourself in picture 15 information picture 31 installing batteries 2 software 8 9 IP address finding 39 K KODAK EZ200 Software getting help 48 installing 9 problems 47 starting 21 using 29 L lcd camera status 3 overview 3 lens cleaning 58 specifications 57 live...

Page 79: ...3 downloading videos 23 saving still pictures 26 using camera in 19 PHOTOIMPRESSION software getting started 34 installing 9 picture video count lcd 5 pictures downloading to pc 23 remaining lcd 5 saving in pc camera mode 26 storing on pc 22 taking in digital camera mode 11 17 taking in pc camera mode 24 viewing information 31 pixel resolution 56 power checking batteries 4 turning camera on and of...

Page 80: ...umbers 49 Settings button 30 settings camera 32 shut down auto 3 silent movie clips taking 17 software ARCSOFT PHOTOIMPRESSION 9 34 ARCSOFT VIDEOIMPRESSION 9 35 getting help 48 included with camera 9 installing 8 9 KODAK EZ200 9 21 29 MICROSOFT NetMeeting 9 37 using 28 sounds camera list of typical 7 turn on off 6 warning tone 7 warnings troubleshooting 46 speaker on off 6 specifications camera 56...

Page 81: ... 40 printing 41 ReadMe file 42 safety 58 Transfer All button 30 Transfer button 30 troubleshooting 40 42 46 turning camera on and off 2 U USB cable connecting 21 using batteries 59 digital camera 11 pc camera 19 software 28 V video clips digital camera mode 17 in VIDEOIMPRESSION 35 36 pc mode 27 video conferencing 27 38 video picture count 5 VIDEOIMPRESSION software getting started 35 installing 9...

Reviews: