background image

7

Loading Media

Loading Paper and Greeting 
Card Paper

Important:

Use the upper tray for paper and the 
lower tray for greeting card paper.

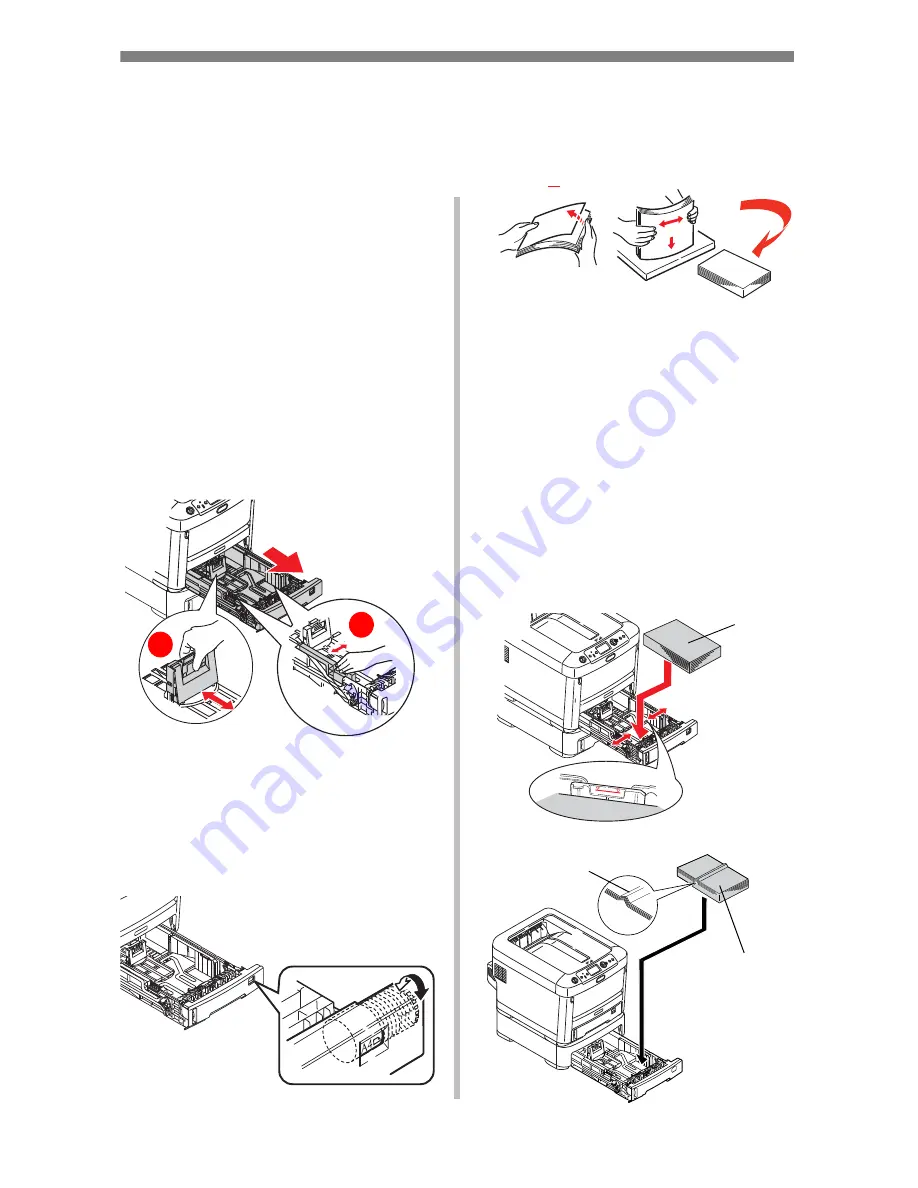
1. Remove the appropriate tray 

from the printer. 

2. Adjust the tray to hold the 

paper or greeting card paper.

a. Rear stopper
b. Paper guides


3. Adjust the paper size dial to 

your paper size. If you are 
loading greeting card paper, 
turn the dial to the “blank” 
setting. 

4. Fan the edges of the paper or 

greeting card paper to 
separate the sheets. 

5. Load the paper or greeting 

card paper. If you are loading 
greeting card paper, make sure 
that you load it:

• in the lower tray.
• with the crease facing up.

Note:

The upper tray holds 250 
sheets of paper. The lower tray 
holds 100 sheets of greeting 
card paper.


a

b

1

3

Paper

Greeting Card 

Crease

Paper 

Summary of Contents for DUPLEX DL2100

Page 1: ... Eastman Kodak Company 2010 User s Guide for the KODAK DL2100 Duplex Printer ...

Page 2: ...nce 11 Supplies 11 Replacing the Image Drum 12 Replacing the Transfer Belt 13 Replacing the Fuser 15 Cleaning the LED Head 16 Clearing Paper Jams 17 Troubleshooting 22 Resolving Printer Error Messages 22 Resolving Error Messages on the Kiosk 23 Resolving Error Messages on the KODAK Advanced Picture Exchange 26 Correcting Print Skewing 29 Cleaning the Front Pick Rollers 29 Cleaning the Duplex Rolle...

Page 3: ...able can cause fraying and may lead to fire or electric shock This product has an earthed plug as a safety feature and will only connect to an earthed socket Do not attempt to defeat the earthing Otherwise fire or shock may occur If using an extension cable or power strip ensure that the total current rating amperes of all connected equipment is less than the maximum rating of the extension cable ...

Page 4: ...y cause a fire Turn off the product before cleaning to prevent any risk of injury Clean using a damp cloth Do not use liquid or aerosol cleaners Ensure loose clothing and hair are kept clear of moving parts when the product is in operation to prevent possible risk of injury Do not carry out any operations on the product that are not specified in the User s Guide Doing so may result in electric sho...

Page 5: ... on both sides Front View 1 Exit tray 2 Operator panel 3 Front cover release lever 4 Top cover release 5 Upper paper tray Holds up to 250 sheets of paper 6 Lower paper tray Holds 100 sheets of paper 7 Paper level indicators 8 Image Drum units Cyan Magenta Yellow Black 9 Duplex unit 10 LED heads 11 Fuser release levers 12 Toner cartridges Cyan Magenta Yellow Black 1 2 3 4 5 6 7 8 9 10 11 12 ...

Page 6: ...5 Rear View 1 Power switch 4 USB port 2 AC power socket 5 Ethernet port 3 Duplex unit 1 2 3 4 5 ...

Page 7: ...new setting for a Value 4 Press On Line to exit the Menu Printing the Configuration Report The Configuration report provides a list of the current printer menu settings 1 Press Enter the down arrow 2 Select Print Information 3 Press Enter 4 Press Enter to select Configuration 5 Press Enter to select Execute The Configuration report prints On Line Cancel Enter Scroll Up Scroll Down Scroll Back ...

Page 8: ...t the paper size dial to your paper size If you are loading greeting card paper turn the dial to the blank setting 4 Fan the edges of the paper or greeting card paper to separate the sheets 5 Load the paper or greeting card paper If you are loading greeting card paper make sure that you load it in the lower tray with the crease facing up Note The upper tray holds 250 sheets of paper The lower tray...

Page 9: ...e the top cover If the LCD displays TONER EMPTY 1 Make sure that you have a sheet of paper on which to place the used cartridge Important Do not leave the top cover open for more than 5 minutes when the image drums are in the printer 2 Open the top cover Caution The fuser becomes extremely hot during normal operation Do not touch it 3 Hold the center of the toner cartridge image drum and lift it o...

Page 10: ... unit with a clean lint free cloth 8 Remove the new cartridge from the box 9 Remove the wrapping and the adhesive tape from the cartridge 10 Carefully place the new toner cartridge onto the image drum 11 Press down on the toner release lever 12 Gently shake the cartridge image drum from side to side to distribute the toner evenly inside the cartridge ...

Page 11: ...d lower it into the printer Align the pegs on the drum assembly with the slots on the printer 11 Gently wipe the LED head with a lint free cloth 12 Close the top cover 13 Place the old cartridge inside the packaging from the new cartridge Recycle appropriately ...

Page 12: ...r Magenta 107 8542 1 KODAK DL2100 Duplex Printer Toner Yellow 824 2323 1 KODAK DL2100 Duplex Printer Toner Cyan 103 1145 1 KODAK DL2100 Duplex Printer Paper Glossy 8 5 x 11 in 885 1875 250 Sheets KODAK DL2100 Duplex Printer Paper Glossy A4 190 4267 250 Sheets KODAK DL2100 Duplex Printer Greeting Card Paper 4 8 x 6 8 in 843 3260 200 Sheets ...

Page 13: ...ter for more than 5 minutes wrap the drum inside a black plastic bag to protect it from light Never expose the drum to direct sunlight or bright room lighting 3 Hold the center of the toner cartridge image drum and lift it out of the printer 4 Place the toner cartridge image drum on a sheet of paper 5 Lift the toner release lever 6 Hold the right end of the cartridge and carefully lift it out of t...

Page 14: ... Turn off the printer 2 Wait approximately 10 minutes for the fuser to cool 3 Open the top cover Caution The fuser becomes extremely hot during normal operation Do not touch it The surface of the green image area of the drum is delicate and light sensitive Do not touch it and do not expose it to normal room light for more than 5 minutes If the drum needs to be out of the printer for more than 5 mi...

Page 15: ... new belt unit a Lower the belt unit into the printer Make sure that the handle is at the front of the printer and the drive gear is at the rear of the printer b Align the drive gear on the belt with the gear in the printer c Press the belt into place d Turn the two fasteners 90 to the right 9 Install each toner cartridge image drum See Step 9 on page 20 10 Close the top cover a a b a b d d ...

Page 16: ... front of the printer b Hold the handle of the fuser and lift it out of the printer If the fuser is still warm place it on a flat surface that will not be damaged by heat 5 Remove the new fuser from its packaging 6 Hold the new fuser by the handle Make sure that the retaining levers a are upright and the locating lugs b are facing you 7 Install the fuser in the printer Make sure that the lugs are ...

Page 17: ...ad if the image area is not clear has white lines 1 Turn off the printer Caution Do not use methyl alcohol or other solvents on the LED head Damage to the lens surface will occur 2 Gently wipe the LED head surface with a lint free cloth 3 Close the top cover ...

Page 18: ...tial message will go away temporarily then Paper Jam will appear again 370 373 382 383 381 372 371 391 392 380 400 390 Paper Jam Error Message Summary Error No Location of Jam Error No Location of Jam 370 Duplex unit 382 Paper exit 371 Duplex unit 383 Duplex unit 372 Duplex unit 390 Multi Purpose tray 373 Duplex unit 391 Paper tray 380 Paper feed 392 Second Paper tray 381 Paper path 400 Paper size...

Page 19: ...n The fuser becomes extremely hot during normal operation Do not touch it The surface of the green image area of the drum is delicate and light sensitive Do not touch it and do not expose it to normal room light for more than 5 minutes 4 Carefully remove all of the toner cartridge image drums and place them on a sheet of paper 5 Cover them to protect them from light 6 Carefully remove any jammed p...

Page 20: ...sheet is well advanced into the fuser a Move both fuser release levers toward the front of the printer to release the fuser Hold the fuser by the handle and lift it out of the printer b Place the fuser on a flat surface c Move the paper release lever and pull the jammed paper from the fuser d Replace the fuser unit and move the fuser release levers toward the rear of the printer See Replacing the ...

Page 21: ... sequence 1 Cyan 2 Magenta 3 Yellow 4 Black 10 Close the top cover 11 Open the rear exit tray and pull out any paper 12 Close the rear exit tray 13 If there is paper jammed in the duplex unit a Open the cover for the duplex unit and remove any paper b Close the cover for the duplex unit Printer Front ...

Page 22: ... the release lever and open the front cover 16 Remove any jammed paper 17 Close the front cover 18 Remove the paper tray and any jammed paper 19 Insert the tray 20 If there is paper jammed in the second paper tray a Remove the second paper tray and any jammed paper b Insert the tray ...

Page 23: ...hows information that will help you correct the error Press the up and down arrow buttons to scroll through the Help information Problem Message Possible Solution There is a paper jam See Clearing Paper Jams on page 17 Cover open Close the printer cover Out of paper Check that paper is loaded If necessary load new paper See Loading Paper and Greeting Card Paper on page 7 The toner is empty Check t...

Page 24: ...rror the application is enabled under User Mode 2 Run Application Health Check 3 Check that the Enablement software for the DL2100 Printer is installed Printer indicates NOT FOUND on the Device Health Check Screen USB connection 1 Check that the power cord is connected the printer is turned on the USB cable is connected to the printer and the console there is no printer error the paper trays are s...

Page 25: ...our system administrator 5 If the problem persists contact KODAK Service and Support Disconnected appears on the Network Configuration screen 1 Check that the network cable is connected at both ends 2 Check that the network device that the Kiosk is connected to is powered on 3 Check the Network Settings with your system administrator 4 If the problem persists contact KODAK Service and Support Prob...

Page 26: ...k that you can see a printer when you select Search for Printers 4 If a printer s is found touch next to the default printer and select Save 5 If you are unable to find your printer via the search Touch Manually Configure the keyboard icon Use the on screen keyboard to enter the IP address of the printer Touch Done Test Connection OK 6 If a connection is found touch Save 7 If the connection is sti...

Page 27: ...PEX processor there is no printer error the paper trays are set for the correct setting 2 Run Device Health Check 3 If the problem persists contact KODAK Service and Support You are having connectivity issues and your site uses DHCP 1 From the Main screen of the APEX touch Setup System Configuration Configure Network 2 Use the arrows to select ipconfig renew 3 Touch Execute 4 Check the Network Set...

Page 28: ...DL2100 Printer is installed on the Kiosk 3 Run Device Health Check to make sure the printer is recognized by the APEX 4 Resatellite the Kiosk From the Main screen of the Kiosk touch Setup Configure System Settings Kiosk Network Join Leave Kiosk Network next to Single Kiosk Save The Kiosk restarts 5 Touch Setup Configure System Settings Kiosk Network Join Leave Kiosk Network next to Join Kiosk Netw...

Page 29: ...f a printer s is found touch next to the default printer and select Save 5 If you are unable to find your printer via the search Touch Manually Configure Enter the IP address of the printer Touch Test Connection 6 If a connection is found touch Save 7 If the connection is still not found have your system administrator check the Network Settings in the Pre Installation Requirements for the KODAK DL...

Page 30: ...water Clean the rollers in both paper trays Wipe in one direction only rotating the roller to clean the entire surface 5 Remove the paper trays from the printer 6 Repeat the cleaning procedure on the rollers inside of the bays for the paper trays 7 Wait approximately 5 minutes for the rollers to dry 8 Plug the power cord for the printer into the power source 9 Turn on the printer Top of print Bott...

Page 31: ...le you use the damp cloth to wipe the other roller Use the damp cloth to wipe the entire surface of the roller Repeat the procedure for the second roller 6 Use the damp cloth to clean the lower set of rollers Wipe in one direction only rotating the roller to clean the entire surface 7 Wait approximately 5 minutes for the rollers to dry 8 Close the cover for the duplex unit 9 Plug the power cord fo...

Page 32: ...ts in lower tray Paper weight 148 g m in upper tray 270 g m in lower tray Paper output 100 sheets in the top exit tray 80 g m Paper feed Paper tray Media size Upper tray 8 5 x 11 in 22 x 28 cm A4 Media size Lower tray 6 77 x 9 6 in 17 2 x 24 4 cm Greeting Card Paper Media type KODAK DL2100 Duplex Printer Paper KODAK DL2100 Duplex Printer Greeting Card Paper Replacement Toner life 1000 duplex sheet...

Page 33: ... saving 17 W maximum Temperature Operating 50 to 90 F 10 to 32 C 20 to 80 Relative Humidity Storage 32 to 109 F 0 to 43 C 10 to 90 Relative Humidity Print environment 59 to 80 F 15 to 27 C 20 to 80 Relative Humidity Noise Sound pressure level Operating 55dB A Standby 37dB A ITEM SPECIFICATION ...

Page 34: ...Eastman Kodak Company 343 State Street Rochester NY 14650 Eastman Kodak Company 2010 Kodak is a trademark P N 4J7470 04 10 Printed in U S A ...

Reviews: