Kodak CHERISH C520 User Manual Download Page 3

Page | 4

Parent Unit Overview

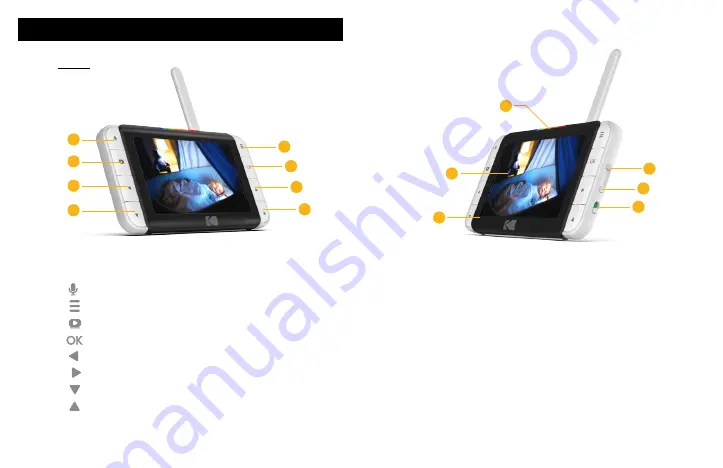
PARENT UNIT OVERVIEW

Keys

a. 


b.


c. 


d.


e.


f.   


g. 


h.


: Press and hold to speak to your baby
: Press to enter/exit the Menu mode
: Press to turn on/off the LCD display
: Press to confirm
: Press to scroll/pan left
: Press to scroll/pan right
: Press to scroll/pan down
: Press to scroll/pan up

1. 

Battery Status Indicator

2.  Volume Up

3.  Volume Down

4.  Power On/Off Slider

5.  Display (LCD Screen)

6.  Microphone

a

b

d

f

h

c

e

g

2

5

1

3

4

6

Summary of Contents for CHERISH C520

Page 1: ......

Page 2: ...al dated sales receipt You will need to produce a copy of your dated sales receipt to confirm warranty status For product related questions please send an email to support kodaksmarthome com This User...

Page 3: ...enter exit the Menu mode Press to turn on off the LCD display Press to confirm Press to scroll pan left Press to scroll pan right Press to scroll pan down Press to scroll pan up 1 Battery Status Indi...

Page 4: ...plugged in and it s fully charged the second LED lights up in green when the Parent Unit is switched on The first LED lights up in red when it s charging and the adapter is plugged in the second LED l...

Page 5: ...5 1 2 3 BABY UNIT OVERVIEW 1 Camera Lens 2 IR Lens 3 Microphone 4 Pair Button 5 SD Card Cover 6 Lens Frame 7 LED Power Indicator 8 Power ON OFF Switch 9 Speaker 10 Charging Socket 11 Ball Joint Arm 12...

Page 6: ...ue for first few seconds Camera locating router Blue blinking every one second Camera connected to router Solid Blue Camera in pair mode Blinking Blue Red Firmware upgrading DO NOT SWITCH OFF THE CAME...

Page 7: ...be reduced by other solid structures such as walls or electrical appliances including radios TVs computers cordless or mobile phones fluorescent lights or dimmer switches ESSENTIAL GUIDELINES FOR THE...

Page 8: ...ions 4 1 Snapshot 4 2 Add a Device 4 3 Melody 4 4 Time Settings 4 5 Temperature 4 6 Brightness 4 7 Camera Loop 4 8 Zoom 4 9 Volume TABLE OF CONTENTS 5 Disposal of the Device Environment 6 Cleaning 7 T...

Page 9: ...hen assembling keep small parts away from children 1 SAFETY INSTRUCTION WARNING This product is not a toy Never let children play with it This Baby Monitor is not and shall not be deemed to be a subst...

Page 10: ...are both switched ON the display on the Parent Unit will show the image captured by the Baby Unit If the Baby Unit camera is not in range or is switched off the Parent Unit beeps repeatedly and an err...

Page 11: ...select then to proceed to the next step c Press to add camera then to proceed d Press the button or button to select the available camera number Press to add a camera unit e You will then see a sign t...

Page 12: ...lide the ON OFF switch to the ON position to switch on the Baby Unit The power indicator lights up in blue Slide the ON OFF switch to the OFF position to switch off the Baby Unit The power indicator g...

Page 13: ...on the parent unit to talk to your baby through the Baby Unit s loudspeaker The TALK icon will be displayed at the top of the LCD screen Press VIDEO ON OFF key to turn the LCD display on or off but st...

Page 14: ...Unit 6 Parent Unit Battery Status 7 Temperature 8 Humidity 9 Talk Key appears as you press on the talkback key on the parent unit Take Snapshot View Snapshot Add Delete View Camera Select Melody to p...

Page 15: ...m the camera 4 2 1 Camera Registration 4 2 Add Pair a Camera 1 Press for the menu bar 2 Press the or until SNAPSHOT CAPTURE is highlighted Press to confirm 3 Press the button or until SNAPSHOT CAPTURE...

Page 16: ...camera in the Parent Unit you are not allowed to remove the camera You can re register the same camera using other camera number If there is no camera connected to the Parent Monitor you will see the...

Page 17: ...Press the button or to set 4 Press the MENU to save and exit 4 4 Time Settings 1 Press on the Parent Unit for the menu bar 2 Press or button to select MELODY and press to proceed to the next step 3 Us...

Page 18: ...t for the menu bar 2 Press the button or to select LOOP OFF icon and press to confirm 3 The screen will then display images from different registered cameras in a loop of cam 1 cam 2 cam 3 cam 4 4 Pre...

Page 19: ...y pack in an environmentally friendly manner in accordance with your local regulations 5 PROPER DISPOSAL OF THE DEVICE Wipe your Baby Monitor with a slightly moistened or anti static cloth Refrain fro...

Page 20: ...ING The Battery icon on the Parent Unit flashes Battery pack in the Parent Unit is running low Connect the Parent Unit to an electrical outlet with the supplied power adapter for recharging the parent...

Page 21: ...Baby Unit is in a dark room which causes the infra red illumination to turn on and the picture image to change from color to black and white When the room becomes brighter the picture will return to...

Page 22: ...earch for KODAK Smart Home Download and install the KODAK Smart Home app on your mobile device 8 KODAK SMART HOME IN APP SETUP Apart from connecting the Baby Unit with the Parent Unit you can also con...

Page 23: ...ked to create an account To set up an account On your mobile device open the KODAK Smart Home app Tap SIGN UP Follow the in app instructions to create a new account Step 2 Create or Login to Your Acco...

Page 24: ...i network name and password handy you will now pair your Baby Monitor near your wireless router with the KODAK Smart Home app Select Add new device Select Baby Series KODAK CHERISH C520 The app will t...

Page 25: ...has entered the setup mode You may now release the Pair button and tap Continue on your mobile device Step 4 Get Your Baby Unit Camera into the Setup Mode For IOS devices you will have to connect to t...

Page 26: ...rt pairing with your mobile device automatically You will hear Setup Completed when the Baby Monitor is successfully paired You may choose one of the recommended names or rename your Baby Monitor by s...

Page 27: ...e KODAK Smart Home app You may now run a test by clicking on the snapshot view from your desired baby unit in order to access the live view You should be able to see video from the Baby Unit Camera of...

Page 28: ...an account and installed a baby unit simply click on the KODAK Smart Home app icon to monitor your baby by visiting the dashboard 9 MONITORING YOUR BABY VIA THE APP You can pinch outwards to zoom in...

Page 29: ...may also perform one or more of the following actions by clicking on the MENU icon Dashboard Tap here to return to the Home screen Video Gallery Tap here to view your recorded footage Events Tap here...

Page 30: ...Grant Access which is located on the side menu of the Dashboard 10 GRANT ACCESS 10 1 Add Friend 1 Click on which was located on the Dashboard 2 Select Grant Access under Device 3 Click on which is lo...

Page 31: ...n edit friends and make changes the settings anytime you want 10 2 Edit Friend 1 Click on the email of the person that you d like to make changes on 2 Click Save to save changes 3 Click on to remove f...

Page 32: ...clusions contained below eBuyNow warrants that this product or certified accessory sold for use with this product is manufactured to be free from defects in materials and workmanship under normal cons...

Page 33: ...FINANCIAL LOSS ARISING OUT OF OR IN CONNECTION WITH THE ABILITY OR INABILITY TO USE THE PRODUCTS OR ACCESSORIES TO THE FULL EXTENT THESE DAMAGES MAY BE DISCLAIMED BY LAW Some jurisdictions do not allo...

Page 34: ...her acts which are not the fault of eBuyNow or its authorised distributor are not covered Use of Non eBuyNow branded Products and Accessories Defects or damage due to the use of non eBuyNow branded or...

Page 35: ...if a warranty card was included in your box a completed warranty card showing the serial number of the Product d a written description of the problem and most importantly e your address and telephone...

Page 36: ...distance between the equipment and receiver Connect the equipment into an outlet on a circuit different from that to which the receiver is connected Consult the dealer or an experienced radio TV tech...

Page 37: ...nly signifies that the Industry Canada technical specifications were met This product meets the applicable Industry Canada technical specifications WARNING Le pr sent appareil est conforme aux CNR d I...

Page 38: ...romagnetic compatibility EMC and the European Community Directive 2006 95 EC relating to Electrical Safety Directive 2011 65 EC on the restriction of use of hazardous substances RoHS and 2009 125 EC r...

Page 39: ...483 5 MHz Operating Temperature 0 C 40 C Maximum RF Power 20dBm for CE 12 TECHNICAL SPECIFICATIONS Parent Unit Display 5 IPS LCD 800 x 480 resolution Brightness Control 5 levels Default 3 Volume Contr...

Page 40: ...Page 78...

Reviews: