background image

Maintaining Your Printer

33

www.kodak.com/go/aiosupport

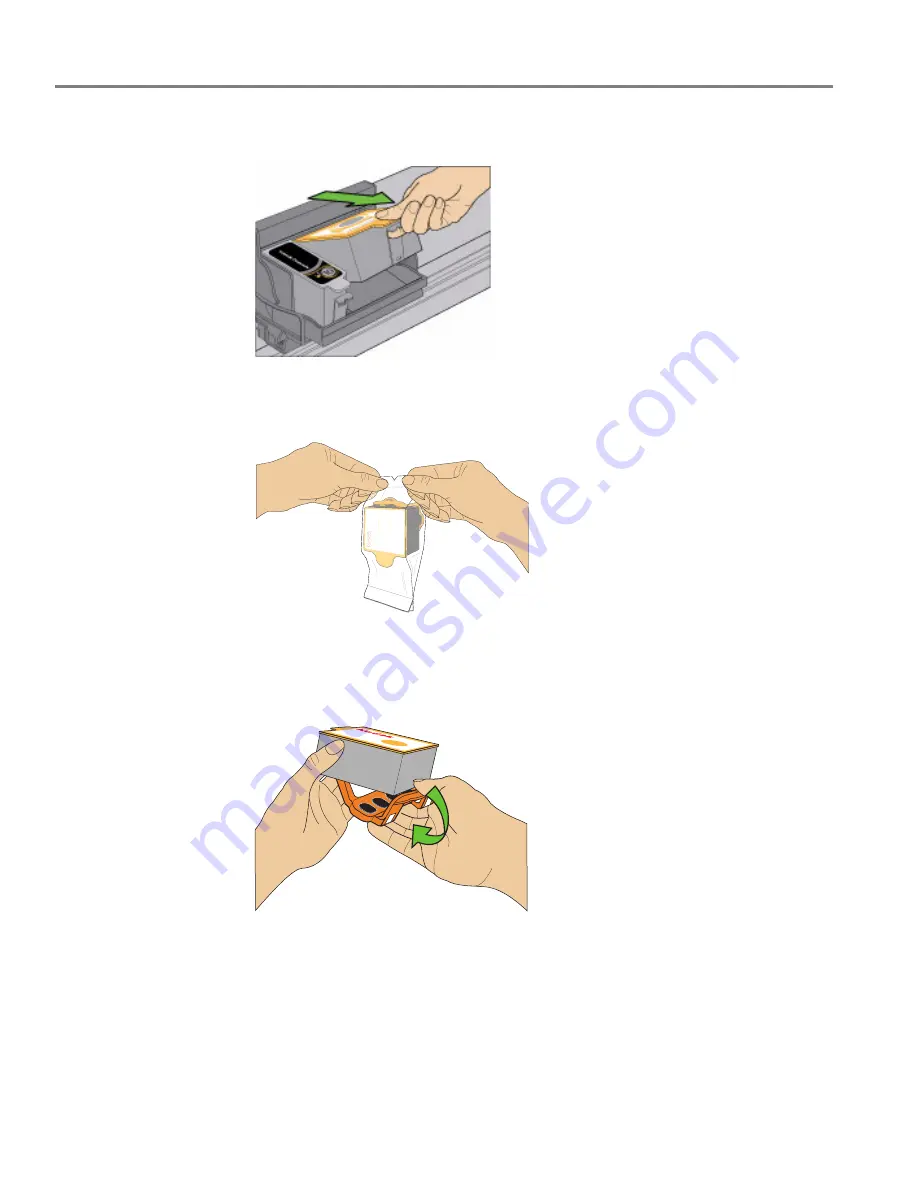
3. Pinch the latch on the ink cartridge and lift it out of the printhead. 

4. Remove the ink cartridge from its bag.

IMPORTANT: 

Insert the ink cartridge into the printhead immediately to prevent the 

printhead from drying out. 

5. Remove the protective cap from the cartridge.

10

Summary of Contents for 1749456 - 32; ESP5250 Es Printer

Page 1: ...KODAK ESP 5200 Series All in One Printer Includes Information for the ESP 5250 All in One Printer ESP 5260 All in One Printer Extended User Guide MS SD HC MM C Rotate Back Home...

Page 2: ...Kodak Company Rochester NY 14650 Eastman Kodak Company 2009 Kodak EasyShare and Perfect Touch are trademarks of Eastman Kodak Company Specifications subject to change without notice P N 1K5831 Septemb...

Page 3: ...network 10 Connecting to another KODAK All in One Printer 10 Adding a network connection to a USB connected computer 11 For WINDOWS OS based computers 11 For MACINTOSH Computers 11 3 Handling Paper P...

Page 4: ...eral care and cleaning 29 Cleaning the scanner glass 30 Cleaning inside the scanner lid 31 Replacing ink cartridges 32 Replacing the printhead 35 Upgrading the printer software and firmware 39 Upgradi...

Page 5: ...s 47 Warranty 47 System requirements 47 Safety information 49 Regulatory compliance 51 FCC statement 51 Canadian statements 51 German compliance statement 52 REACH Article 33 declarations 52 Waste ele...

Page 6: ...ts 1 Wi Fi connectivity LED 9 Printhead with ink cartridges installed 2 Memory card slot 10 Right paper edge guide 3 Control panel 11 Paper tray 4 LCD 12 Paper tray extender paper stop 5 USB port 13 L...

Page 7: ...egins copying scanning printing maintenance task and file transfer 7 Cancel button Stops the current operation and returns to the menu returns to previous item when navigating menus 8 Rotate button Ch...

Page 8: ...ng Home Center Software for MACINTOSH Computers On a MACINTOSH Computer Home Center Software has three panes Select Tools and Maintenance These panes let you do the following Select pane select your p...

Page 9: ...Power Press to change the time to energy saving low power select from 1 to 4 hours in 0 5 hour increments After the Time to Low Power the printer goes into a low power mode Tagged Images Printing see...

Page 10: ...ardware and Sound Printers 2 Right click your printer and select Set as Default Printer For WINDOWS 7 OS based computers 1 Select Start Control Panel Hardware and Sound Devices and Printers 2 Right cl...

Page 11: ...ly installed and communicating For assistance with any of the items listed above contact your Internet service provider or your network administrator Connecting to a wireless network using the WiFi Se...

Page 12: ...instructions to install the software Connecting to an unlisted network To connect to an unlisted network using the Wi Fi Setup Wizard 1 Press Home 2 Press to select Network Settings then press OK 3 Wi...

Page 13: ...e you press OK on the printer make sure you know where the router s push button is or where to enter the generated PIN If necessary consult your Internet service provider or router device manufacturer...

Page 14: ...nced IP Address Setup then press OK 4 Press OK again to continue 5 Select one of the following then press OK Dynamic DHCP Automatic Private Manual Static 6 If you selected Manual Static you are prompt...

Page 15: ...g an ESP 5250 printer you must install the software for the newer model If you are connecting to another ESP 5250 printer or to an older model On a WINDOWS OS based computer a Select Start All Program...

Page 16: ...s 5250 5260 c Select Network Wireless WiFi then click Next When your printer is detected driver installation begins 8 If your wireless all in one printer example KodakESP5200 1133 is listed a Highligh...

Page 17: ...r types You can use Plain paper 20 to 24 lb 75 to 90 gsm Photo paper up to 12 mil 290 gsm Card stock 110 lb 200 gsm max Envelopes most standard types Transparencies inkjet variety with white stripe La...

Page 18: ...ith cutouts or with cellophane windows Loading paper Loading plain paper The paper tray capacity is 100 sheets of plain paper To load plain paper 1 Open the paper tray 2 Pull out the paper tray extend...

Page 19: ...photo paper To load photo paper 1 Remove any paper from the tray 2 Carefully fan and stack the photo paper then insert the paper short side first into the tray with the logo side facing up 3 Move the...

Page 20: ...paper tray capacity is 20 envelopes To load envelopes 1 Remove any paper from the tray 2 Insert the envelope s into the tray with the flap up and against the right side of the tray 3 Move the left pap...

Page 21: ...print photos options 1 Press Home 2 If necessary press to select View and Print Photos then press OK 3 Press or as needed to change the settings below Print Photos Option Settings Description View Pho...

Page 22: ...ou use the default settings one 4 x 6 in 101 x 152 mm picture is printed To print a picture 1 Load photo paper with the logo side facing up see Loading photo paper page 14 and move the left paper edge...

Page 23: ...t photo options To print pictures with options other than the default settings such as a different print size black and white instead of color or a date on the print 1 Load photo paper with the logo s...

Page 24: ...re is displayed then press OK 12 When you are done selecting pictures press Start to begin printing IMPORTANT To prevent loss of data from your memory card do not remove it from the printer while prin...

Page 25: ...lect a portion of your picture for printing The crop window matches the aspect ratio of the selected output print size To zoom and crop a picture 1 Load photo paper with the logo side facing up see Lo...

Page 26: ...cted to your computer with a USB cable NOTE If you have large video files or a large number of pictures 400 or more we recommend that you use a memory card reader attached directly to your computer to...

Page 27: ...n the scanner and immediately press Start without following the remaining steps below You can use this feature when the printer has been idle or when it is turned on the printer automatically goes to...

Page 28: ...rges up to 500 of the original size Plain Paper Quality Normal default Good quality output prints faster than Best Best The highest quality but the slowest print speed eliminates the banding effect th...

Page 29: ...smaller than the paper in the paper tray the printer automatically arranges the pictures to best fit the paper size Plain Paper Quality Normal default Good quality output prints faster than Best Best...

Page 30: ...ess to select Copy Size 7 Press or to select the enlargement or reduction you want NOTE If you select Fit to Page the printer detects the size of the original on the scanner glass and the size of the...

Page 31: ...To darken or lighten the copy 1 Lift the scanner lid and place the document face down on the glass 2 Close the lid 3 Press Home 4 If needed press or to select Copy Document or Copy Photo 5 Press OK 6...

Page 32: ...and documents Color black and white gray scale Resolution dpi File format pdf rtf tif jpg for documents jpg bmp tif for pictures Base name by default scanned files are named scan1 scan2 etc Location...

Page 33: ...n Home Center Software then select Scan Pictures and Documents 4 Open the Tools panel if it is not open by clicking the Tools icon 5 Click Printer Scan Settings 6 Select the Picture tab 7 Select Autom...

Page 34: ...the Electronics Industry Alliance at www eia org or go to www kodak com go recycle General care and cleaning CAUTION Always disconnect the power to the printer before cleaning it Do not use harsh or a...

Page 35: ...acetone benzene or carbon tetrachloride on the glass as these chemicals may damage it Do not pour or spray liquid directly on the glass the liquid might seep under the glass and damage the printer To...

Page 36: ...printer or any of its parts To clean the white document backing under the scanner lid 1 Unplug the printer and raise the scanner lid 2 Gently clean the underside of the lid with a soft cloth or spong...

Page 37: ...e When an ink cartridge is out of ink the printer LCD displays a message stating that the black or color ink cartridge needs replacing IMPORTANT Do not use non Kodak brand or refilled ink cartridges T...

Page 38: ...h the latch on the ink cartridge and lift it out of the printhead 4 Remove the ink cartridge from its bag IMPORTANT Insert the ink cartridge into the printhead immediately to prevent the printhead fro...

Page 39: ...www kodak com go aiosupport 34 KODAK ESP 5200 Series All in One Printer 6 Insert the ink cartridge into the printhead 7 Press down on the tab until you hear a click 8 Close the printer access door...

Page 40: ...intenance procedure Replace the printhead only if you receive a new printhead from Kodak To replace the printhead 1 Make sure your printer is on 2 Lift the printer access door and wait for the carriag...

Page 41: ...One Printer 5 Unlatch the used printhead by lifting the button in the center of the carriage 6 Lift the used printhead out of the carriage 7 Remove the new printhead from its bag CAUTION Do not touch...

Page 42: ...Maintaining Your Printer 37 www kodak com go aiosupport 8 Remove the two plastic protective shields 9 Place the new printhead into the carriage Insert it at the angle shown...

Page 43: ...ud snap 11 Insert the black ink cartridge into the printhead 12 Press down on the ink cartridge until you hear it click into position 13 Repeat steps 11 12 for the color ink cartridge 14 Close the pri...

Page 44: ...ur computer is connected to the Internet 2 Connect the printer to the computer with a USB cable if not currently connected 3 Open Home Center Software 4 Click the Tools icon to open the side navigatio...

Page 45: ...Home 2 Press to select Maintenance 3 With Check Ink Levels selected press OK The LCD shows approximate levels of ink in the cartridges so you know when it s time to order replacement cartridges Reset...

Page 46: ...d is connected to the AC adapter and is plugged into an outlet or power strip If the USB 2 0 cable was disconnected from the printer then reconnected or if power to the printer was interrupted restart...

Page 47: ...artridges again Make sure the cartridges click into place Paper jam Check for paper in the rear access cleanout area Open the printer access door and gently remove any paper from inside the printer Ma...

Page 48: ...k On The printer is ready Power light What it means Off The Wi Fi radio is either turned off or is turned on but not connected to a wireless network Blinks continuously The Wi Fi radio is turned on an...

Page 49: ...lain paper Photo quality mode on photo paper Photo Printing Features Quantity Up to 99 may vary for different models of the 5200 series printers Print Sizes 2 x 3 in 5 x 7 6 cm 3 5 x 5 in 9 x 12 7 cm...

Page 50: ...lity Best Normal Draft Brightness 3 to 3 Copy Photo Features Color Black and white or color Quantity 1 to 99 copies may vary for different models of the 5200 series printers Copy Sizes 2 x 3 in 5 x 7...

Page 51: ...mory cards SD MS Duo MMC SDHC Image Formats Supported Image printing supports JPEG EXIF v2 2 does not support progressive JPEG format Number of USB Ports One rear device port high speed Protocols Supp...

Page 52: ...ndensing and atmospheric pressure to approximately 10 000 ft ASL Full image Quality Environmental Range 15 C 59 F to 30 C 86 F and 20 to 80 RH ENERGY STAR Qualified Warranty Product One year from purc...

Page 53: ...vailable Interface USB 2 0 Full Speed USB 2 0 High Speed Removable Drive CD ROM CD ROM Other Internet access capability Internet access capability Paper Types Supported Plain Paper 20 to 24 lb 60 to 9...

Page 54: ...Executive 7 25 x 10 5 in 184 x 266 mm US Letter 8 5 x 11 in 216 x 280 mm US Legal 8 5 x 14 in 216 x 356 mm Custom sizes from 4 8 5 in wide and 6 14 in long Index Card Stock 4 x 6 in index cards 101 x...

Page 55: ...Do not block this product s covers or openings or insert any objects through slots Do not use aerosol products inside or around this product Do not spill any liquid on this product Do not attempt to...

Page 56: ...the equipment and receiver Connect the product into an outlet on a circuit different from that to which the receiver is connected Consult the dealer or an experienced radio TV technician for help CAUT...

Page 57: ...am Bildschirmarbeitsplatz gem BildscharbV vorgesehen REACH Article 33 declarations Go to www kodak com go REACH for information about the presence of substances included on the candidate list accordin...

Page 58: ...r attachments such as third party ink or ink tanks failure to follow Kodak s operation maintenance or repacking instructions failure to use items supplied by Kodak such as adapters and cables or claim...

Page 59: ...Address 16275 Technology Drive San Diego CA 92127 USA Product Name KODAK ESP 5250 All in One Printer Power adapters HP A0601R3 VP 09500084 000 Radio Module Number US101 Safety IEC 60950 1 2001 EN 6095...

Page 60: ...e and time setting 4 synchronizing to your computer 4 Default printer settings resetting 4 Document paper sizes 49 Dowloading latest software and firmware 41 DPOF See Tagged images printing E Energy S...

Page 61: ...ay 1 Paper tray capacity envelopes 15 photo paper 14 plain paper 13 Paper tray extender 1 Photo paper capacity 14 loading 14 Photo paper sizes 49 Photo printing features 44 Plain paper capacity 13 loa...

Page 62: ...ted network connecting to 7 USB port 1 USB to wireless connection adding 11 W Warranty 46 Water exposure troubleshooting 29 Web support www kodak com go esp5250downloads 41 www kodak com go esp5250spe...

Reviews: