background image

Taking pictures and videos

 9

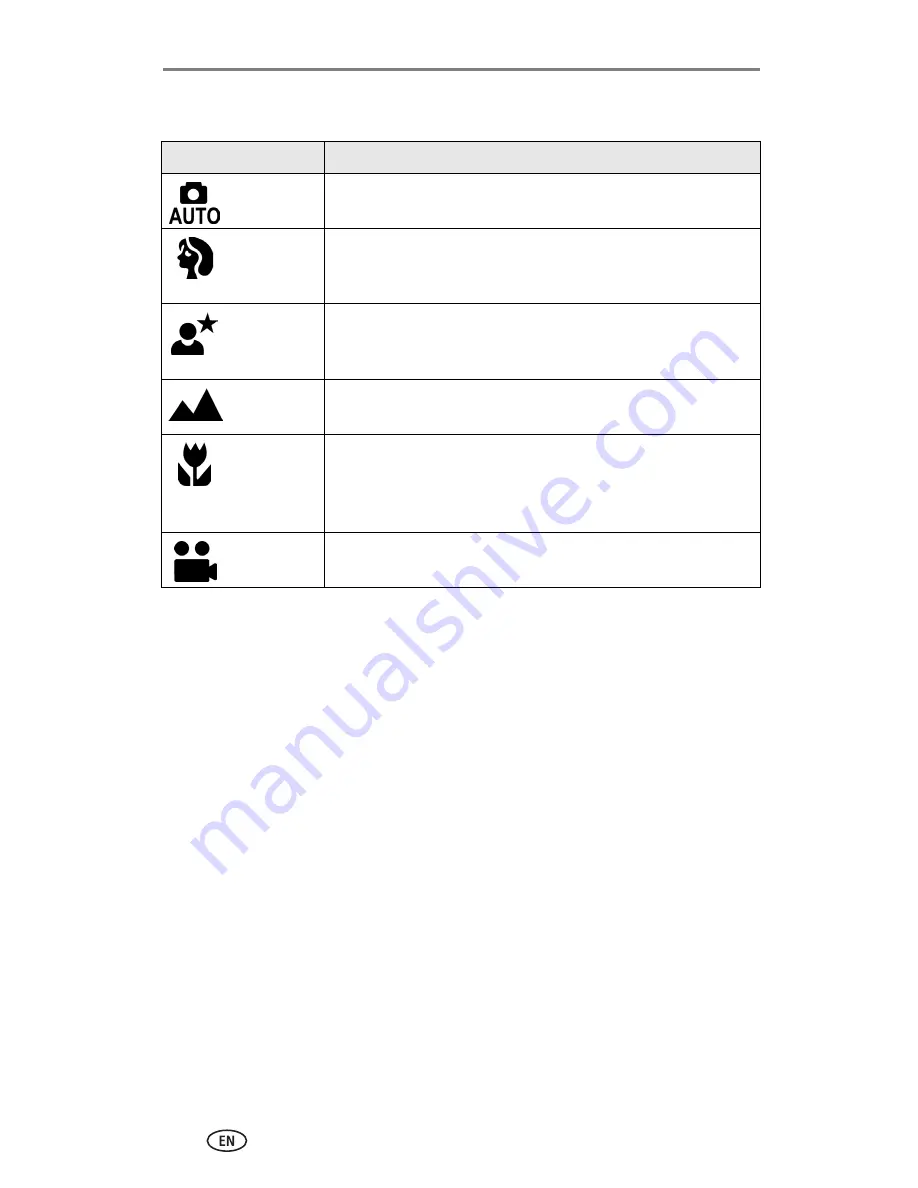
Capture modes

Use this mode

For

Auto

General picture-taking. Automatically sets exposure, focus, 
and flash.

Portrait

Full-frame portraits of people. Subject is sharp and the 
background is indistinct. Subject should be at least 6 ft (2 m) 
away and fill the frame with a head and shoulders pose.

Night

Night scenes or low-light conditions. Place the camera on a 
flat, steady surface or use a tripod. Due to slow shutter speeds, 
advise people to stay still for a few seconds after the flash fires.

Landscape

Distant subjects. Flash does not fire unless you turn it on. 
Auto-focus framing marks are not available in Landscape.

Close-up

Close subjects 3.9-23.6 in. (10-60 cm) from the lens in Wide 
Angle; 7.9-23.6 in.(20-60 cm) in Telephoto. Use available light 
instead of flash if possible. Use the camera screen to frame the 
subject.

Video

Capture video with sound. See 

Taking a video, page 8

.

Summary of Contents for 1652957 - EasyShare CX 7220

Page 1: ...Kodak EasyShare CX7220 zoom digital camera User s Guide www kodak com For interactive tutorials www kodak com go howto...

Page 2: ...Eastman Kodak Company 343 State Street Rochester New York 14650 Eastman Kodak Company 2004 All screen images are simulated Kodak and EasyShare are trademarks of Eastman Kodak Company P N 6B8947...

Page 3: ...Product features i Front top side view 1 Grip 6 Mode dial Power 2 Wrist strap post 7 Flash unit 3 Microphone 8 Viewfinder lens 4 Self Timer Video light 9 Lens 5 Shutter button 6 8 5 1 4 2 7 9 3...

Page 4: ...al display 7 8 Viewfinder Ready light 2 Share button 9 Flash Status button 3 Controller buttons 4 10 Zoom button Wide angle Telephoto 4 OK button 11 Grip 5 DC In 3V for optional AC adapter 12 13 Menu...

Page 5: ...roduct features iii Side view Bottom view 1 Slot for optional SD MMC card 2 USB Universal Serial Bus port 1 Battery door 3 Dock connector 2 Tripod socket locator for dock 4 Locator for dock 1 2 1 2 3...

Page 6: ...just taken 10 Using optical zoom 11 Using digital zoom 11 Using the flash 12 Changing picture taking settings 14 Putting yourself in the picture or video 16 Pre tagging for album names 17 Customizing...

Page 7: ...Printing pictures from your computer 32 Ordering prints online 33 Printing from an optional SD MMC card 33 Printing without a computer 33 7 Troubleshooting 34 Camera problems 34 Computer connectivity...

Page 8: ...first IMPORTANT Install the software from the Kodak EasyShare software CD before connecting the camera or dock to the computer Otherwise the software may load incorrectly See Installing the software p...

Page 9: ...battery door and lift to open 3 Insert the AA batteries as shown 4 Close the battery door If you purchased an optional Kodak EasyShare Ni MH rechargeable battery pack also included with the Kodak Easy...

Page 10: ...eries For acceptable battery life and to make sure your camera operates dependably use the replacement batteries listed above Extending battery life Limit the following activities that quickly deplete...

Page 11: ...a Dirt on the battery contacts can affect battery life Wipe the contacts with a clean dry cloth before loading batteries in the camera Battery performance is reduced at temperatures below 41 F 5 C Whe...

Page 12: ...button 5 Press the Menu button to exit The text is displayed in the selected language Setting the date and time Setting the date and time first time The Date Time have been reset message appears after...

Page 13: ...yShare software may update the camera clock when you connect the camera See the EasyShare software Help for details Checking camera and picture status The icons that appear on the camera screen indica...

Page 14: ...ot to seat the connector and close the card door To remove the card turn off the camera Push the card in then release it When the card is partially ejected pull it out NOTE When using a card for the f...

Page 15: ...up mode or when using zoom For best results use the camera screen to frame your subject 3 Press the Shutter button halfway and hold to set the exposure and focus 4 When the ready light turns green con...

Page 16: ...conditions Place the camera on a flat steady surface or use a tripod Due to slow shutter speeds advise people to stay still for a few seconds after the flash fires Landscape Distant subjects Flash do...

Page 17: ...screen press the OK button To make the camera screen turn on whenever the camera is on see Liveview page 18 Reviewing the picture or video just taken After you take a picture or video it appears on t...

Page 18: ...oom Combined zoom settings are from 2 1X to 6 0X You must turn on the camera screen to activate digital zoom IMPORTANT You may notice a decrease in printed image quality when using digital zoom The bl...

Page 19: ...6 9 ft 0 5 2 1 m Flash mode Flash fires Auto When the lighting conditions require it Off Never Fill Every time you take a picture regardless of the lighting conditions Use when the subject is in shado...

Page 20: ...se modes it remains until you change it All other flash settings return to the default when you edit the mode or turn off the camera NOTE Flash is disabled if Burst is on see page 14 Capture mode Defa...

Page 21: ...16 Exposure Compensation Still modes Choose how much light enters the camera This setting remains until you change it or exit the current capture mode If pictures are too dark increase the value If p...

Page 22: ...ures with a reddish brown antique look Set Album Choose Album names See Pre tagging for album names page 17 Video Length Video mode Choose the amount of recording time for videos This setting remains...

Page 23: ...rn off the menu screen The Self Timer icon is displayed in the status area 5 Place the camera on a flat surface or use a tripod 6 Compose the scene Take a picture or video as usual then move so that y...

Page 24: ...button 3 Highlight an album name then press the OK button Repeat to select more than one album name Selected albums are noted with a check mark 4 To remove a selection highlight the album name then p...

Page 25: ...on off default Press OK to manually turn the screen on or off see page 10 This setting remains until you change it On camera screen is on whenever the camera is on Off default camera screen is off Da...

Page 26: ...ay the camera screen text in different languages This setting remains until you change it See page 5 Format Format camera memory CAUTION Formatting deletes all pictures and videos including those that...

Page 27: ...Review button 2 Press to scroll backward or forward through pictures and videos For fast scrolling press and hold 3 Press the Review button to exit NOTE Pictures taken at the Best 3 2 quality setting...

Page 28: ...built in speaker There is no sound during playback Deleting pictures and videos 1 Press the Review button 2 Press to locate a picture or video or highlight one in multiple view then press the Delete...

Page 29: ...e press the OK button again NOTE You can also press the Menu button highlight Magnify then press the OK button The picture is magnified The magnification value is displayed Press to see different part...

Page 30: ...protected pictures and videos Formatting internal memory also deletes email addresses album names and Favorites To restore them see the Kodak EasyShare software Help Tagging pictures and videos for al...

Page 31: ...r computer When you transfer the tagged pictures and videos to your computer Kodak EasyShare software opens and categorizes your pictures and videos in the appropriate album folder See the EasyShare s...

Page 32: ...ou press the OK button or until battery power is exhausted This setting remains until you change it Displaying pictures and videos on a television You can display pictures and videos on a television c...

Page 33: ...r location NOTE Pictures and videos are copied not moved To remove pictures and videos from the original location after they are copied delete them see page 21 Tags that you applied for print email an...

Page 34: ...Windows 98 98SE ME 2000 SP1 or XP OS Internet Explorer 5 01 or higher 233 MHz processor or greater 64 MB RAM 128 MB RAM for Windows XP OS 200 MB hard disk space available CD ROM drive Available USB p...

Page 35: ...screen instructions to install the software Windows OS based computer select Complete to automatically install the most commonly used applications Select Custom to choose the applications you wish to...

Page 36: ...ture is tagged Tagging pictures for printing 1 Press the Share button 2 Press to locate a picture 3 Press to highlight Print to tag all pictures in the current image storage location highlight Print A...

Page 37: ...formation on printing from your computer or card see page 32 NOTE For the best 4 x 6 in 10 x 15 cm prints set the camera to Best 3 2 picture quality see page 15 Tagging pictures and videos for emailin...

Page 38: ...software Help for details Tagging pictures and videos as favorites 1 Press the Share button 2 Press to locate a picture or video 3 Press to highlight Favorite then press the OK button The Favorite ico...

Page 39: ...See your computer user s guide for details 3 Plug the other end of the USB cable into the labeled USB port on the camera 4 Turn on the camera Kodak EasyShare software opens on your computer The softwa...

Page 40: ...o your door Printing from an optional SD MMC card Automatically print tagged pictures when you insert your card into a printer with an SD MMC slot See your printer user s guide for details Make prints...

Page 41: ...er sold separately then try again See page 2 and page 3 for more information The camera does not turn off and the lens does not retract Camera buttons and controls do not function The camera screen do...

Page 42: ...a clean dry cloth page 3 before loading batteries in the camera Insert new batteries If using rechargeable batteries charge before inserting page 2 and page 3 Picture taken does not appear as framed...

Page 43: ...d When the ready light glows green press the Shutter button the rest of the way down to take the picture Decrease Exposure Compensation page 14 and try again The picture is not clear To automatically...

Page 44: ...Not enough space to copy files Files not copied There is not enough space in the image storage location you are copying to internal memory or the card Delete pictures from the image storage location y...

Page 45: ...re Help Can only mark image with 32 album names Onlythe first32album names will be saved The maximum number of album names 32 has been associated with an image NOTE Albums previously associated with a...

Page 46: ...g and glows steady green Auto exposure or auto focus are not locked Release the Shutter button and recompose the picture Ready light glows steady red Camera s internal memory or card is full Transfer...

Page 47: ...w kodak com go cx7220support Help with Windows operating system and working with digital pictures www kodak com go pcbasics Download the latest camera software and firmware www kodak com go cx7220down...

Page 48: ...5 4125 China 800 820 6027 Singapore 800 6363 036 Denmark 3 848 71 30 Spain 91 749 76 53 Ireland 01 407 3054 Sweden 08 587 704 21 Finland 0800 1 17056 Switzerland 01 838 53 51 France 01 55 1740 77 Taiw...

Page 49: ...cal viewfinder Preview Frame rate 20 fps Field of view 99 Continuous AE and AWB Lens Taking lens 2X optical zoom lens 39 78 mm 35 mm film camera equivalent f 3 8 wide f 5 0 telephoto Focus system Cent...

Page 50: ...0 video Flash Electronic flash Guide no 9 ISO 100 Auto flash with pre flash Working range ISO 140 1 6 9 2 ft 0 5 2 8 m wide 1 6 6 9 ft 0 5 2 1 m telephoto Flash modes Auto Fill Red eye Off Capture Cap...

Page 51: ...tact customer support see page 40 Review Quickview Yes Video output NTSC or PAL selectable Power 2 AA non rechargeable starter batteries 2 AA lithium 2 AA Ni MH CRV3 Ni MH rechargeable battery pack 3V...

Page 52: ...Connect a tripod directly to the camera do not connect a tripod to the camera dock or printer dock Service agreements are available in some countries Contact a dealer of Kodak products for more inform...

Page 53: ...r visit www kodak com go cx7220accessories Power saving features Minutes seconds of video 16 MB internal memory 46 sec 16 MB SD MMC 53 sec 32 MB SD MMC 1 min 50 sec 64 MB SD MMC 3 min 44 sec 128 MB SD...

Page 54: ...equipment off and on the user is encouraged to try to correct the interference by one or more of the following measures 1 reorient or relocate the receiving antenna 2 increase the separation between t...

Page 55: ...atus ii 6 12 menu ii 14 OK ii 5 on off i 4 review ii 20 share ii 10 29 shutter i 8 transfer 1 zoom ii 11 C cable audio video A V 25 USB 1 32 camera dock 4 locator connector on camera iii camera screen...

Page 56: ...ice setting video out 18 viewing pictures videos 25 F favorites tagging 31 FCC compliance 47 fill flash 12 firmware finding version on camera 19 upgrading 47 flash i range 12 settings 12 turning off 1...

Page 57: ...ra 44 memory image storage location 15 inserting card 7 internal 15 removable card 15 storage capacities 45 menu button ii 14 review 22 setup menu 18 share 29 microphone i MMC card formatting 19 inser...

Page 58: ...card 33 from computer 32 optimizing printer 40 ordering online 33 tagged pictures 29 33 without computer 33 protecting pictures videos 23 R ReadMe file 34 ready light ii status troubleshooting 39 rec...

Page 59: ...system requirements 27 upgrading 47 specifications camera 42 status checking on screen 6 screen icons 6 storage capacities battery 3 internal memory card 45 support technical 40 system requirements co...

Page 60: ...23 taking 8 transferring to computer 32 viewing on television 25 viewfinder ii lens i using camera screen as 10 viewing camera information 19 magnified picture 22 picture video information 26 picture...

Reviews: