4
9
OPERATION
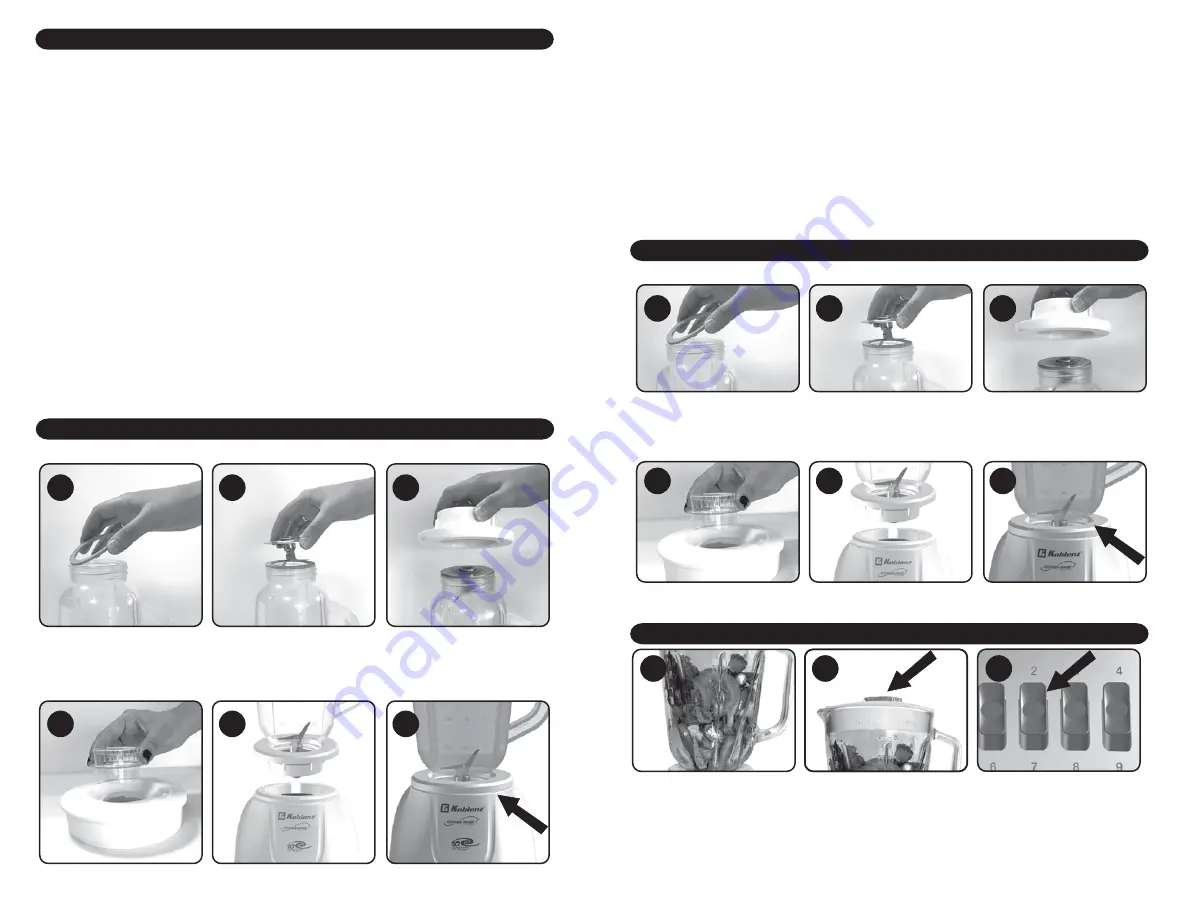
1. Invert the jar and place the silicon
gasket over the lower opening of
the jar
2. Invert the blades and place on
the jar.
3. Place and screw the base of the
jar.
4. Insert cup into protector cover.
5. Place jar into motor housing until
it is properly fit.
6. Turn to the maximum in order to
get an correct assembly.
ASSEMBLE
7
8
9
4
5
6
1
2
3
1. Invierta el vaso y coloque el
empaque de silicón sobre la
abertura inferior del vaso.
2. Invierta las cuchillas y colóquelas
dentro del vaso.
3. Coloque y enrosque el porta
vaso de la licuadora.
1
2
3
4
5
6
Tu licuadora Koblenz es un aparato multi-velocidades. Estos rangos de velocidades hacen las preparaciones
rápidas, fáciles e interesantes.
1. Lave los alimentos y córtelos en piezas pequeñas.
2. Coloque los alimentos dentro del vaso.
3. Antes de licuar, agregue el nivel deseado de agua o mezcla líquida en el vaso.
4. Inserte la tapa en la tapa
protectora.
5. Ensamble el vaso con la base
del motor.
6. Gire hasta llegar a tope, esto
asegura un ensamble adecuado.
7. Coloque el alimento que desee
procesar en el vaso de plástico o
vidrio.
8. Coloque la tapa protectora.
9.Oprima el botón en la velocidad
que desee
ENSAMBLE
USO
IMPORTANT: DO NOT USE BLENDER WITHOUT LIQUID
SPEEDS:
OFF:
Shutdown or stop button
PULSE:
Your blender has 2 pulses, low for low speed and high for high speed.
To use the speed 1-5 it must be in LOW (button must not be pressed)
1:
Easy cleaning / grate
2:
Puree
3:
Chop
4:
Beat
5:
Mix
To use the speed 6-10 the button must be at HIGH (button must be pressed)
6:
Grate
7:
Mix / grind
8:
Grind
9:
Blend
10:
Crush ice
IMPORTANTE: NO UTILIZAR LA LICUADORA SIN LÍQUIDO
VELOCIDADES:
ON/OFF:
Botón de apagado o parar
PULSO:
Su licuadora cuenta con dos pulsos,“LOW” para velocidad baja y con “HIGH” para velocidad alta.
Para ocupar la velocidad 1-5 debe estar en LOW (el botón no debe estar presionado)
1:
Fácil limpieza / Rallar
2:
Puré
3:
Picar
4:
Batir
5:
Mezclar
Para ocupar la velocidad 6-10 el botón debe estar en HIGH (el botón debe estar presionado)
6:
Rallar
7:
Mezclar/Moler
8:
Moler
9:
Licuar
10:
Triturar hielo
FOR FIRST USE
BLADES ASSEMBLE
ENSAMBLE DE LAS CUCHILLAS
BLENDER ASSEMBLE
ENSAMBLE DE LA LICUADORA
1. Read all sections of this booklet and follow all instructions carefully.
2. Make sure blender is unplugged.
3. Wash parts of unit, which will contact with foods.
4. Thoroughly dry all accessories and re-assemble in blender, plug it into outlet and you are ready to use
your new blender.
5. Place foodstuff into glass or plastic jar.
6. Put protector cover on glass or plastic jar and place jar into housing properly.
Place measure cup on hole in protector cover.
7. Select the desired speed.
8. When blending is complete, turn control to “OFF”.


