6
Preparation before Installation
NOTE: TO AVOID DAMAGE TO YOUR HOOD,
PREVENT DEBRIS FROM
ENTERING THE VENT OPENING.
x
Decide the location of the venting pipe
from the hood to the outside. Refer to
Figure 1.
x
A straight, short venting run will allow
the hood to perform more efficiently.
x
Try to avoid as many transitions,
elbows, and long run as possible. This
may reduce the performance of the
hood.
x
Temporarily wire the hood to test for
proper operation before installing.
x
Peel protective film off the hood (if any).
x
Make sure the cabinet has full access
opening for the hood as shown on
Figure 2.
Hood Installation
CAUTION: If required to move the cooking
range to install the hood, turn off the power
on an electric range at the main electrical
box. SHUT OFF THE GAS BEFORE MOVING
A GAS RANGE.
1. Using references on Table 1 and
measurements on page 11 mark the
leveling point for hood-mounting bracket
inside the cabinet.
2.
Secure two hood mounting screws (not
provided) inside the cabinet leaving 1/8”
away from the cabinet as shown on Figure
3.
3. Loosen hood-mounting brackets at the
back of the hood, adjust brackets and
tighten screws as shown in Figure 4.
4.
Refer to Figure 5. Align hood-mounting
bracket to the mounting screws inside the
cabinet and hook hood into place. Secure
and tighten the mounting screws.
CAUTION: MAKE SURE THE HOOD IS
SECURE BEFORE RELEASING
.
Figure 1
Figure 2
Figure 3
Figure 4
Summary of Contents for RA2830SB
Page 2: ... ENGLISH 1 FRENCH 21 SPANISH 42 ...
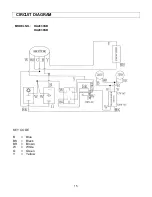
Page 38: ...36 SCHEMA DE CABLAGE Nos de modèles RA2830SB RA2836SB ...
Page 52: ...50 ...
Page 64: ...62 ...


