15
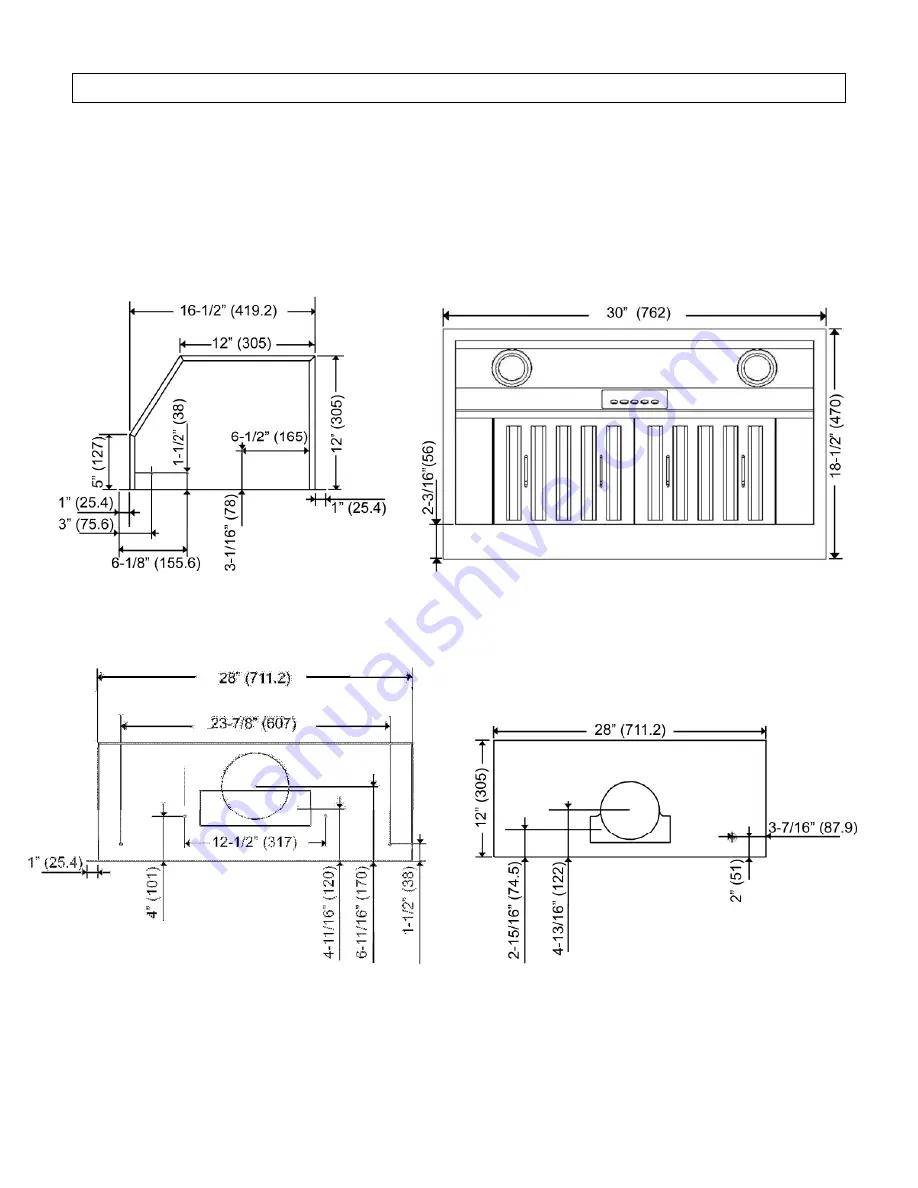
MEASUREMENTS & DIAGRAMS
All ( ) are in millimeter.
All inch measurements are converted from millimeters. Inch measurements are estimated.
MODEL NO: OVS-INX2630SQB-600-40
Side View
Bottom View
Back View
Top View
Page 1: ...KOBE Brand Range Hood Model No OVS INX2630SQB 600 40 BRILLIA SERIES INX 026 INSTALLATION INSTRUCTIONS AND OPERATION MANUAL...
Page 2: ...IF THERE IS ANY PROBLEM 1 DO NOT INSTALL THE UNIT AND KEEP ALL ORIGINAL PACKAGING MATERIAL 2 Have your original proof of purchase and product serial number ready 3 Call 1 877 BUY KOBE 289 5623 or e m...
Page 3: ...E 13 SPECIFICATIONS 14 MEASUREMENTS DIAGRAMS 15 PARTS LIST 17 CIRCUIT DIAGRAM 19 TROUBLE SHOOTING 20 WARRANTY 21 WARRANTY INFORMATION FORM 23 READ ALL INSTRUCTIONS CAREFULLY BEFORE STARTING A L L W I...
Page 4: ...atment negligence or any other circumstances beyond the control of KOBE RANGE HOODS authorized agents Any repair carried out without the supervision of KOBE RANGE HOODS authorized agents will automati...
Page 5: ...ou still smell gas call the Gas Company and Fire Department right away CAUTION 1 For general ventilation use only Do not use to exhaust hazardous or explosive materials and vapors 2 To reduce the risk...
Page 6: ...Hood B Warranty Registration Card C Instruction Manual WEBSITE D Baffle Filter X2 E Oil Tunnel F Stainless Steel Spacer X2 G Remote Control with holder H Rectangular Exhaust Plate I Rectangular Exhau...
Page 7: ...ABINET TABLE 1 A Height of Floor to Ceiling B Height of Floor to Counter Top Standard 36 C Height of Counter Top to Wood Frame Bottom Minimum 26 to 30 D Height of Wood Frame SAFETY WARNING HOOD MAY HA...
Page 8: ...commended 4 It is recommended to install front rear stud support not included Refer to Figure 2 For safety purposes extra installation holes on the side of the insert are provided Prepare the side stu...
Page 9: ...e screws removed from vent covers Use the Round and Rectangular vent covers removed from rear vent to seal top vent Remove the 4 screws that secure the blower system Refer to Figure 8 Hold the blower...
Page 10: ...trical wires 22 Connect three wires black white and green to house wires and cap with wire connectors Connect wires according to their colors i e black to black white to white and green to green 23 St...
Page 11: ...ood Refer to Figure 12 30 Install baffle filters Angle baffle filter toward back of hood Push baffle filter up until almost level Slide forward into recess behind the front of hood Lower baffle filter...
Page 12: ...hood to QuietMode prior to any preparation or cooking Adjust speed as needed Power Control Press Power Control to turn On Off the range hood Hood will power on at Low speed Output Display 3 Minute De...
Page 13: ...the ECO Control The ECO icon will be displayed to show that it has been activated In order for ECO to take effect the unit must be turned off If the fan is running power it off by pressing the Power C...
Page 14: ...uietMode NOTE Requires 2 AAA Batteries Batteries not included Power Control Press Power Control to turn hood ON and OFF Hood will power on at Low speed 3 Minute Delay Shut Off Control Delay Shut Off C...
Page 15: ...will return to speed function control ECO Control To activate ECO when the unit is powered off press the ECO Control The ECO icon will be displayed to show that it is active To deactivate it press th...
Page 16: ...ub off any stubborn spots Use dry soft towel to dry the hood 3 DO NOT allow deposits to accumulate or remain on the hood 4 DO NOT use ordinary steel wool or steel brushes Small bits of steel may adher...
Page 17: ...n with LED Display Timer Control 3 Minute Delay Shut Off Wireless Remote Control ECO Control LIGHTS LED Lights 3W x 2 Dual Level Lighting HOOD DIMENSION W X D X H 30 x 18 1 2 x 12 OPTIONAL ACCESSORIES...
Page 18: ...MEASUREMENTS DIAGRAMS All are in millimeter All inch measurements are converted from millimeters Inch measurements are estimated MODEL NO OVS INX2630SQB 600 40 Side View Bottom View Back View Top Vie...
Page 19: ...16 Front View Ajustable Stainless Steel Liner Sold Separately Model No INL36252B...
Page 20: ...1 0401 0120 01 8 Blower Bracket L1 0105 2630 9 Oil Tunnel IN2630SQB 700 B101 2630 14A 10 Blower System 40 L1 0302 A120 01 11 Bottom Casing B101 2630 09 12 Baffle Filter Support B101 2630 30 13 Stainle...
Page 21: ...18 1 2 3 10 4 11 12 5 6 7 13 8 14 15 9 16 17 18 Optional Liner Sold Separately 19 20...
Page 22: ...19 CIRCUIT DIAGRAM MODEL NO OVS INX2630SQB 600 40...
Page 23: ...range hood is vibrating The blower system is not secure Tighten the turbine impeller squirrel cage and air chamber The turbine impeller squirrel cage is not balanced Replace the turbine impeller squi...
Page 24: ...shipping expenses Un installation of defective product and Installation of replacement product Warranty Exclusions This warranty does not cover including but not limited to the following a Improper i...
Page 25: ...ial number 5 Have a description of the nature of any defect in the product or part TO REQUEST WARRANTY SERVICE PLEASE CONTACT THE KOBE RANGE HOODS SERVICE CENTER KOBE Service Center USA Only Tel 1 855...
Page 26: ...purpose 1 Date of purchase 2 Model No 3 Serial No For warranty service or spare parts purchase contact KOBE Service Center USA Only Toll Free 1 855 800 KOBE 5623 Email kobe adcoservice com For servic...
Page 27: ...ecommand d utiliser cette hotte l tranger puisque l alimentation lectrique pourrait ne pas tre compatible et enfreindre le code de l lectricit de ce pays L usage de la hotte KOBE l tranger est votre p...