background image


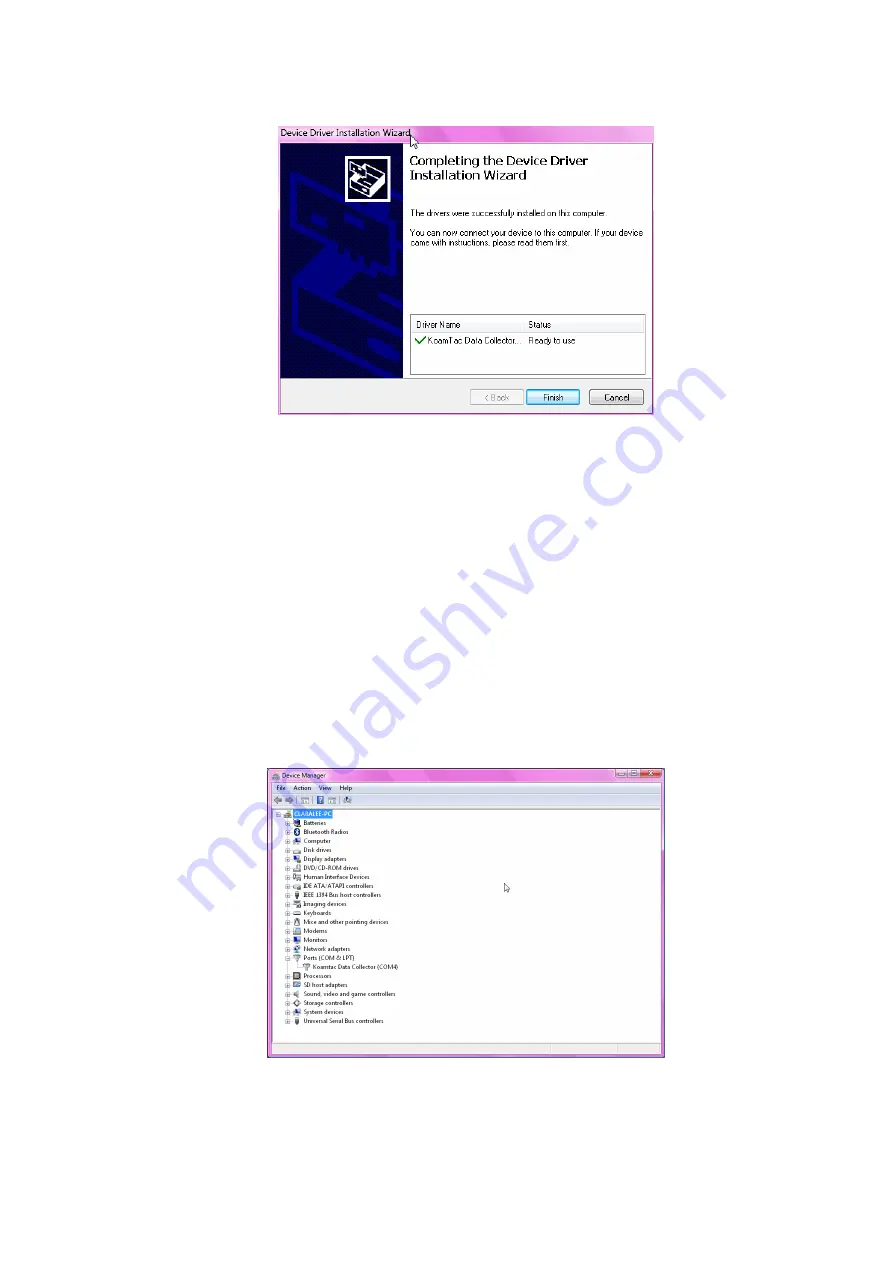
Click 

Finish

 icon in Device Driver Installation Wizard window 


Connect KDC to Computer 

Using the USB cable included with the KDC, follow the directions below. 


Connect ultra mini USB connector to the KDC. 


Connect Type A USB connector to your PC. 


Wait until your computer beeps and/or displays the message Found 

New Hardware.


Verify COM Port Address 


User can verify installed COM Port in Device Manager 


Summary of Contents for KDC450

Page 1: ...KDC450 User Manual November 2011 ...

Page 2: ...t 15 of the FCC Rules Operation is subject to the following two conditions 1 This device may not cause harmful interference and 2 this device must accept any interference received including interference that may cause undesired operation INFORMATION TO USER This equipment has been tested and found to comply with the limit of a Class B digital device pursuant to Part 15 of the FCC Rules These limit...

Page 3: ...1 Operation frequency 13 56 MHz 2 Modulation method ASK RFID Spec ...

Page 4: ...ly of products visit us at www koamtac com FEATURES KDC100 KDC200 KDC250 KDC300 KDC450 USB CONNECTIONS 2 1 1 1 1 RECHARGEABLE BATTERY YES YES YES YES YES SCAN ENGINE Laser Laser Laser Imager Laser AUTOMATIC DATA UPLOAD YES YES YES YES YES STORES10 000 BARCODES YES YES YES YES No KTSYNC SOFTWARE YES YES YES YES YES SDK FOR DEVELOPERS YES YES YES YES YES SUPPORTS MICROSOFT WINDOWS XP VISTA 7 MOBILE ...

Page 5: ... 4 KoamTac Installation CD with KTSync for Microsoft Windows XP Vista 7 and Mobile 5 0 KDC Device Driver User Manual 5 One Protective KDC Rubber Case KDC100 200 250 300 or One Smartphone Protective Rubber Case KDC450 NOTE Depending on your region or distributor package contents may vary KDC100 200 250 300 KDC400 1 2 KDC Characteristics Figure 1 KDC Package ...

Page 6: ...hich indicate placement of scan and scroll buttons OLED display LEDs and ports on your KDC All KDC models are similar except for the KDC100 which includes an additional USB connector KDC100 Barcode Reader and Data Collector KDC200 KDC250 KDC300 Barcode Reader and Data Collector KDC200 Figure 2 Characteristics of KDC100 ...

Page 7: ...KDC250 300 KDC450 Figure 3 Characteristics of KDC200 KDC250 KDC300 KDC450 ...

Page 8: ... click on the Setup directory Click on the PC_Setup exe file which executes the KTSync Setup Wizard NOTES If KTSync Setup Wizard locates an older version of KTSync on your computer you will be prompted to remove the older program before installing the new version Select Remove KTSync then click Finish When removal is complete click Close Go to Step 2 to run KTSync Setup Wizard If you have any prob...

Page 9: ... Click Next icon in KTSync Confirm Installation window Within a few minutes installation of KTSync will be complete Click Close icon and wait for the Device Driver Installation Wizard to load ...

Page 10: ...ges you will see during the installation of the KDC Device Driver Click Next icon in Device Driver Installation Wizard window Click Continue Anyway icon in Software Installation Logo testing window Click Finish icon in Device Driver Installation Wizard window ...

Page 11: ... Wait until your computer beeps and or displays the message Found New Hardware Found New Hardware Wizard Select No not this time option in Found New Hardware Wizard and click Next if your PC pops up the following Found New Hardware Wizard Select Install the software automatically Recommended option in Found New Hardware Wizard and click Next if your PC pops up the following Found New Hardware Wiza...

Page 12: ...Click Continue Anyway icon in Software Installation Logo testing window Click Finish icon in Found New Hardware Wizard window Verify COM Port Address User can verify installed COM Port in Device Manager ...

Page 13: ... directory Click on the PC_Setup exe file which executes the KTSync Setup Wizard NOTES If KTSync Setup Wizard locates an older version of KTSync on your computer you will be prompted to remove the older program before installing the new version Select Remove KTSync then click Finish When removal is complete click Close Go to Step 2 to run KTSync Setup Wizard If you have any problems please refer t...

Page 14: ...icon in KTSync Confirm Installation window Click Close icon in KTSync Installation Complete window and wait for Device Driver Installation Wizard Click Install this driver software anyway in Windows Security window ...

Page 15: ...USB cable included with the KDC follow the directions below Connect ultra mini USB connector to the KDC Connect Type A USB connector to your PC Wait until your computer beeps and or displays the message Found New Hardware Verify COM Port Address User can verify installed COM Port in Device Manager ...

Page 16: ...SE CONNECT PDA TO PC PRIOR TO INSTALLATION 1 PC_Setup exe creates Mobile_Setup exe file under C Program Files KoamTac KTSync Windows Mobile directory 2 Execute Mobile_Setup exe Select Windows Mobile version to install Click Next icon ...

Page 17: ... on PDA screen COM port Assignment User should assign a COM port for KDC before using pKTSync User should pair KDC with PDA using PDA Bluetooth manager and assign a COM port for Bluetooth communication Please refer to the PDA manual for the details of COM port assignment method ...

Page 18: ...lications productivity ktsync_luxv html Blackberry Download and install bKTSync from the Blackberry App World http appworld blackberry com webstore content 16861 lang en iPad iPhone iPod touch Download and install iKTSync from the Apple App Store http itunes apple com us app ktsync id372916602 mt 8 ...

Page 19: ...ys the message New Hardware Found You will be prompted to search for a device driver for KDC 6 Browse then select KTReader inf file from the KoamTac directory created in Step 2 Follow screen prompts to continue with the device driver installation NOTE KTReader inf is the device driver for 32bit Microsoft Windows XP Vista and Windows 7 If you have a 64bit computer use KTReader inf file from XP Vist...

Page 20: ... the thick end of strap through the thin loop 3 Pull the strap tight to secure Charge KDC Battery Prior to using the KDC you must charge its battery To charge the battery follow these directions 1 Connect the KDC cable to the ultra mini USB connector on the KDC 2 Connect the KDC cable to Type A USB connector on your computer 3 Your KDC battery will begin charging Within a few minutes two small LED...

Page 21: ... be configured easily and quickly But to perform at its maximum level the KDC must be configured properly Until you are familiar with configuring the KDC it is recommended that you DO NOT modify the KDC settings The KDC can be configured in three different methods which are explained in Section 3 3 KDC Menus Chapter 4 Synchronization and Appendix C Special Barcodes CONFIGURATION METHODS FOR THE KD...

Page 22: ...problems scanning a barcode try the following suggestions while pointing the KDC at the barcode and depressing the scan button Modify the angle of the KDC in relation to the barcode making the angle bigger or smaller as needed Modify the distance between the barcode and the KDC moving closer or further away as needed Check option settings defined in the KDC menu section and change options as neede...

Page 23: ...abled Disabled Disabled N A N A N A Set Barcodes 410 415 UPCEwithAddon Enabled Disabled Disabled Disabled N A N A N A 1D Symbology Codabar N A N A Enabled Enabled N A Code 11 N A N A Enabled Enabled N A Code 32 N A N A Enabled Enabled N A Code 39 N A N A Enabled Enabled N A Code 93 N A N A Enabled Enabled N A Code 128 N A N A Enabled Enabled N A EAN 8 N A N A Enabled Enabled N A EAN 13 N A N A Ena...

Page 24: ...A Enabled Disabled Disabled Disabled N A N A N A EAN8_as_EAN13 Enabled Disabled Disabled Disabled N A N A N A UPCE_as_EAN13 Enabled Disabled Disabled Disabled N A N A N A ReturnCheckDigit Enabled Disabled Disabled Disabled N A N A N A VerifyCheckDigit Enabled Disabled Disabled Disabled N A N A N A UPCA_as_EAN13 Enabled Disabled Disabled Disabled N A N A N A I2of5_VerifyCheckDigit Enabled Disabled ...

Page 25: ... A Check Digit Enabled Disabled N A N A Enabled Enabled N A NumberSys Enabled Disabled N A N A Enabled Enabled N A 2DgtAddenda Enabled Disabled N A N A Disabled Disabled N A 5DgtAddenda Enabled Disabled N A N A Disabled Disabled N A EAN 13 VerifyChkDgt Enabled Disabled N A N A Enabled Enabled N A 2DgtAddenda Enabled Disabled N A N A Disabled Disabled N A 5DgtAddenda Enabled Disabled N A N A Disabl...

Page 26: ...e None N A Data Editor Partial Data Start Position 1 1 1 1 N A No of Char s 0 chars 0 chars 0 chars 0 chars N A Action Select Select Select Select N A Handshake Enabled Disabled Disabled Disabled Disabled Disabled N A Terminator None CR LF CR LF Tab Right Left Down Up Arrow CR LF CR LF CR LF CR LF CR LF Data Process Chk Duplicate Enabled Disabled Disabled Disabled Disabled Disabled N A Power Enabl...

Page 27: ...c Disabled Disabled Disabled Disabled Disabled HID Ctrl Char Disabled Alt Numpad Character Disabled Disabled Disabled Disabled Disabled Power Enabled Disabled Enabled Enabled Enabled Enabled Enabled Pairing Pairing neighboring Bluetooth devices Discovering Discovering neighboring Bluetooth devices N A N A N A N A N A Connecting to View Connect to Bluetooth device N A N A N A N A N A BT Service HID...

Page 28: ...lt Settings MSR Data Only Default Default Default Default N A Data Format Packet Data Track Separator N A CR LF N A CR LF CR LF Use Track1 N A Yes N A Yes Yes Use Track2 N A Yes N A Yes Yes Use Track3 N A Yes N A Yes Yes Beep on error reading Enabled Disabled N A Disabled N A Disabled Disabled MSR Config Encryption Enabled Disabled N A Enabled N A Disabled Disabled Table 3 KDC Menu Options ...

Reviews: