background image


25

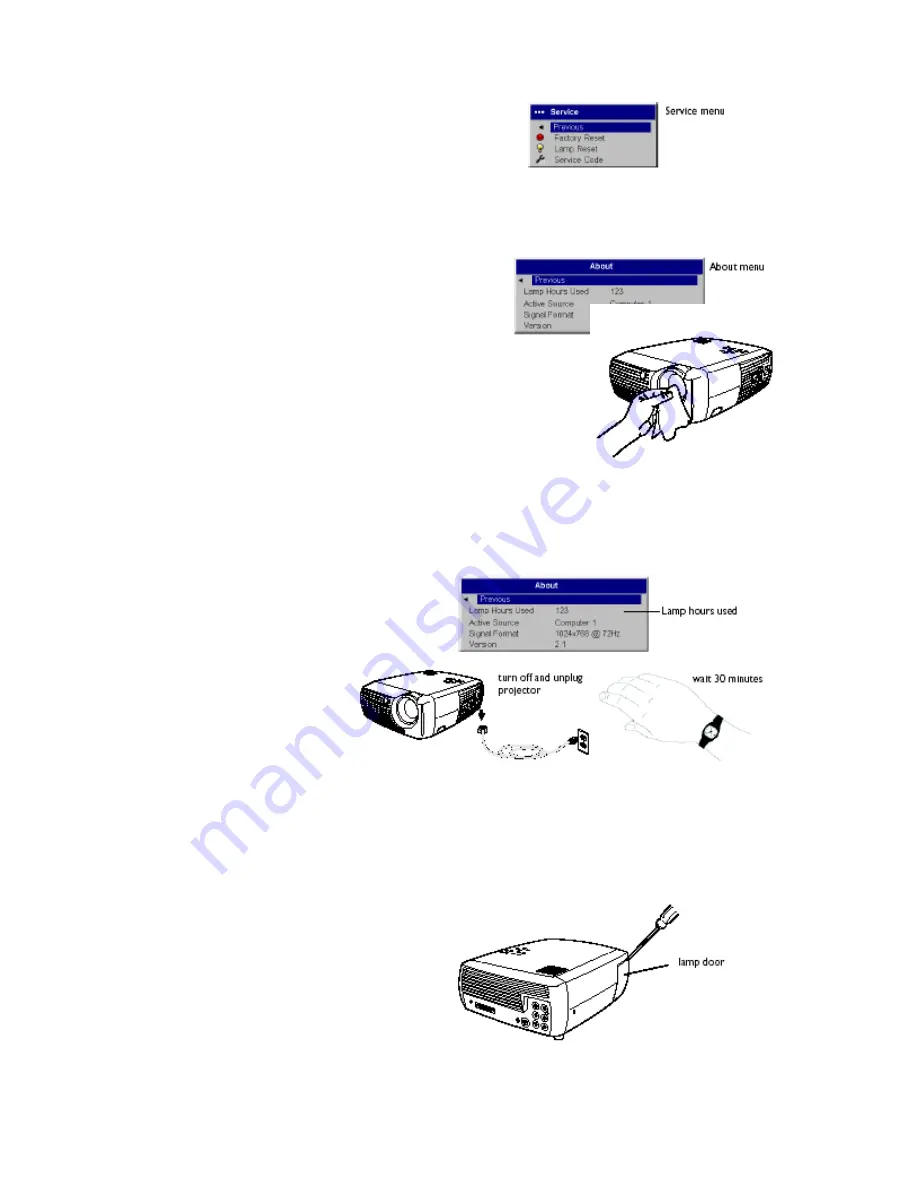
Service

: To use these features, highlight them and press 

Select

.  


Factory Reset

: restores all settings to their default. 

Lamp Reset

: resets the lamp hours used counter in the About 

menu to zero. Do this only after changing the lamp.


Service Code

: only used by authorized service personnel. 

About

: provides information about the projector and the 

active source. 


Maintenance 

Cleaning the Lens


Apply a non-abrasive camera lens cleaner to a soft, dry cloth.  

• 

Avoid using an excessive amount of cleaner, and don’t apply the 
cleaner directly to the lens. Abrasive cleaners, solvents or other 
harsh chemicals might scratch the lens. 


Lightly wipe the cleaning cloth over the lens in a circular motion. 

Replace the lens cap immediately, if you don’t intend to use the projector. 


Replacing the Projection Lamp 


The lamp hours used timer in the 
About menu counts the number 
of hours the lamp has been in 
use. Twenty hours before the 
lamp life expires, the 
message “Change lamp” appears 
on the screen at startup. If the 
maximum lamp time is exceeded, 
the lamp will not light. In this 
case, after replacing the lamp 
you must reset the lamp hours by 
simultaneously pressing both 

Volume 

buttons on the keypad 

and holding them for 10 seconds. 

 
NOTE

: You can order new lamp housings from your dealer or directly from Knoll. See the 

packing list

 for 

information. Use only a replacement lamp with the same type and rating as the original lamp, model  
SP-LAMP-021 or LP21. 
 

Turn off the projector and unplug the power cord. 

Wait 30 minutes to allow the projector to cool thoroughly. 

Turn the projector on its side 

so that the lamp door is facing 
you. Using a flat-blade 
screwdriver, gently pry the lamp 
door from the projector by 
placing the screwdriver blade 
into the space between the top 
of the lamp door and the 
projector. 

Loosen the two captive 

screws that attach the lamp 
housing to the projector. 

Detach the lamp connector from the projector by depressing the locking tab on the connector and lightly 

pulling it free. 
 

Summary of Contents for HD102

Page 1: ...HD102 HDTV DLP Projector Users Manual v1 1 ...

Page 2: ...ations Ul cUL TUV GOST Other specific Country Approvals may apply Please see product certification label Declaration of Conformity Knoll Systems 11791 Machrina Way 210 Richmond BC V7A 4V3 Canada We declare under our sole responsibility that this projector conform to the following directives and norms EMC Directive 89 336 EEC Amended by 93 68 EEC EMC EN 55022 EN 55024 EN 61000 3 2 EN 61000 3 3 Low ...

Page 3: ... Displaying video 13 Adjusting the image 13 Shutting down the projector 14 Troubleshooting your setup 14 Using the remote control 19 Using the audio 19 Using the keypad buttons 19 Optimizing computer images 20 Optimizing video images 20 Customizing the projector 21 Using the menus 21 Picture menu 22 Settings menu 25 Maintenance 25 Cleaning the Lens 24 Replacing the Projection Lamp 25 Cleaning the ...

Page 4: ...his manual for proper startup and shutdown procedures In the unlikely event of the lamp rupturing discard any edible items placed in the surrounding area and thoroughly clean the area along all sides of the projector Wash hands after cleaning the area and handling the ruptured lamp This product has a lamp which contains a very small amount of mercury Dispose of it as required by local state or fed...

Page 5: ...pecifications on your multimedia projector be sure to visit our website as specifications are subject to change Visit www knollsystems com for more information Accessories The standard accessories that came with your projector can be found on the included packing list Optional accessories are listed in the Accessories catalog that came with the projector and can also found on our website See the i...

Page 6: ...sing an authorized ceiling mount Position the projector the desired distance from the screen The distance from the lens of the projector to the screen the zoom setting and the video format determine the size of the projected image The top illustration to the right shows three projected image sizes For more information about image sizes at different distances see Projected Image Size on page 27 The...

Page 7: ...ndard Broadcast TV not HDTV via cable digital cable satellite TV DVD or VCR NTSC PAL and SECAM formats Component 480i Composite video or S video Component Video Composite video or S video Component Video Composite RCA video connection on page 11 Component on page 12 Not for progressive i e HDTV sources See page 6 Standard Video Camera NTSC PAL and SECAM formats Component 480i Composite video or S ...

Page 8: ... Required computer connections Connect one end of the provided computer cable see page 11 for connecting video devices to the blue DVI Computer In connector on the projector Connect the other ends USB and VESA to the USB and VGA ports on your computer If you are using a desktop computer you will need to disconnect the monitor cable from the computer s video port first This connection allows you to...

Page 9: ...xternal video port when a projector is connected Usually a key combination like FN F8 or CRT LCD key turns the external display on and off Locate a function key labeled CRT LCD or a function key with a monitor symbol Press FN and the labeled function key simultaneously Refer to your laptop s documentation to learn your laptop s key combination No laptop image Try pressing the keypad Auto Image but...

Page 10: ...ge on page 9 a Click Next to begin searching for the driver b Make sure Search for the best driver is selected then click Next c Uncheck any checked boxes and then click Next Windows automatically locates the driver If this driver has been removed reload the driver using your Windows operating system CD d When Windows finds the driver you are ready to install it Click Next Skip this section if you...

Page 11: ...nd most DVDs are 16 9 which is the default for this projector This projector is not intended for use with 4 3 screens When in 4 3 mode the projector places black bars on both sides of the image Native mode centers the image and turns off the internal scaler so that any resolution larger than 854x480 is cropped on the edges If you are projecting onto a screen the size shape of the screen may determ...

Page 12: ...ct a component video cable with red green and blue RCA connectors into the source device component connector Connect the other three ends of the component cable into the component Video connector on the projector Use the composite A V cable s red and white audio connectors as described on the previous page the yellow connectors on the A V cable are not used Keep in mind that component video delive...

Page 13: ... keypad No image Try pressing the Source or Auto Image Get help on page 15 Adjusting the image Adjust the height of the projector by pressing the release button to extend the foot Rotate the leveling foot at the rear of the projector if necessary Position the projector the desired distance from the screen at a 90 degree angle to the screen See page 27 for a table listing screen sizes and distances...

Page 14: ...tor You can turn the projector off simply by toggling the power switch to the off position You can also press the remote s Power button to place the projector in the Off state while it is running When the Power button is pressed twice once to start the power down process and a second time to verify that you want to power the projector off the lamp turns off and the LED blinks green for one 1 minut...

Page 15: ...e information A fan or lamp failure has occurred Make sure the vents aren t blocked see page 18 Turn off the projector and wait one minute then turn the projector on again If the projector exceeds its lamp life page 25 replace the lamp and reset the lamp timer Contact Technical Support if the problem persists Solid Red An unidentifiable error please contact Technical Support The following tables s...

Page 16: ...16 ...

Page 17: ...17 ...

Page 18: ...over for support contact information This product is backed by a limited warranty When sending the projector in for repair we recommend shipping the unit in its original packing material or having a professional packaging company pack the unit Please insure your shipment for its full value ...

Page 19: ...e button see page 23 and a source toggle Resize button to change the Aspect Ratio see page 22 Auto Image button to resynch the projector to the source Preset button to restore stored settings see page 22 Overscan button to remove noise in a video image page 23 Troubleshooting the remote Ensure the batteries are installed in the proper orientation and are not dead Ensure you re pointing the remote ...

Page 20: ...Color Temperature in the Advanced menu page 21 Adjust the Phase Tracking or Horizontal or Vertical position in the Advanced menu page 23 Once you have optimized the image for a particular source you can save the settings using Presets This allows you to quickly recall these settings later page 22 Optimizing video images After your video device is connected properly and the image is on the screen y...

Page 21: ...press Select then use the up and down arrow buttons to adjust the value select an option using radio buttons or turn the feature on or off using check boxes Press Select to confirm your changes Use the arrows to navigate to another setting When your adjustments are complete navigate to Previous or Exit then press Select to go to the previous menu press the Menu button at any time to close the menu...

Page 22: ...elect 16 9 to watch enhanced widescreen DVDs For more information regarding Aspect Ratio see page 11 Presets Presets are provided that optimize the projector for displaying computer presentations photographs film images and video images Film input is material originally captured on a film camera like a movie video input is material originally captured on a video camera like a TV show or sporting e...

Page 23: ...offset the amount of black in the color of the red green and blue colors Video Standard when it is set to Auto the projector attempts to automatically pick the video standard based on the input signal it receives The video standard options may vary depending on your region of the world If the projector is unable to detect the correct standard the colors may not look right or the image may appear t...

Page 24: ...u can project from behind a translucent screen Ceiling turns the image upside down for ceiling mounted projection Low Power toggles between on and Off Turn it on to lower the light output of the lamp This also lowers the fan speed making the projector quieter Display Messages displays status messages such as Searching or Mute in the lower left corner of the screen Screen Saver Off prevents the scr...

Page 25: ... hours before the lamp life expires the message Change lamp appears on the screen at startup If the maximum lamp time is exceeded the lamp will not light In this case after replacing the lamp you must reset the lamp hours by simultaneously pressing both Volume buttons on the keypad and holding them for 10 seconds NOTE You can order new lamp housings from your dealer or directly from Knoll See the ...

Page 26: ... fully plugged in 9 Replace the lamp door 10 Plug in the power cord and toggle the Power switch to turn the projector back on 11 To reset the lamp hour timer navigate to the Settings Service menu and select Lamp Reset See page 24 for details Cleaning the Lamp Housing Screens In dirty or dusty environments the two dust filter screens in the lamp housing can become clogged causing high temperatures ...

Page 27: ...ycles Table 3 Red LED Behavior Explanation One 1 blink The lamp won t strike after five 5 attempts Check the lamp and lamp door installations for loose connections Two 2 blinks The lamp counter hours have exceeded lamp life hours Replace the lamp and reset the lamp hours counter Three 3 blinks The projector has shutdown Check to see if the lamp door is open If the lamp door is closed toggle off th...

Page 28: ...tured Product Warranty for applicable warranty information WARRANTY LIMITATION AND EXCLUSION Knoll shall have no further obligation under the foregoing limited warranty if the Product has been damaged due to abuse misuse neglect accident unusual physical or electrical stress unauthorized modifications tampering alterations or service other than by Knoll or its authorized agents causes other than f...

Reviews: