background image

3

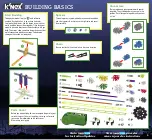
Connectors

There are blue and gray connectors with special

long slots. They slide together as you see in the

pictures. Push these parts together until you hear

a “click.”

Spacers

There are places in your model where you need to add blue

and silver spacers. Be sure to use the right color and count

them carefully.

BUILDING BASICS

Parts Count

Before you start building, be sure to compare the parts in your

set with the parts list here. If anything is missing, call or write

to us using the information on the back cover.

We are here to help you!

Chain

Be sure to attach all the chain links in the same direction.

Start Building

To begin your model, find the

and follow the

numbers. Each piece has its own shape and color.

Just look at the pictures, find the pieces in your set that

match and then connect them together. Try to face your

model in the same direction as the instructions while you

build. The arrows show you where the parts connect, but

not all connections points have arrows. Faded colors

show you this section is already built.

1

1

2

-

2

1

3

for Instruction Updates

Go to

Va à

mises `

a jour des instructions

pour des

Summary of Contents for Imagine Build Play COBRA'S CURSE DUELING COASTER 51023

Page 1: ......

Page 2: ...your product and packaging responsibly The wheelie bin symbol indicates that the product and batteries must not be disposed of in the domestic waste as they contain substances which can be damaging to the environment and health Please use designated collection points or recycling facilities when disposing of the item or batteries BATTERY INFORMATION IMPORTANT STUFF FOR PARENTS KIDS Keep these inst...

Page 3: ...ll or write to us using the information on the back cover We are here to help you Chain Be sure to attach all the chain links in the same direction Start Building To begin your model find the and follow the numbers Each piece has its own shape and color Just look at the pictures find the pieces in your set that match and then connect them together Try to face your model in the same direction as th...

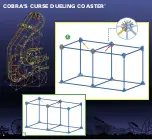
Page 4: ...4 1 1 COBRA S CURSE DUELING COASTER ...

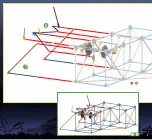
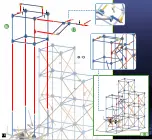
Page 5: ...5 2 3 1 3 1 2 2 3 3 ...

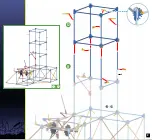
Page 6: ...6 5 1 3 x9 1 5 1 6 4 6 3 7 3 2 2 ...

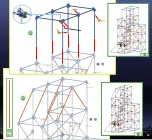
Page 7: ...7 7 1 8 1 6 8 ...

Page 8: ...8 10 1 10 1 8 9 ...

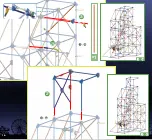
Page 9: ...11 1 12 1 10 12 4 9 ...

Page 10: ...10 1 13 1 12 13 ...

Page 11: ...11 14 1 15 1 14 1 13 15 x8 x8 ...

Page 12: ...16 1 15 17 1 17 3 3 2 2 3 12 ...

Page 13: ...1 17 1 20 19 18 20 1 1 10 13 ...

Page 14: ...14 1 20 1 22 22 21 1 21 x5 x7 ...

Page 15: ...15 1 22 23 1 23 1 24 1 23 24 x6 ...

Page 16: ...16 1 26 1 24 1 27 1 26 26 25 27 x1 ...

Page 17: ...17 1 28 1 32 1 28 1 27 29 28 32 31 30 x4 32 ...

Page 18: ...1 33 1 32 33 1 33 1 35 34 35 33 2 2 18 ...

Page 19: ...u as installé 2 piles AA ou LR6 dans le moteur Instalaste dos pilas AA o LR6 en el motor Hast du 2 Batterien der Baugröße AA oder LR6 eingelegt Hai installato 2 batterie AA o LR6 nel motore Foram instaladas as pilhas 2 AA ou LR6 no motor Heb je er 2 AA of LR6 batterijen ingestoken NL PT IT DE ES FR EN ...

Page 20: ...20 1 42 1 39 42 40 41 40 40 40 40 40 x6 x1 40 41 ...

Page 21: ...upérieure du circuit Fixe les connecteurs à la partie inférieure du circuit exactement comme l indique le schéma FR EN Be sure to push the connectors on firmly until they click Pousse bien les connecteurs jusqu à ce qu ils cliquent FR EN Always connect the track top side to top side throughout the build Connecte toujours le côté supérieur du circuit contrele côté supérieur tout au long de la const...

Page 22: ...22 T Tr ra ac ck k A A P Pi is st te e A A 1 44 1 42 43 44 ...

Page 23: ...Al construir conecta siempre la pista de lado superior a lado superior Die einzelnen Schienenstücke müssen immer mit der Oberseite nach oben zeigen wenn sie miteinander verbunden werden Collega sempre la rotaia parte superiore a parte superiore in tutta la costruzione Liga sempre a face superior da pista à face superior durante a montagem Maak steeds de bovenkant van het spoor vast aan de bovenkan...

Page 24: ...24 1 48 1 46 47 48 ...

Page 25: ...25 1 50 1 48 49 50 ...

Page 26: ...1 52 1 50 51 52 26 ...

Page 27: ...1 54 1 52 53 54 27 ...

Page 28: ...1 56 1 54 55 56 28 ...

Page 29: ...1 58 1 56 57 58 29 ...

Page 30: ...1 60 1 58 59 60 30 ...

Page 31: ...1 62 1 60 61 62 31 ...

Page 32: ...1 64 64 1 62 63 32 ...

Page 33: ...1 66 1 64 65 66 33 ...

Page 34: ...34 1 68 1 66 67 68 T Tr ra ac ck k B B P Pi is st te e B B ...

Page 35: ...35 1 70 1 68 69 70 ...

Page 36: ...1 72 1 70 71 72 36 ...

Page 37: ...1 74 1 72 73 74 37 ...

Page 38: ...1 76 76 1 74 75 38 ...

Page 39: ...1 78 78 1 76 77 39 ...

Page 40: ...1 80 80 1 78 79 40 ...

Page 41: ...1 82 82 1 80 81 41 ...

Page 42: ...1 84 1 82 83 84 42 ...

Page 43: ...1 86 1 84 85 86 43 ...

Page 44: ...44 1 88 88 1 86 87 ...

Page 45: ...45 1 90 90 1 88 89 ...

Page 46: ...46 1 92 92 1 90 91 ...

Page 47: ...47 1 94 94 1 92 93 ...

Page 48: ...MPORTANT Attache les chaînons dans le même sens IMPORTANTE Conecta los Eslabones de la Cadena en la misma dirección WICHTIG Befestige die Kettenglieder immer in die gleiche Richtung IMPORTANTE Collegare le maglie della catena nella stessa direzione IMPORTANTE Prende os Elos da Corrente seguindo a mesma direcção BELANGRIJK Maak de ketenschakels vast in dexelfde richting NL PT IT DE ES EN FR ...

Page 49: ...49 1 100 101 100 99 ...

Page 50: ...50 102 103 104 1 104 1 101 1 103 ...

Page 51: ...uement Regarde au verso pour d autres moyens de contacter K NEX Si des voitures restent coincées au cours de la descente Est ce que le modèle est construit comme il faut Vérifie que la voiture ne heurte pas des pièces K NEX Est ce que les pièces du circuit sont connectées comme il faut Est ce que la voiture est fixée au circuit comme il faut Ajuste le circuit de façon à y éliminer des endroits pla...

Page 52: ...onstrucción Instrucciones de la prima en www knex com thrill rides Bauvorschlag Zusätzliche Bauanleitungen bei www knex com thrill rides Idea di costruzione Bonus Istruzioni a www knex com thrill rides Ideia de construção Instruções do bônus em www knex com thrill rides Idee voor bouwen De instructies van de bonus bij www knex com thrill rides EN FR NL PT IT DE ES ...

Page 53: ...le jouet restera inutilisé pendant longtemps Ne mettez pas les petites tiges dans les trous du moteur elles endommageraient le moteur et il n est pas possible de les enlever Aidez l environnement en jetant votre produit et son emballage de manière responsable Le symbole de la poubelle à roulettes indique qu il ne faut pas jeter le produit et les piles avec les ordures ménagères car ils contiennent...

Page 54: ...sie wieder aufgeladen werden das Wiederaufladen darf nur unter Aufsicht eines Erwachsenen stattfinden Nichtwiederaufladbare Batterien dürfen nicht wieder aufgeladen werden Die Komponenten von Staub freihalten nicht in Wasser tauchen Zu entsorgende Batterien nicht ins Feuer werfen sie können auslaufen oder explodieren und Körperverletzungen verursachen Wenn das Spielzeug längere Zeit nicht verwende...

Page 55: ...e ao topo da Pista Liga os conectores à base da Pista exactamente como demonstrado Faz avançar os conectores firmemente até encaixarem com um estalido Liga sempre a face superior da Pista à face superior durante a montagem Página 51 Para prenderes as carruagem desliga uma peça da pista e seguidamente enfia as rodas da carruagem sobre a face superior da pista Depois junta as peças da pista umas às ...

Page 56: ......

Reviews: