Start Building
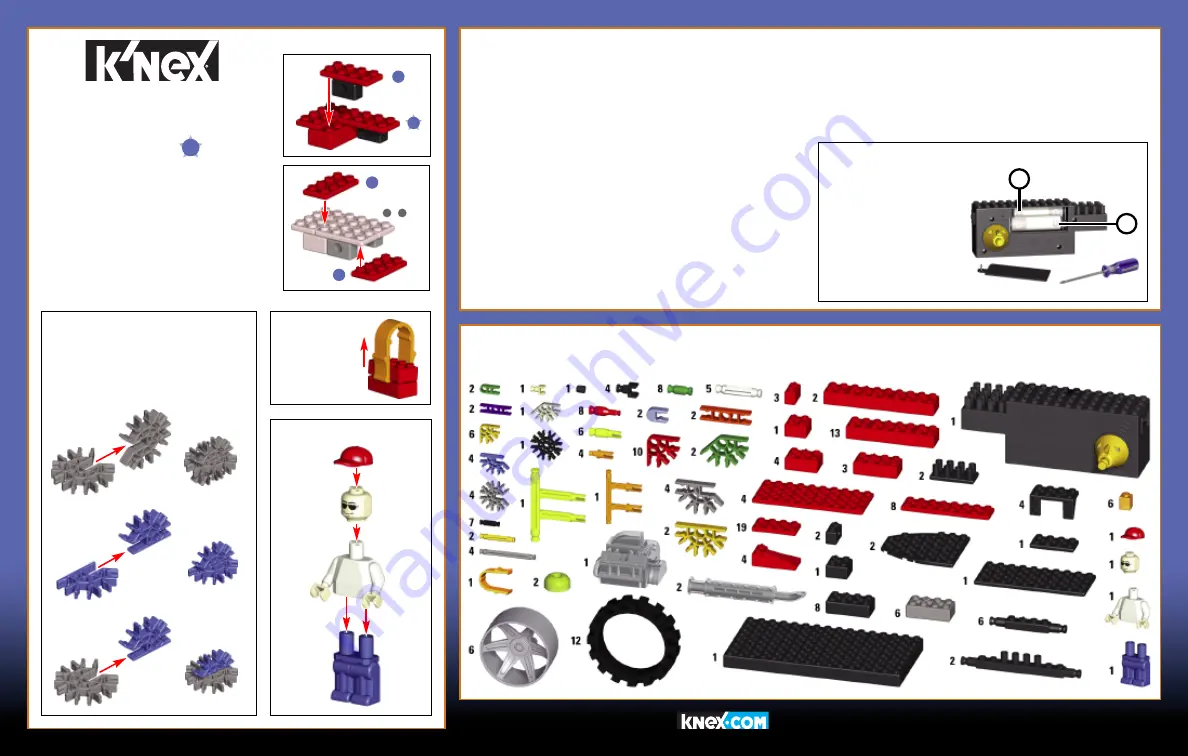
To begin your model, find the
and follow
the numbers. Each piece has its own shape
and color. Just look at the pictures, find the
pieces in your set that match and then connect
them together.
Try to face your model in the same direction as
the instructions while you build. Faded colors
show you this section is already built. You’ll
want to connect the new section to the place
where the arrows are pointing.
1
Caution: To Avoid Battery Leakage
•
Be sure to insert the batteries correctly and always follow the toy and
battery manufacturers’ instructions.
•
Do not mix old and new batteries or alkaline, standard (carbon-zinc)
or rechargeable (nickel-cadmium) batteries. Only batteries of the same
or equivalent type recommended should be used.
•
Always remove weak or dead batteries from the product; do not
short-circuit supply terminals.
•
Insert batteries with correct polarity (+/-) as shown.
Important Tips
•
Alkaline batteries AA (LR6) are recommended.
•
Rechargeable batteries are not recommended.
•
Remove rechargeable batteries from toy before charging; they must be
charged only under adult supervision.
•
Non-rechargeable batteries must not be recharged.
•
Keep components free of dust; do not immerse or use in water.
•
Do not dispose of batteries in a fire; they could leak or explode and
cause injury.
•
Remove all batteries if the toy will not be used for a long period of time.
•
Do not put Rods smaller than 2 inches in any openings of the motor;
they will damage the motor, and cannot be removed.
B
ATTERY
I
NFORMATION
Figure Assembly
3
2
1
3
4
1
2
-
Connectors
There are blue and gray Connectors with
special long slots. They slide together as
you see in the pictures. Push these parts
together until you hear a “click.”
How to Insert and
Remove Batteries
Use a small Phillips head
screwdriver to loosen the
screw. Insert 2 fresh AA
batteries (LR6) into the
compartment with the
correct polarity (+/-) as
shown here.
Before you start building, be sure to compare the parts in your set with the parts listed here.
If anything is missing, call or write to us using the information on the back cover. We are happy to help you!
P
ARTS
L
IST
B
UILDING
B
ASICS
for Instruction Updates
Go to
K’NEX
Brick
Separator
Tool
–
–
Summary of Contents for COLLECT & BUILD PICK-UP TRUCK
Page 1: ......
Page 2: ......
Page 5: ...5 1 8 5 6 7 8 1 4 1 6 ...
Page 7: ...7 1 2 3 4 1 4 1 3 1 3 ...
Page 8: ...8 5 6 7 1 7 1 4 1 5 1 5 ...
Page 9: ...9 8 9 10 1 10 1 7 1 8 ...
Page 10: ...10 11 12 13 14 15 11 15 11 13 11 ...
Page 11: ...11 16 1 16 1 10 11 15 ...
Page 12: ...12 17 20 17 18 17 18 19 20 ...
Page 13: ...13 17 26 17 20 17 23 24 25 26 21 22 23 ...
Page 14: ...14 1 27 17 26 1 16 27 ...
Page 15: ...15 28 30 28 29 28 29 30 ...
Page 16: ...16 28 31 28 30 28 31 34 31 32 33 28 34 ...
Page 17: ...17 1 35 28 34 1 27 35 ...
Page 20: ......


