


4
Connectors
There are blue and gray
connectors with special
long slots. They slide
together as you see in
the pictures. Push these
parts together until you
hear a “click.”
Connecteurs
Tu peux assembler ces connecteurs tout
à fait uniques en les faisant glisser l’un avec
l’autre. Pousse fort jusqu’à ce que tu entendes
un « clic ».
Chain
Be sure to attach all the chain links
in the same direction.
Chaine
Assure-toi de fixer tous les maillons
de la chaîne dans le même sens.
Spacers
There are places in your model where
you need to add blue and silver spac-
ers. Be sure to use the right color and
count them carefully.
Espaceurs
Il y a des endroits sur ton modèle ou tu
auras besoin de te servir d’espaceurs.
Assure-toi d’utiliser la bonne couleur et
le nombre d’espaceurs indiqué sur les
instructions.
2
3
1
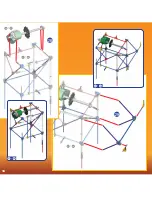
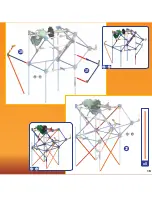
Start Building
To begin your model, find the and follow the numbers.
Each piece has its own shape and color. Just look at the
pictures, find the pieces in your set that match and then
connect them together. Try to face your model in the same
direction as the instructions while you build. The arrows
show you where the parts connect, but not all connections
points have arrows. Faded colors show you this section is
already built.
Démarre ta Construction
Pour commencer ton modèle, trouve l’étape numéro
et suis les numéros. Chaque pièce a sa propre forme et sa
propre couleur. Regarde les illustrations, trouve les pièces
qui correspondent à ce que tu vois et assemble-les. Pour
t’aider pendant que tu construis, oriente ton modèle dans le
même sens que les instructions. Les flèches t’indiquent où
les pièces s’assemblent, mais les points de raccordement
n’ont pas tous des flèches. Les pièces de couleur délavée
sont celles que tu as déjà assemblées.
BUILDING BASICS
BASES DE LA CONSTRUCTION
1
1
Summary of Contents for 51432
Page 1: ......
Page 7: ...7 3 4 5 1 5 1 2 7 7 1 1 1 1...
Page 8: ...8 6 7 1 7 1 5...
Page 9: ...9 x4 8 9 1 8 1 9 1 7 1 8 9...
Page 10: ...10 10 11 1 11 1 9...
Page 11: ...11 12 13 1 12 1 13 1 11 1 12 11 2...
Page 12: ...12 14 15 1 14 1 15 1 13 1 14...
Page 13: ...13 16 17 18 1 17 1 18 1 15 1 17 13 2...
Page 14: ...14 x8 x6 19 20 1 19 1 20 1 18 1 19...
Page 15: ...15 21 22 21 21 22 21 4 3 11 7 3 2 1 2...
Page 16: ...16 23 24 21 24 21 22 3 4 2 2 2 1...
Page 18: ...18 28 29 21 28 21 29 21 25 21 28 27 26...
Page 19: ...19 x5 30 32 31 21 31 21 32 21 29 21 31 19...
Page 20: ...20 33 1 33 1 20 21 32 20...
Page 22: ...22 34 35 1 35 1 33 22...
Page 24: ...24 38 39 1 39 1 37 24...
Page 25: ...25 1 39 40 41 1 41...
Page 26: ...26 42 43 1 43 1 41 26...
Page 27: ...27 44 45 1 45 1 43...
Page 28: ...28 46 47 1 47 1 45...
Page 29: ...29 48 49 1 49 1 47...
Page 30: ...30 50 51 1 51 1 49...
Page 31: ...31 52 53 1 53 1 51...
Page 32: ...32 54 55 1 55 1 53...
Page 33: ...33 56 57 1 57 1 55...
Page 34: ...34 58 59 1 59 1 57...
Page 35: ...35 60 61 1 61 1 59...
Page 36: ...36 62 63 1 63 1 61...
Page 37: ...37 64 65 1 65 1 63 37...
Page 38: ...38 66 67 1 67 1 65...
Page 44: ......