


quality products that will provide you with the best results. Check the information labels
of each product for information on penetration times, product compatibility, and
general dry (or “cure”) times. It is best to test your stain and/or finish on a scrap piece of
wood, or inconspicuous area of the assembly, before applying any to the visible wood
surface of your clock. This will demonstrate the coloration of the stain product as well as
familiarize you with both products manageability and dry times.
When applying stain/finish, be sure to work in a clean, warm, dry, well-ventilated area.
We recommend applying stain/finish to all wood surfaces, inside and outside of the
assembly, in order to protect the wood for years to come. If you are in-experienced with
wood finishing, please consult with local product dealers and/or woodworkers in your
area. They may have valuable information, which could aid you with the
staining/finishing of your clock. You are also welcome to contact Klockit by dialing our
toll free number (1-800-556-6474).
It is important that you always allow stains and protective finishes to dry thoroughly
(typically 24-48 hours) before successive applications are added. You should always
make certain that the final finish application is allowed the same thorough drying time
prior to handling the wood for final assembly.
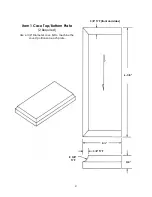
Final Assembly:
Once the final coating of finish has completely dried, you may
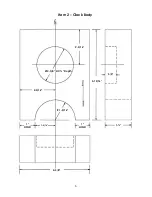
proceed with final assembly. This simply involves mounting the clock insert into the 2-3/8”
diameter counter-bored hole. Clock inserts can be purchased separately through the
Klockit catalog or website. You may select from 2-13/16” diameter non-alarm inserts, or
you may use 2-3/4” diameter inserts with the #15612 rubber gasket. No matter which
insert you should choose to use, it is important that the mounting diameter of either insert
be 2-3/8” with a depth no greater than ¾”. Klockit will provide the mounting
specifications for all inserts within the catalog or website, so make certain to verify this
information prior to purchase.
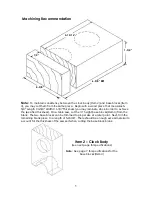
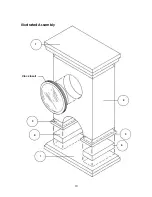
If necessary, place a fresh battery into the clock insert and use the time set knob to set
the clock to the current time. If you have selected a 2-13/16” insert, simply mount it into
the 2-3/8” diameter counter-bore. If you have selected a 2-3/4” insert, remove the
plastic mount gasket from the back mount portion of the insert. Install the rubber gasket
(#15612 – purchased separately) and mount the insert.
Take a moment to rotate the
insert to ensure the “12” and “6” o’clock positions are vertically plumb in relation to the
clock assembly.
Conclusion:
Congratulations on the completion of the Arc De Triomphe Desk Clock!
Whether you have built this clock for your own use, to give as a gift to be cherished by
someone special in your life, or even for resale, we hope that you are proud of your
finished product.
Here at Klockit, we strongly believe that our customers are the real product designers.
Our continued success at offering top quality kit and plan products that are fun, as well
as rewarding to work with, depends on customer feedback and input. We sincerely
welcome your comments and suggestions regarding our product designs, and/or our
instruction materials, that will help us to improve our products.
9


