Klipsch Aragon Stage One User Manual Download Page 18

SYSTEM SETUP

The Stage One Setup Menu is a quick and easy step-by-step guide to configur-
ing your system. You can access and navigate the Setup Menu from the remote
control or by using the Stage Manager and Enter button on the front panel.
When you complete a setup item, the system will automatically advance to the
next selection until setup is complete. It will then revert to the initial menu.

Remote Control System Setup

With the ProntoNEO, select the Setup button to enter the Setup Menu. The Up and
Down buttons change the currently selected menu or option and the Left and Right
buttons change the setting. Use the OK button to enter or exit a particular menu.

Front-Panel System Setup

Although most of the instructions below are primarily for operation from the
remote control, you can use the Stage Manager and the Enter button to set up
the Stage One completely from the front panel. Press the Enter button to enter
and exit the Setup Menu. Turn the Stage Manager knob to the left or right to
make choices or adjustments in the selected menu. Press the Stage Manager
knob to enter a particular menu. When applicable, each subsequent press of
the Stage Manager will advance to the next channel or parameter. Press the
Enter button to exit a menu.
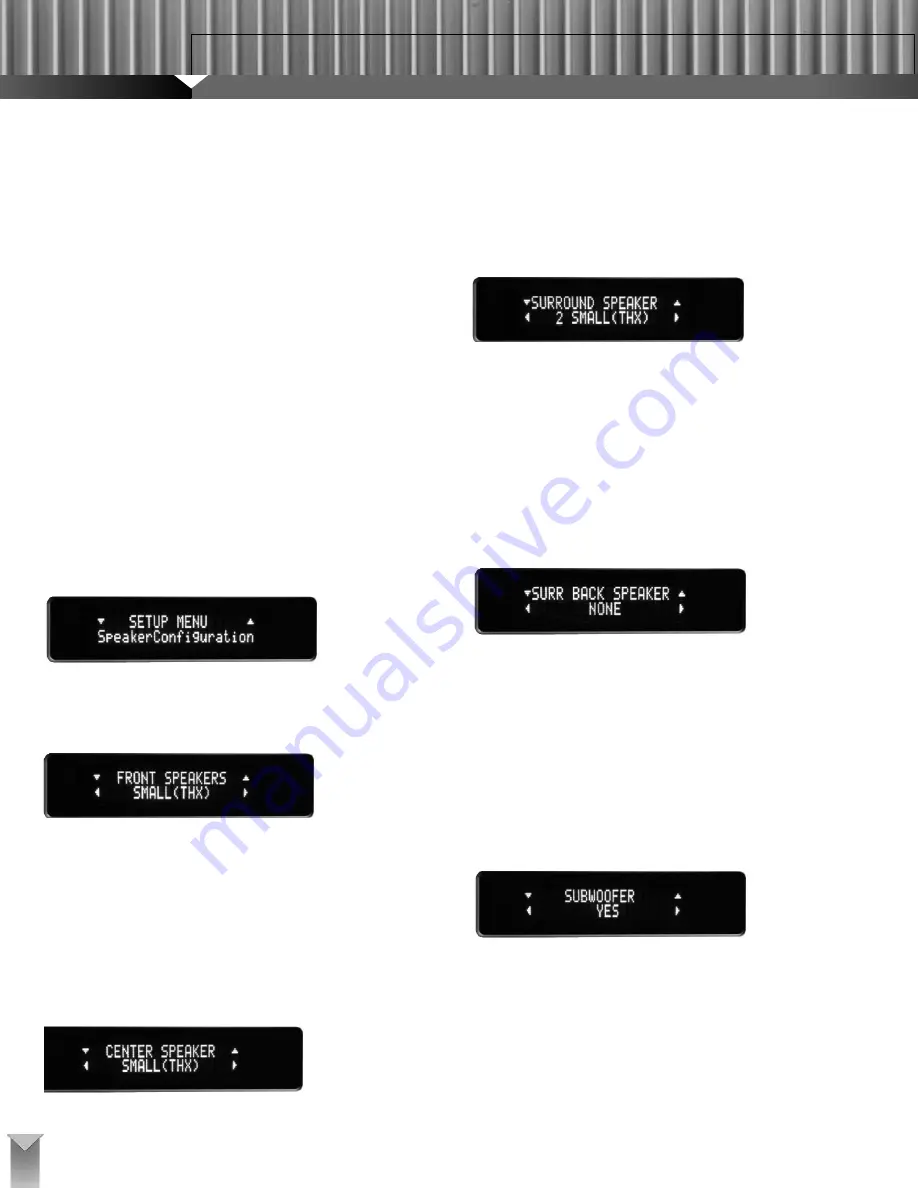
SETUP MENU

Press the Setup button on the remote or the Enter button on the front panel to
begin the setup procedure.

SPEAKER CONFIGURATION

The Speaker Configuration menu enables you to adjust the bass management
of your system. Press the remote OK button or front-panel Stage Manager to
enter the Speaker Configuration menu.

Front Speakers

Use the Left and Right buttons on the remote control or Stage Manager knob
to configure the front left and right front speakers as Large or Small. Select
Small (THX) when the front left and right speakers have limited bass response
or if you simply want the bass from all channels to go to a subwoofer. Select
Large for full low-frequency output to the front left and right speakers. The
default THX setting for the front left and right loudspeakers is Small, which
reroutes bass below the crossover frequency to the subwoofer output. (The
crossover frequency can be adjusted in a subsequent menu.) Once you have
selected the correct speaker designation, press the Up button or the Stage
Manager to move to Center Speaker configuration.

Center Speaker

The center speaker can be configured as Large, Small (THX), or None. If you
select Small, the Stage One will reroute bass below the crossover frequency
from the center channel to the subwoofer output if there is a subwoofer in the
system; if there is no subwoofer and the front left and right speakers are

configured as Large, bass from the center channel will be split between the
front left and right speakers. If you do not have a center speaker, select None,
which will split the center-channel output between the front left and right
speakers. The default THX setting for the center channel is Small. Use the
remote’s Left and Right buttons or the Stage Manager knob to select the
desired setting. Then press the Up button on the remote control or the Stage
Manager on the front panel to move to Surround Speaker configuration.

Surround Speakers

The Stage One gives you three choices for number of surround speakers—None,
One, or Two—and two choices for type—Large or Small (THX). If you select Large,
the surround speakers will receive full-range signals. Selecting Small will redirect
bass in the surround channels below the crossover frequency to the subwoofer out-
put if there is a subwoofer in the system; if there isn’t a subwoofer, bass will be split
between the front left and right speakers if they are configured as Large. The
default THX setting for the surround speakers is 2 Small. Use the Left and Right
buttons on the remote control or the Stage Manager on the front panel to select the
Surround Speakers setting. Once you have chosen the correct speaker designa-
tion, press the Up button on the remote control or the Stage Manager knob on the
front panel to move to Surround Back Speaker configuration.

Surround Back Speakers

If you select None in surround speaker configuration, the Stage One will auto-
matically set the surround back speaker configuration to None. If you have both
surround and surround back speakers, your only choice for this setting will be to
choose the quantity–None, One or Two–as the size configuration will be set the
same as that of the surround speakers. If your surround speakers are set to
Large, you should make sure your surround back speakers can handle a
full-range signal as well. If they cannot, you should set the surround speakers
size to Small so that the bass for all of these speakers is redirected to the sub-
woofer. Use the Left and Right buttons on the remote or the Stage Manager knob
to select the correct surround back speaker setting. Then press the up button on
the remote or the Stage Manager knob to move to Subwoofer configuration.

Subwoofer

There are three options for the subwoofer setting—No, Yes, and Ultra2. If your
system does not have a subwoofer, choose No. If it has a THX Ultra2-certified
subwoofer or a subwoofer that is capable of reproducing frequencies down to
20Hz, choose Ultra2. If it has a subwoofer that is not THX Ultra2 certified and
not capable of reproducing frequencies down to 20Hz, choose Yes. The sub-
woofer will reproduce the low-frequency effects (LFE) channel of Dolby Digital
and DTS soundtracks as well as any bass rerouted from speakers designated
as Small. A subwoofer signal is also created during Stereo and Pro Logic II
playback. Use the Left and Right buttons on the remote control or the Stage
Manager knob on the front panel to select the correct subwoofer setting. Then
press the OK button on the remote or the front-panel Enter button to exit the
Speaker Configuration menu and continue to the Level Settings menu.

STAGE ONE 

THX SURROUND PREAMPLIFIER

18

Summary of Contents for Aragon Stage One

Page 1: ...THX ULTRA2 SURROUND PREAMPLIFIER STAGE ONE...

Page 2: ...lug 11 Power Cord Protection Power supply cords should be routed so that they are not likely to be walked on or pinched by items placed upon or against them paying particular attention to cords at plu...

Page 3: ...l at your leisure afterward The version number of the owner s manual is located at the bottom of this page Updates will be provided on our Web site at http www aragonelectronics com Click on Help Cent...

Page 4: ...deo Sources Built in AM FM Tuner Front Panel Controls Front Panel Control Operations Stage Manager Control and Enter Button Normal Mode Post processing Mode Tuning Mode Menu Mode Speaker Configuration...

Page 5: ...Input Digital Inputs Analog Inputs Video Inputs Multi channel Analog Input Antenna Input Speaker Placement and Configuration System Setup Remote Control System Setup Front panel System Setup Speaker...

Page 6: ...ia a back panel RS 232 port This enables us to make the Stage One compatible with new sources and to enhance its opera tion without ever having to touch the hardware or even remove it from your system...

Page 7: ...button This allows you to watch one source while you listen to another without going through any complicated setup menus Built In AM FM Tuner The Stage One has a built in AM FM tuner with 20 station p...

Page 8: ...to the next channel Press the Enter button to exit the Level Settings Menu Speaker Distance Turn the Stage Manager knob to increase or decrease the speaker distance setting for an output channel Press...

Page 9: ...nd Back output channels DTS ES Discrete soundtracks contain a discrete surround back channel signal which is decoded by the DSP module and fed to the Surround Back outputs The Stage One will not decod...

Page 10: ...NT VIDEO INPUTS Three Component Video inputs are provided on the rear panel These are assigned to the TV DVD and Video inputs and are high definition compati ble When one of these three sources is sel...

Page 11: ...o output is provided on the rear panel The signal from the selected digital source is routed to the Toslink digital out put for recording purposes 5 ANALOG RECORD OUTPUTS Two sets of outputs are provi...

Page 12: ...the Left and Right buttons to adjust the left right balance 7 8 VOL The Vol and Vol buttons adjust the Stage One s overall volume level 9 10 CH When the Stage One s built in tuner is selected the CH...

Page 13: ...igital processing enabling the Stage One to act as a stereo analog preamplifier while still allowing subwoofer operation PLII Pressing the PLII button when the signal for the currently selected source...

Page 14: ...Tuner Pressing the Tuner button switches the remote to the Tuner page where you can select the band select a preset or tune stations PRO LOGIC II MODES The Pro Logic II Modes page allows you to selec...

Page 15: ...holding the preset button for three seconds will store the currently selected station as the preset SEPARATE VIDEO The Separate Video switching page allows the video input to be adjusted independently...

Page 16: ...you have connected For optimum per formance the gain should be adjusted to the highest point before clipping occurs See Advanced Features VIDEO INPUTS The rear panel of the Stage One provides 17 Video...

Page 17: ...s all on screen dialog action and effects for realistic sonic effect Surround Left and Right Speakers The surround left and right speakers function as the dimensional speakers in a surround speaker se...

Page 18: ...een the front left and right speakers The default THX setting for the center channel is Small Use the remote s Left and Right buttons or the Stage Manager knob to select the desired setting Then press...

Page 19: ...el setting Center Press the Left and Right buttons on the remote or turn the Stage Manager knob to adjust the level of the center speaker if present to 75dB Press the Up button on the remote or the fr...

Page 20: ...ns on the remote or turn the front panel Stage Manager knob to set the distance measured from the right surround speaker if present to the listening position Press the Up button on the remote or the S...

Page 21: ...en your system contains both sur round and surround back speakers the surround channels in the soundtrack are stereo and the Dolby Digital bitstream contains a flag indicating that the soundtrack is S...

Page 22: ...ires the use of an external phono pream plifier AUTOMATIC FORMAT DETECTION When you select an input the processor will search for a digital signal and if it finds one it will determine the format and...

Page 23: ...ol allows the user to gradually adjust the soundfield either towards the front or the rear This can be useful to help achieve the desired balance from all of the speakers with certain recordings that...

Page 24: ...e two primary surround channels The Stage One can extract and reproduce this extra channel when surround back speakers are present in the system These soundtracks are backwards compatible and can be p...

Page 25: ...anges our perception of a sound depending on the direction from which the sound is coming In a movie theater there is an array of sur round speakers so that the surround information is all around you...

Page 26: ...Stage One s front panel When the Tuner is selected use the Stage Manager to change stations Press the Stage Manager to enter the tuning mode The currently selected band will flash Turn the knob clockw...

Page 27: ...ly in modes that use the surround channels Shifting the balance toward the surround channels using the Down button will reduce the volume of the front channels Moving the bal ance toward the front cha...

Page 28: ...ade lighting Other available options are Off and Dim Reset System The default setting is No If you press the Right button on the remote control to change this setting to Yes and then press the OK butt...

Page 29: ...u have an unal tered serial number and or you purchased from a ARAGON authorized dealer This Warranty is only valid for the original purchaser and will automatically terminate prior to expiration if t...

Page 30: ...30 STAGE ONE THX SURROUND PREAMPLIFIER...

Page 31: ...___State_____________________ How did you hear about Aragon Audio Home Theater Magazine Other Magazine Radio Newspaper Television Trade Show Friend Retail Dealer Direct Mail Have you purchased Aragon...

Page 32: ...contact your local authorized Aragon dealer For your records Stage One THX Surround Preamplifier Date Purchased Serial A KLIPSCH AUDIO TECHNOLOGIES BRAND 3502 WOODVIEW TRACE SUITE 200 INDIANAPOLIS IN...

Reviews: