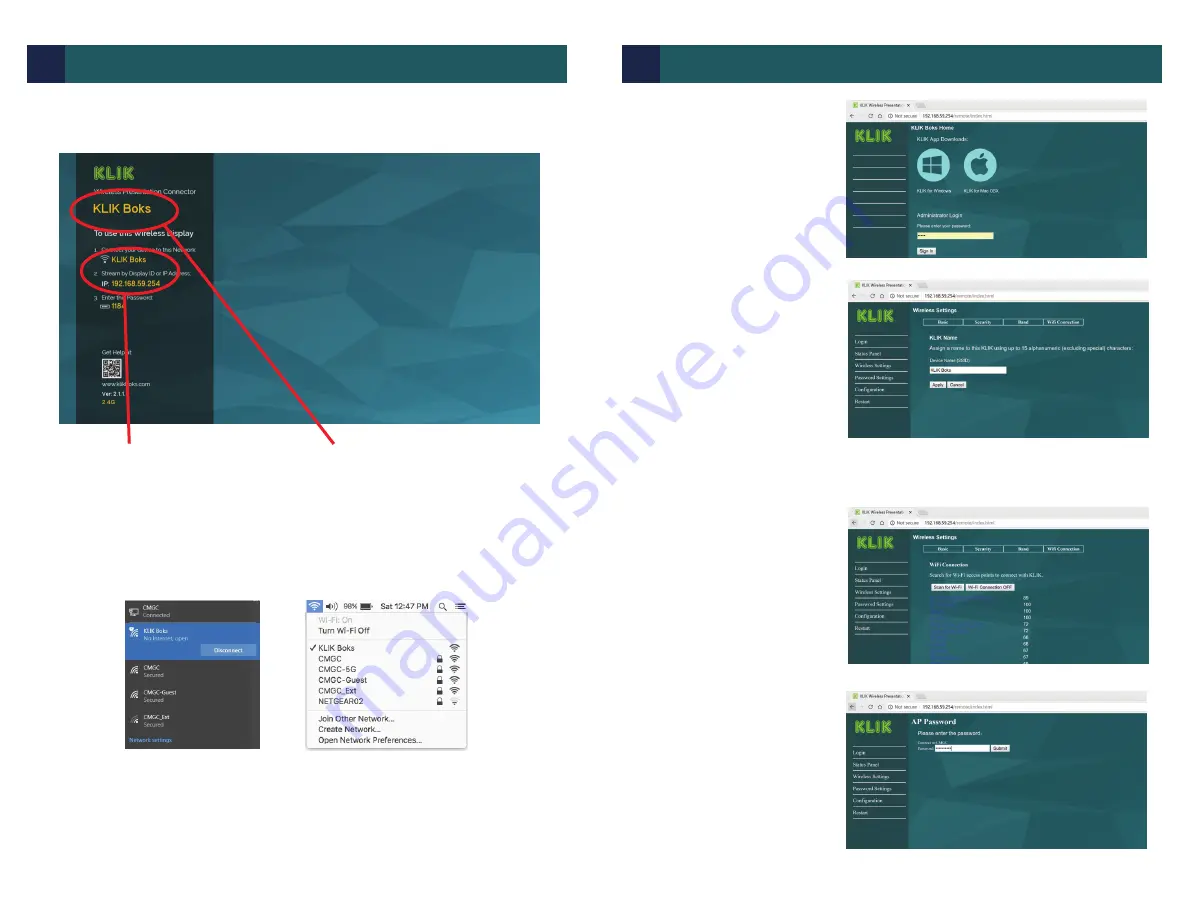
First, Connect to KLIK using Wi-Fi
1)
Power on the KLIK Boks and confirm that the Standby screen is shown on the
presentation display:
4)
Select Wireless Settings
from the menu on the left,
then click on the Wi-Fi Connec-
tion tab to navigate to the
Wi-Fi pairing screen.
5)
Click on the “Scan for Wi-Fi”
button to search for the
wireless access point that KLIK
will be connected with . This
could take up to 2 minutes to
complete. Select the preferred
wireless Access Point (AP)
from the list.
NOTE:
If you change the Device Name at this stage, you must reconnect using the
new name as in section 4b in order to continue setup.
NOTE:
Connect to KLIK as if you are connecting to a Wi-Fi network.
6)
Enter the password for your
selected Wi-Fi Access Point
and click Submit. The KLIK
Boks will terminate broadcast-
ing its SSID and will connect
to the Wi-Fi network. Any
connected devices will be
disconnected.
This is the Wi-Fi signal name
being broadcast by KLIK. Connect
to this SSID as shown below.
This is the Device ID, the default
name of the KLIK Boks. It can be
changed during Setup.
Ready for Connection
Windows
Mac
2)
Open your computer’s Wireless Network connection manager and select the
KLIK Boks by name. Press Connect. No password is required.
3)
Open a browser window
and navigate to the KLIK Boks
IP address shown in the
Standby screen (default is
192.168.59.254). Enter the
password (Default is admin)
and click Sign In.:
Page 2
Page 3
Copyright 2018 KLIK Communications Inc. - All Rights Reserved www.klikboks.com - Document QSG8.1.0
4
Add KLIK to A Wireless Network
4
Add KLIK to A Wireless Network


