23
EN
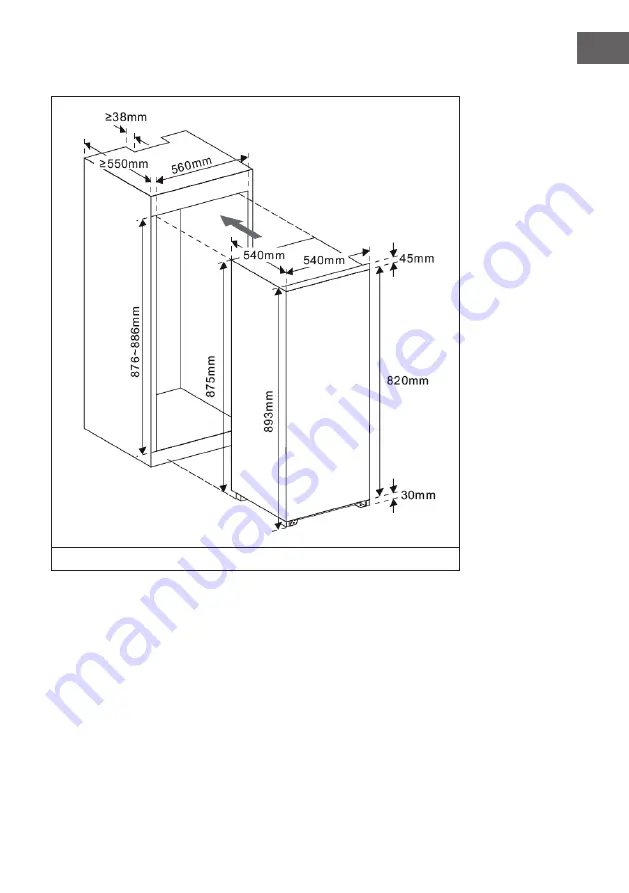
Install the Appliance
Step 1
: Ensure the size of cabinet and ventilation are enough.
Page 1: ...10030104 Coolzone 130 Kühlschrank Fridge Frigorífico Réfrigérateur Frigorifero ...
Page 2: ......
Page 3: ...formationen rund um das Produkt zu erhalten INHALTSVERZEICHNIS Sicherheitshinweise 4 Geräteübersicht 6 Türanschlag drehen 6 Installation 8 Inbetriebnahme und Bedienung 13 Reinigung und Pflege 14 Fehlerbehebung 15 Hinweise zur Entsorgung 16 TECHNISCHE DATEN Artikelnummer 10030104 Stromversorgung 220 240 V 50 60 Hz KONFORMITÄTSERKLÄRUNG Hersteller Chal Tec GmbH Wallstraße 16 10179 Berlin Deutschland...
Page 4: ...mit nassen Händen an Verwenden Sie nach Möglichkeit kein Verlängerungskabel Falls Sie doch eines verwenden achten Sie darauf dass der Amperewerte des angeschlossenen Geräts den maximalen Amperewert des Netzkabels nicht überschreitet Lassen Sie um das Gerät herum mindestens 5 cm Platz zu den Seiten und 10 cm Platz nach hinten damit die Luft ausreichend zirkulieren kann Stellen Sie keine heißen Lebe...
Page 5: ...eklemmt oder beschädigt ist Achten Sie darauf dass sich keine Mehrfachsteckdosen oder Netzteile auf der Rückseite des Geräts befinden Um eine Kontamination von Lebensmitteln zu vermeiden beachten Sie bitte die folgenden Anweisungen Ein längeres Öffnen der Tür kann zu einem deutlichen Temperaturanstieg in den Fächern des Gerätes führen Reinigen Sie regelmäßig Oberflächen die mit Lebensmitteln in Be...
Page 6: ...ät leer ist und ziehen Sie den Stecker aus der Steckdose Wenn Sie die Tür entfernen müssen Sie das Gerät zurückneigen Lehnen Sie das Gerät an eine stabile Wand von der es nicht wegrutschen kann Heben Sie alle Zubehörteile auf Sie brauchen die Teile wenn Sie die Tür wieder installieren Legen Sie das Gerät nicht flach auf den Boden da das Kühlsystem sonst beschädigt werden könnte Führen Sie den Türw...
Page 7: ...ab Heben Sie die Tür an und stellen Sie sie auf einen weichen Untergrund um Krat zer zu vermeiden Schrauben Sie die untere Aufhängung ab 3 Schrauben Sie die obere und untere Lochabdeckung ab und befestigen Sie sie an den gegenüberliegenden Seiten ...
Page 8: ...ersichern Sie sich dass die Tür horizontal und ver tikal richtig ausgerichtet ist so dass die Dichtung an allen Seiten schließt Drehen Sie dann die untere Aufhängung um und befestigen Sie sie links oben INSTALLATION Mitgeliefertes Zubehör Führung 2x Abdeckung 2x Gleiter 2x Abdeckung 2x Schrauben 15x inkl 2x Ersatz Dichtung 1x ...
Page 9: ...9 DE Einbauanleitung Schritt 1 Versichern Sie sich dass der Einbauschrank groß genug ist und ausreichende Belüftung bietet ...
Page 10: ...üfen ob sich die Holztür des Einbauschranks komplett schließen lässt Schritt 4 Öffnen Sie die Gerätetür und die Holztür gemein sam und markieren Sie die Position des Gleiters bei komplett geöffneter und fast geschlossener Tür Neh men Sie den Gleiter aus der Führung und befestigen Sie ihn mit 2 Schrauben an der Holztür Befestigen Sie dann die Abedeckung auf dem Gleiter Schrau ben Sie die Führung wi...
Page 11: ...t justieren Sie das Ge rät nach Befestigen Sie die unteren Klammern zum Schluss mit Schrauben am Einbauschrank Schritt 7 Befestigen Sie die oberen Klammern ebenfalls mit Schrauben am Einbauschrank Schritt 8 Benutzen Sie die Gummidichtung um den Spalt zwischen Kühlschrank und Einbauschrank auf der Seite auf der sich die Tür öffnet abzudichten ...
Page 12: ...oren Öfen Boilern oder direktem Sonnenlicht Stellen Sie das Gerät so auf dass der Netzstecker jederzeit erreichbar ist Um die Gefahr eines Stromschlags bei einer Störung oder Fehlfunktion zu verringern muss das Gerät an eine geerdete Steckdose angeschlossen werden Falls Sie sich nicht sicher sind ob Ihre Steckdose den Anforderungen entspricht lassen Sie sich von einem Elektriker beraten Schließen ...
Page 13: ...auszugleichen Der Freiraum zur Decke soll mindestens 30 cm betragen und das Gerät sollte mit einem Abstand von mehr als 10 cm an eine Wand gestellt werden damit die Wärme abgeleitet werden kann Lassen Sie den Kühlschrank vor der ersten Inbetriebnahme mindestens eine halbe Stunde lang stehen bevor Sie ihn an den Strom anschließen Lassen Sie den Kühlschrank 2 3 Stunden laufen bevor Sie frische oder ...
Page 14: ...feuchten Lappen Das Gitter des Kondensators auf der Rückseite des Gerätes und die angrenzenden Bauteile können mit einem weichen Bürstenaufsatz abgesaugt werden Reinigungstipps Auf der Außenseite des Gerätes kann sich Kondenswasser bilden Dies kann auf eine Änderung der Raumtemperatur zurückzuführen sein Wischen Sie das Kondenswasser ab Wenn das Problem weiterhin besteht wenden Sie sich bitte eine...
Page 15: ... Menge warmer Lebensmittel wurde in den Kühlschrank gegeben Stellen Sie die Temperatur auf eine kühlere Stufe Das Gerät steht neben einer Wärmequelle Stellen Sie das Gerät an einem anderen Ort auf Das Gerät kühlt zu stark Die Temperatur ist nicht richtig eingestellt Stellen Sie die Temperatur auf eine weniger kühle Stufe Ungewöhnliche Geräusche Das Gerät steht nicht eben Stellen Sie die Füße richt...
Page 16: ...Informieren Sie sich über die örtlichen Regelungen zur getrennten Sammlung elektrischer und elektronischer Gerätschaften Richten Sie sich nach den örtlichen Regelungen und entsorgen Sie Altgeräte nicht über den Hausmüll Durch die regelkonforme Entsorgung der Altgeräte werden Umwelt und die Gesundheit ihrer Mitmenschen vor möglichen negativen Konsequenzen geschützt Materialrecycling hilft den Verbr...
Page 17: ...ss to the latest user mannual and other information about the product CONTENT Safety Instructions 18 Product Overview 20 Reverse Door 20 Installation 22 Operation 27 Care and Maintenance 28 Troubleshooting 29 Hints on Disposal 30 TECHNICAL DATA Item number 10030104 Power supply 220 240 V 50 60 Hz DECLARATION OF CONFORMITY Producer Chal Tec GmbH Wallstraße 16 10179 Berlin Germany This product is co...
Page 18: ... the appliance with wet hands while standing on a wet surface It is not recommended to use this refrigerator with an extension cord or power board Please ensure that the appliance is plugged directly into the electrical outlet When positioning the appliance ensure that there is at least a 5 cm clearance at the sides and a 10 cm clearance at the back as this is the main outlet for heat This will al...
Page 19: ...and unload refrigerators When positioning the unit make sure that the power cord is not pinched or damaged Make sure that there are no multiple sockets or power supplies on the back of the unit To avoid contamination of food please follow the instructions below A prolonged opening of the door can lead to a significant rise in temperature in the compartments of the appliance Regularly clean surface...
Page 20: ...unit is unplugged and empty To take the door off it is necessary to tilt the unit backwards You should rest the unit on something solid so that it will not slip during the door reversing process All parts removed must be saved to do the reinstallation of the door Do not lay the unit flat as this may damage the coolant system It s better that 2 people handle the unit during assembly ...
Page 21: ...1 EN 1 2 Unscrew the top hinge Then lift the door and place it on a padded surface to avoid scratching Unscrew bottom hinge 3 Unscrew and move screw holes at top and bottom of cabinet from left to right ...
Page 22: ...igned horizontally and vertically so that the seal are closed on all sides before finally tightening the hinge Then turn over removed bottom hinge and inert it and screw it to the top front of the unit INSTALLATION Kits for installation Guide 2x Cover 2x Slider 2x Cover 2x Screws 15x incl 2 spare parts Rubber Seal 1x ...
Page 23: ...23 EN Install the Appliance Step 1 Ensure the size of cabinet and ventilation are enough ...
Page 24: ...or and wooden door to check whether wooden door can close totally and smoothly Schritt 4 Open appliance door and wooden door together and mark the position of slider when the slider can function well at all angle during door closes or opens Take slider out of guide and fix slider with wooden door by two screws Then fix slider cover onto the slider Unscrew the guide from appliance door Repeat steps...
Page 25: ...en smooth ly and appliance is sealed well If not slightly ad just the unit Then fix bottom bracket with wooden cabinet Schritt 7 Fix top bracket with wooden cabinet Schritt 8 Attached rubber seal to the gap between unit and wooden cabinet at door open side ...
Page 26: ...d well away from sources of heat such as radiators boilers direct sunlight It must be possible to disconnect the appliance from the mains power supply This appliance must be grounded This oven is equipped with a cord having a grounding wire with a grounding plug It must be plugged into a wall receptacle that is properly installed and grounded In the event of an electrical short circuit grounding r...
Page 27: ...heel for levelling if unstable The top space of the refrigerator shall be greater than 30 cm and The refrigerator should be placed against a wall with a free distance more than 10 cm to facilitate heat dissipation Before initial start keep the refrigerator still for half an hour before connecting it to power supply Before putting any fresh or frozen foods the refrigerator shall have run for 2 3 ho...
Page 28: ...ing them back into the appliance Clean the outside of the appliance with a damp cloth The condenser grille on the back of the unit and the adjacent components can be vacuumed with a soft brush attachment Cleaning Tips Condensation may form on the outside of the unit This may be due to a change in the room temperature Wipe off the condensation water If the problem persists contact a qualified techn...
Page 29: ...as placed in the appliance within the last 24 hours Turn the temperature regulation to a colder setting temporarily The appliance is near a heat source Please look in the installation location section Appliance cools too much Temperature is set too cold Turn the temperature regulation knob to a warmer setting temporarily Unusual noises Appliance is not level Re adjust the feet The appliance is tou...
Page 30: ...te collection point for the recycling of electrical and electronic equipment By ensuring this product is disposed of correctly you will help prevent potential negative consequences for the environment and human health which could otherwise be caused by inappropriate waste handling of this product For more detailled information about recycling of this product please contact your local council or yo...
Page 31: ......
Page 32: ......