6
DE
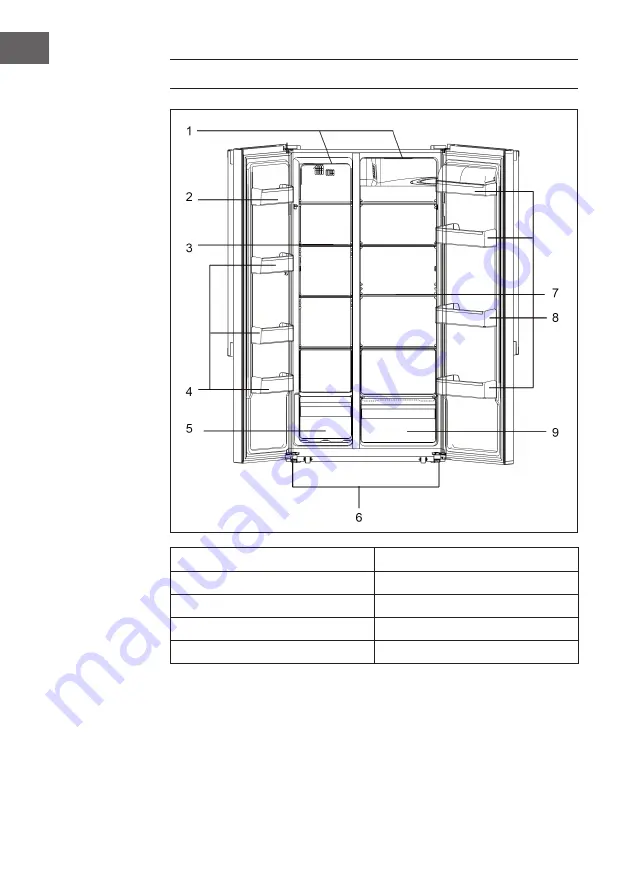
GERÄTEÜBERSICHT
1 Licht
6 Verstellbare Füße
2 Türfach
7 Kühlschrank-Ablage
3 Gefrierschrank-Ablage
8 Kühlschrank-Türfach
4 Gefrierschrank-Türfach
9 Kühlschrank-Schublade
5 Gefrierschrank-Schublade
Page 1: ...10032024 K hl Gefrierkombination Refrigerator Freezer Frigor fico combi Combin r frig rateur cong lateur Combinazione frigo e freezer...
Page 2: ......
Page 3: ...ten 3 Konformit tserkl rung 3 Sicherheitshinweise 4 Ger te bersicht 6 Installation 7 Tasten und Symbole 9 Bedienung 10 Zubeh r 1 1 Reinigung und Pflege 12 Fehlersuche und Fehlerbehebung 13 Hinweise zu...
Page 4: ...l hbirne nicht an wenn sie l nger gebrannt hat kann Sie hei werden Verstauen sie keine leicht entz ndlichen oder explosiven Stoffe und Gegenst nde im Ger t Dieses Ger t enth lt das K ltemittel Isobuta...
Page 5: ...e einen Plastikschaber Untersuchen Sie regelm ig den Abfluss im K hlschrank Wenn er schmutzig oder verstopft ist reinigen Sie ihn Andernfalls l uft das Kondenswasser ber und sammelt sich unten im Ger...
Page 6: ...6 DE GER TE BERSICHT 1 Licht 6 Verstellbare F e 2 T rfach 7 K hlschrank Ablage 3 Gefrierschrank Ablage 8 K hlschrank T rfach 4 Gefrierschrank T rfach 9 K hlschrank Schublade 5 Gefrierschrank Schublade...
Page 7: ...Sie alle Teile bis zur erneuten Installation gut auf Legen Sie das Ger t nicht auf den Boden der K hlkreislauf k nnte sonst besch digt werden Lassen Sie sich beim Entfernen der T ren und bei der erneu...
Page 8: ...sie sollten sich leicht ffnen lassen Stellen Sie das Ger t auf einen ebenen festen Untergrund Erlauben Sie gen gend Platz um den K hlschrank auf einer ebenen Fl che zu installieren Lassen Sie um das...
Page 9: ...ODE Taste um einen der folgenden Modi auszuw hlen SMART ECO SUPER COOLING SUPER FREEZING und USER SETTING in diesem Modus wird kein Symbol angezeigt D Halten Sie die Taste 3 Sekunden lang gedr ckt um...
Page 10: ...angezeigt 7 Rechts in Display wird die eingestellte Temperatur des K hlschranks angezeigt HINWEIS Wenn die T ren l nger als 90 Sekunden offen stehen ert nt ein Warnsignal bis Sie die T ren wieder sch...
Page 11: ...smittel k nnen vor dem Gebrauch im K hlschrank oder bei Raumtemperatur aufgetaut werden je nachdem wie schnell sie auftauen sollen Kleinere St cke k nnen sogar noch gefroren gekocht werden In diesem F...
Page 12: ...r t und die Oberfl chen besch digen Das Ger t muss trocken sein bevor es wieder in Betrieb genommen wird Reinigen Sie das Ger t nicht mit therischen le und organischen L sungsmittel sie k nnen die Kun...
Page 13: ...r t steht in der N he einer W rmequellen Stellen Sie das Ger t nicht neben W rmequellen Das Ger t k hlt zu stark Die Temperatur ist zu niedrig eingestellt W hlen Sie kurzzeitig eine h here Temperatur...
Page 14: ...Informieren Sie sich ber die rtlichen Regelungen zur getrennten Sammlung elektrischer und elektronischer Ger tschaften Richten Sie sich nach den rtlichen Regelungen und entsorgen Sie Altger te nicht...
Page 15: ...echnical Data 15 Declaration of Conformity 15 Safety Instructions 16 Product Description 18 Installation 19 Buttons and Symbols 21 Operation 22 Accessories 23 Care and Cleaning 24 Troubleshooting 25 H...
Page 16: ...de of refrigerating appliances unless they are approved for this purpose by the manufacture Do not touch the light bulb if it has been on for a long period of time because it could be very hot This ap...
Page 17: ...g from the mains socket Do not clean the appliance with metal objects Do not use sharp objects to remove frost from the appliance Use a plastic scraper Regularly examine the drain in the refrigerator...
Page 18: ...18 EN PRODUCT DESCRIPTION 1 LED Light 6 Levelling Feet 2 Balcony 7 Fridge shleves 3 Freezer Shelves 8 Fridge Balcony 4 Freezer Balcony 9 Fridge Drawer 5 Freezer Drawer...
Page 19: ...thing solid so that it will not slip during the door removing process All parts removed must be saved to do the reinstallation of the door Do not lay the unit flat as this may damage the coolant syste...
Page 20: ...with enough space for the refrigerator doors to open easily Select a location with level or nearly level flooring Allow clearance to the right left back and top when installing This will help reduce p...
Page 21: ...F fridge compartment will be turned off C Press to select running mode from SMART ECO SUPER COOLING SUPER FREEZING and USER S SETTING no symbol in display D Press 3 SEC button and hold for 3 seconds t...
Page 22: ...the setting temperature of freezer compartment 7 Display the setting temperature of fridge compartment NOTE If one door keeps open for 90 seconds periodical alarm will be arisen until the door is clo...
Page 23: ...n food prior to be used can be thawed in the fridge compartment or at room temperature depending on the time available for this operation Small pieces may even be cooked still frozen directly from the...
Page 24: ...nents danger of electrical shock Hot vapors can lead to the damage of plastic parts The appliance must be dry before it is placed back into service Ethereal oils and organic solvents can attack plasti...
Page 25: ...Turn the temperature regulation to a colder setting temporarily The appliance is near a heat source Please look in the installation location section Appliance cools too much Temperature is set too col...
Page 26: ...e collection point for the recycling of electrical and electronic equipment By ensuring this product is disposed of correctly you will help prevent potential negative consequences for the environment...
Page 27: ...27 Declaraci n de conformidad 27 Indicaciones de seguridad 28 Descripci n del aparato 30 Instalaci n 31 Botones y s mbolos 33 Utilizaci n 34 Accesorios 35 Limpieza y cuidado 36 Detecci n y resoluci n...
Page 28: ...si han estado encendidas mucho tempo se encontrar n a una temperatura muy elevada No almacene sustancias ni objetos altamente explosivos dentro del aparato Este aparato contiene refrigerante isobutano...
Page 29: ...obstruido l mpielo De lo contrario el agua condensada rebosar y se acumular en la parte inferior del aparato Indicaciones de instalaci n Desembale el aparato y compruebe si est da ado No conecte el a...
Page 30: ...CI N DEL APARATO 1 Luz 6 Patas ajustables 2 Compartimento de la puerta 7 Balda del frigor fico 3 Balda del congelador 8 Puerta del frigor fico 4 Puerta del congelador 9 Caj n del frigor fico 5 Caj n d...
Page 31: ...yelo sobre una pared s lida Conserve todas las piezas para la posterior instalaci n No coloque el aparato directamente sobre el suelo pues el sistema de refrigeraci n podr a verse da ado Al retirar la...
Page 32: ...co las cuales deben poder abrirse con facilidad Coloque el aparato en una superficie plana y estable Permita suficiente espacio para instalar el aparato sobre una superficie plana Deje suficiente dist...
Page 33: ...los modos siguientes SMART ECO SUPER COOLING SUPER FREEZING y USER SETTING en este modo no se muestra ning n s mbolo D Mantenga el bot n pulsado durante 3 segundos para activar el bloqueo del panel de...
Page 34: ...seleccionada para el congelador 7 En la parte derecha del display aparece la temperatura seleccionada para el frigor fico ADVERTENCIA Si las puertas se han abierto durante m s de 90 segundos suena un...
Page 35: ...co o a temperatura ambiente antes de su consumo dependiendo de la rapidez con la que los necesite Los pedazos m s peque os incluso pueden cocinarse congelados En este caso el tiempo de cocci n ser may...
Page 36: ...arato y sus superficies El aparato debe estar seco antes de volver a ponerlo en marcha No limpie el aparato con aceites et reos ni disolventes org nicos podr an da ar las piezas de pl stico Entre otro...
Page 37: ...e calor No coloque el aparato junto a fuentes de calor El aparato enfr a demasiado La temperatura seleccionada es demasiado baja Seleccione una temperatura m s alta durante un periodo breve de tiempo...
Page 38: ...Inf rmese sobre las leyes territoriales que regulan la recogida separada de aparatos el ctricos y electr nicos Respete las leyes territoriales y no arroje aparatos viejos al cubo de la basura dom stic...
Page 39: ...he technique 39 D claration de conformit 39 Consignes de s curit 40 Aper u de l appareil 42 Installation 43 Touches et symboles 45 Utilisation 46 Accessoires 47 Nettoyage et entretien 48 Identificatio...
Page 40: ...dans l appareil comme par exemple des sorbeti res Ne touchez pas l ampoule lorsqu elle est rest e allum e longtemps car elle peut tre br lante Ne stockez pas d objet ou produit facilement inflammable...
Page 41: ...rateur Si elle est sale ou bouch e nettoyez la Faute de quoi l eau de condensation d borderait et se retrouverait au fond de l appareil Conseils pour l installation D ballez l appareil et v rifiez qu...
Page 42: ...airage 6 Pieds r glables 2 Compartiment de porte 7 Clayette du r frig rateur 3 Clayette de cong lateur 8 Compartiment de porte du r frig rateur 4 Compartiment de porte du cong lateur 9 Tiroir du r fri...
Page 43: ...et appuyez le conter un mur solide Conservez pr cieusement toutes les pi ces jusqu au remontage Ne posez pas l appareil au sol vous risquez d endommager le circuit r frig rant Faites vous aider d une...
Page 44: ...vent pouvoir s ouvrir facilement Placez l appareil sur une surface plane et r sistante Laissez un espace suffisant pour installer le r frig rateur sur une surface plane Laissez suffisamment de place a...
Page 45: ...pour s lectionner l un des modes suivants SMART ECO SUPER COOLING SUPER FREEZING et USER SETTING pour ce mode aucun symbole ne s affiche D Maintenez la touche enfonc e pendant 3 secondes pour activer...
Page 46: ...La temp rature cible du r frig rateur s affiche sur l cran droite REMARQUE si les portes restent ouvertes plus de 90 secondes un signal d alarme retentit jusqu ce que vous refermiez la porte UTILISAT...
Page 47: ...l s au r frig rateur ou temp rature ambiante avant utilisation selon que vous en avez besoin rapidement ou pas Les plus petits morceaux peuvent m me tre cuits encore congel s ce qui toutefois rallonge...
Page 48: ...l appareil et les surfaces L appareil doit tre sec avant d tre mis en service Ne nettoyez pas l appareil avec des huiles essentielles ou des solvants organiques ils risquent d attaquer les pi ces en p...
Page 49: ...reil est proximit d une source de chaleur Ne placez pas l appareil proximit d une source de chaleur L appareil refroidit trop La temp rature est r gl e trop bas Choisissez temporairement une temp ratu...
Page 50: ...vous concernant les r gles appliqu es pour la collecte d appareils lectriques et lectroniques Conformez vous aux r glementations locales et ne jetez pas vos anciens produits avec les ordures m nag re...
Page 51: ...ati tecnici 51 Dichiarazione di conformita 51 Avvertenze di sicurezza 52 Descrizione del prodotto 54 Installazione 55 Tasti e simboli 57 Utilizzo 58 Accessori 59 Pulizia e manutenzione 60 Ricerca e ri...
Page 52: ...gelato nel dispositivo Non toccare le lampadine poich diventano molto calde Non conservare materiali infiammabili o esplosivi all interno del dispositivo Questo dispositivo contiene il refrigerante i...
Page 53: ...regolarmente lo scarico nel frigorifero Se sporco o intasato pulirlo In caso contrario l acqua di condensa trabocca e si deposita sul fondo del dispositivo Note per l installazione Disimballare il pr...
Page 54: ...IT DESCRIZIONE DEL PRODOTTO 1 Luce 6 Piedi regolabili 2 Scomparto sportello 7 Ripiano frigorifero 3 Ripiano freezer 8 Scomparto frigorifero 4 Scomparto freezer 9 Cassetto frigorifero 5 Cassetto freez...
Page 55: ...ervare tutti i componenti necessari per la reinstallazione degli sportelli Non mettere il dispositivo in posizione orizzontale sul pavimento poich il circuito di raffreddamento potrebbe danneggiarsi S...
Page 56: ...te gli sportelli del frigorifero Posizionare il dispositivo su una superficie piana e stabile Lasciare spazio sufficiente per l installazione del frigorifero Lasciare spazio sufficiente intorno al dis...
Page 57: ...ne C Premere il tasto MODE per selezionare una delle seguenti modalit SMART ECO SUPER COOLING SUPER FREEZING e USER SETTING in questa modalit non appare nessun simbolo D Tenere premuto il tasto per 3...
Page 58: ...e la temperatura del frigorifero impostata NOTA se lo sportello resta aperto pi di 90 secondi il dispositivo emette un segnale acustico fino a quando non si richiude lo sportello Bedienung UTILIZZO Av...
Page 59: ...elati o congelati possono essere scongelati prima dell uso in frigorifero oppure a temperatura ambiente Alimenti pi piccoli possono essere cucinati ancora congelati tenere presente per che il tempo di...
Page 60: ...ossono danneggiare il dispositivo Assicurarsi che il dispositivo sia asciutto prima di metterlo in funzione Non pulire il dispositivo con olii essenziali e solventi organici che possono danneggiare le...
Page 61: ...temperatura pi bassa Il dispositivo vicino ad una fonte di calore Non collocare il dispositivo vicino ad una fonte di calore Il dispositivo raffredda troppo La temperatura impostata troppo bassa Sele...
Page 62: ...n i rifiuti normali Informarsi sulle disposizioni vigenti in merito alla raccolta separata di dispositivi elettrici ed elettronici Non smaltire i vecchi dispositivi con i rifiuti domestici Grazie al c...
Page 63: ......
Page 64: ......